
getting_started.md 94 KB
Timescaledb - Getting Started
Pages: 3
Start coding with Tiger Data
URL: llms-txt#start-coding-with-tiger-data
Easily integrate your app with Tiger Cloud or self-hosted TimescaleDB. Use your favorite programming language to connect to your Tiger Cloud service, create and manage hypertables, then ingest and query data.
"Quick Start: Ruby and TimescaleDB"
URL: llms-txt#"quick-start:-ruby-and-timescaledb"
Contents:
- Prerequisites
- Connect a Rails app to your service
- Optimize time-series data in hypertables
- Insert data your service
- Reference
- Query scopes
- TimescaleDB features
- Next steps
- Load energy consumption data
- 6e. Enable policies that compress data in the target hypertable
To follow the steps on this page:
- Create a target [Tiger Cloud service][create-service] with the Real-time analytics capability.
You need [your connection details][connection-info]. This procedure also works for [self-hosted TimescaleDB][enable-timescaledb].
- Install [Rails][rails-guide].
Connect a Rails app to your service
Every Tiger Cloud service is a 100% Postgres database hosted in Tiger Cloud with Tiger Data extensions such as TimescaleDB. You connect to your Tiger Cloud service from a standard Rails app configured for Postgres.
- Create a new Rails app configured for Postgres
Rails creates and bundles your app, then installs the standard Postgres Gems.
Install the TimescaleDB gem
Open
Gemfile, add the following line, then save your changes:In Terminal, run the following command:
Connect your app to your Tiger Cloud service
In
<my_app_home>/config/database.ymlupdate the configuration to read securely connect to your Tiger Cloud service by addingurl: <%= ENV['DATABASE_URL'] %>to the default configuration:Set the environment variable for
DATABASE_URLto the value ofService URLfrom your [connection details][connection-info]Create the database:
- Tiger Cloud: nothing to do. The database is part of your Tiger Cloud service.
- Self-hosted TimescaleDB, create the database for the project:
Verify the connection from your app to your Tiger Cloud service:
The result shows the list of extensions in your Tiger Cloud service
| Name | Version | Schema | Description |
  | --  | -- | -- | -- |
  | pg_buffercache      | 1.5     | public     | examine the shared buffer cache|
  | pg_stat_statements  | 1.11    | public     | track planning and execution statistics of all SQL statements executed|
  | plpgsql             | 1.0     | pg_catalog | PL/pgSQL procedural language|
  | postgres_fdw        | 1.1     | public     | foreign-data wrapper for remote Postgres servers|
  | timescaledb         | 2.18.1  | public     | Enables scalable inserts and complex queries for time-series data (Community Edition)|
  | timescaledb_toolkit | 1.19.0  | public     | Library of analytical hyperfunctions, time-series pipelining, and other SQL utilities|
Optimize time-series data in hypertables
Hypertables are Postgres tables designed to simplify and accelerate data analysis. Anything you can do with regular Postgres tables, you can do with hypertables - but much faster and more conveniently.
In this section, you use the helpers in the TimescaleDB gem to create and manage a [hypertable][about-hypertables].
- Generate a migration to create the page loads table
This creates the <my_app_home>/db/migrate/<migration-datetime>_create_page_loads.rb migration file.
- Add hypertable options
Replace the contents of <my_app_home>/db/migrate/<migration-datetime>_create_page_loads.rb
with the following:
The id column is not included in the table. This is because TimescaleDB requires that any UNIQUE or PRIMARY KEY
indexes on the table include all partitioning columns. In this case, this is the time column. A new
Rails model includes a `PRIMARY KEY` index for id by default: either remove the column or make sure that the index
includes time as part of a "composite key."
For more information, check the Roby docs around [composite primary keys][rails-compostite-primary-keys].
- Create a
PageLoadmodel
Create a new file called <my_app_home>/app/models/page_load.rb and add the following code:
- Run the migration
Insert data your service
The TimescaleDB gem provides efficient ways to insert data into hypertables. This section shows you how to ingest test data into your hypertable.
- Create a controller to handle page loads
Create a new file called <my_app_home>/app/controllers/application_controller.rb and add the following code:
- Generate some test data
Use bin/console to join a Rails console session and run the following code
to define some random page load access data:
Insert the generated data into your Tiger Cloud service
Validate the test data in your Tiger Cloud service
This section lists the most common tasks you might perform with the TimescaleDB gem.
The TimescaleDB gem provides several convenient scopes for querying your time-series data.
Built-in time-based scopes:
Browser-specific scopes:
Query continuous aggregates:
This query fetches the average and standard deviation from the performance stats for the /products path over the last day.
TimescaleDB features
The TimescaleDB gem provides utility methods to access hypertable and chunk information. Every model that uses
the acts_as_hypertable method has access to these methods.
Access hypertable and chunk information
View chunk or hypertable information:
Compress/Decompress chunks:
Access hypertable stats
You collect hypertable stats using methods that provide insights into your hypertable's structure, size, and compression status:
Get basic hypertable information:
Get detailed size information:
Continuous aggregates
The continuous_aggregates method generates a class for each continuous aggregate.
Get all the continuous aggregate classes:
Manually refresh a continuous aggregate:
Create or drop a continuous aggregate:
Create or drop all the continuous aggregates in the proper order to build them hierarchically. See more about how it works in this [blog post][ruby-blog-post].
Now that you have integrated the ruby gem into your app:
- Learn more about the TimescaleDB gem.
- Check out the official docs.
- Follow the [LTTB][LTTB], [Open AI long-term storage][open-ai-tutorial], and [candlesticks][candlesticks] tutorials.
===== PAGE: https://docs.tigerdata.com/_partials/_add-data-energy/ =====
Load energy consumption data
When you have your database set up, you can load the energy consumption data
into the metrics hypertable.
This is a large dataset, so it might take a long time, depending on your network connection.
- Download the dataset:
Use your file manager to decompress the downloaded dataset, and take a note of the path to the
metrics.csvfile.At the psql prompt, copy the data from the
metrics.csvfile into your hypertable. Make sure you point to the correct path, if it is not in your current working directory:You can check that the data has been copied successfully with this command:
You should get five records that look like this:
===== PAGE: https://docs.tigerdata.com/_partials/_migrate_dual_write_dump_database_roles/ =====
Tiger Cloud services do not support roles with superuser access. If your SQL dump includes roles that have such permissions, you'll need to modify the file to be compliant with the security model.
You can use the following sed command to remove unsupported statements and
permissions from your roles.sql file:
This command works only with the GNU implementation of sed (sometimes referred
to as gsed). For the BSD implementation (the default on macOS), you need to
add an extra argument to change the -i flag to -i ''.
To check the sed version, you can use the command sed --version. While the
GNU version explicitly identifies itself as GNU, the BSD version of sed
generally doesn't provide a straightforward --version flag and simply outputs
an "illegal option" error.
A brief explanation of this script is:
CREATE ROLE "postgres"; andALTER ROLE "postgres": These statements are removed because they require superuser access, which is not supported by Timescale.(NO)SUPERUSER|(NO)REPLICATION|(NO)BYPASSRLS: These are permissions that require superuser access.GRANTED BY role_specification: The GRANTED BY clause can also have permissions that require superuser access and should therefore be removed. Note: according to the TimescaleDB documentation, the GRANTOR in the GRANTED BY clause must be the current user, and this clause mainly serves the purpose of SQL compatibility. Therefore, it's safe to remove it.
===== PAGE: https://docs.tigerdata.com/_partials/_install-self-hosted-debian-based-start/ =====
Install the latest Postgres packages
Run the Postgres package setup script
===== PAGE: https://docs.tigerdata.com/_partials/_free-plan-beta/ =====
The Free pricing plan and services are currently in beta.
===== PAGE: https://docs.tigerdata.com/_partials/_livesync-configure-source-database/ =====
- Tune the Write Ahead Log (WAL) on the Postgres source database
This will require a restart of the Postgres source database.
Create a user for the connector and assign permissions
Create
<pg connector username>:
You can use an existing user. However, you must ensure that the user has the following permissions.
Grant permissions to create a replication slot:
Grant permissions to create a publication:
Assign the user permissions on the source database:
If the tables you are syncing are not in the public schema, grant the user permissions for each schema you are syncing:
- On each table you want to sync, make
<pg connector username>the owner:
You can skip this step if the replicating user is already the owner of the tables.
- Enable replication
DELETEandUPDATEoperations
Replica identity assists data replication by identifying the rows being modified. Your options are that each table and hypertable in the source database should either have:
- A primary key: data replication defaults to the primary key of the table being replicated. Nothing to do.
- A viable unique index: each table has a unique, non-partial, non-deferrable index that includes only columns
marked as
NOT NULL. If a UNIQUE index does not exist, create one to assist the migration. You can delete if after migration.
For each table, set REPLICA IDENTITY to the viable unique index:
- No primary key or viable unique index: use brute force.
For each table, set REPLICA IDENTITY to FULL:
For each UPDATE or DELETE statement, Postgres reads the whole table to find all matching rows. This results
in significantly slower replication. If you are expecting a large number of UPDATE or DELETE operations on the table,
best practice is to not use FULL.
===== PAGE: https://docs.tigerdata.com/_partials/_datadog-data-exporter/ =====
- In Tiger Cloud Console, open [Exporters][console-integrations]
- Click
New exporter - Select
MetricsforData typeandDatadogfor provider
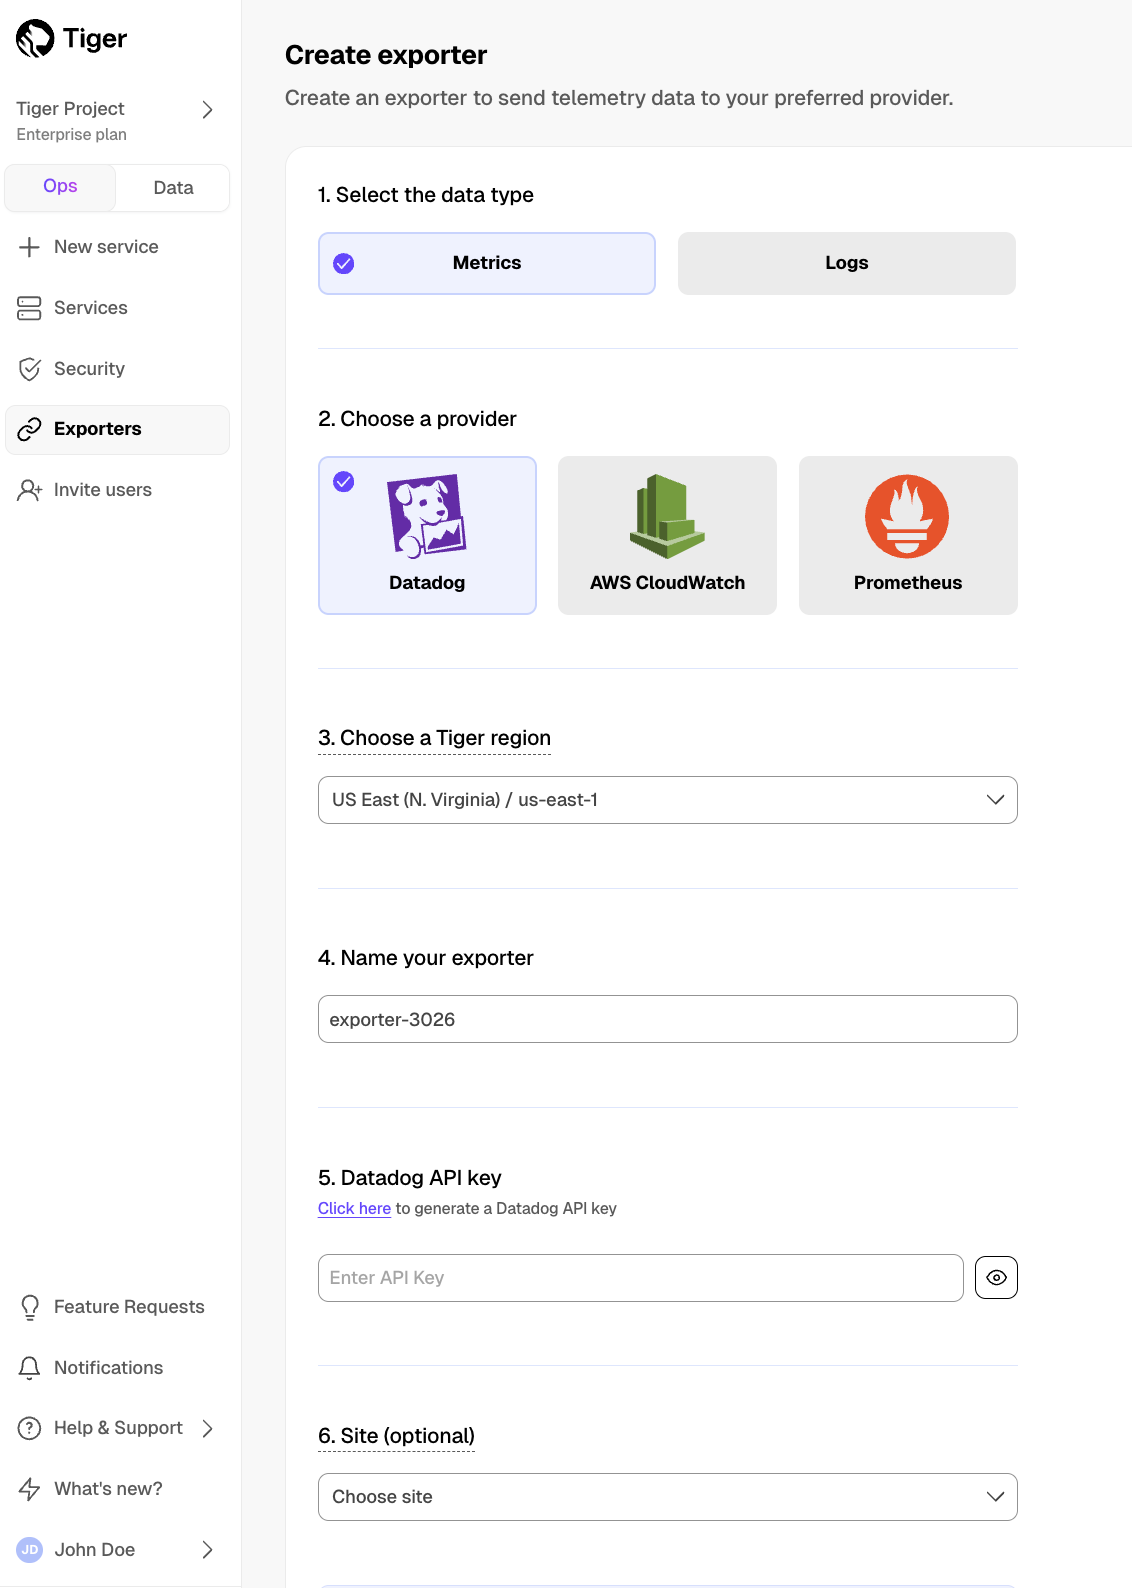
- Choose your AWS region and provide the API key
The AWS region must be the same for your Tiger Cloud exporter and the Datadog provider.
- Set
Siteto your Datadog region, then clickCreate exporter
===== PAGE: https://docs.tigerdata.com/_partials/_migrate_dual_write_6e_turn_on_compression_policies/ =====
6e. Enable policies that compress data in the target hypertable
In the following command, replace <hypertable> with the fully qualified table
name of the target hypertable, for example public.metrics:
===== PAGE: https://docs.tigerdata.com/_partials/_install-self-hosted-redhat-rocky/ =====
- Install TimescaleDB
To avoid errors, do not install TimescaleDB Apache 2 Edition and TimescaleDB Community Edition at the same time.
Initialize the Postgres instance
Tune your Postgres instance for TimescaleDB
This script is included with the timescaledb-tools package when you install TimescaleDB.
For more information, see [configuration][config].
Enable and start Postgres
Log in to Postgres as
postgres
You are now in the psql shell.
- Set the password for
postgres
When you have set the password, type \q to exit psql.
===== PAGE: https://docs.tigerdata.com/_partials/_cloud-mst-restart-workers/ =====
On Tiger Cloud and Managed Service for TimescaleDB, restart background workers by doing one of the following:
- Run
SELECT timescaledb_pre_restore(), followed bySELECT timescaledb_post_restore(). - Power the service off and on again. This might cause a downtime of a few minutes while the service restores from backup and replays the write-ahead log.
===== PAGE: https://docs.tigerdata.com/_partials/_migrate_live_setup_enable_replication/ =====
Replica identity assists data replication by identifying the rows being modified. Your options are that each table and hypertable in the source database should either have:
- A primary key: data replication defaults to the primary key of the table being replicated. Nothing to do.
- A viable unique index: each table has a unique, non-partial, non-deferrable index that includes only columns
marked as
NOT NULL. If a UNIQUE index does not exist, create one to assist the migration. You can delete if after migration.
For each table, set REPLICA IDENTITY to the viable unique index:
- No primary key or viable unique index: use brute force.
For each table, set REPLICA IDENTITY to FULL:
For each UPDATE or DELETE statement, Postgres reads the whole table to find all matching rows. This results
in significantly slower replication. If you are expecting a large number of UPDATE or DELETE operations on the table,
best practice is to not use FULL.
===== PAGE: https://docs.tigerdata.com/_partials/_timescale-cloud-platforms/ =====
You use Tiger Data's open-source products to create your best app from the comfort of your own developer environment.
See the [available services][available-services] and [supported systems][supported-systems].
Available services
Tiger Data offers the following services for your self-hosted installations:
    <tr>
        <th>Service type</th>
        <th>Description</th>
    </tr>
</thead>
<tbody>
    <tr>
        <td><strong>Self-hosted support</strong></td>
        <td><ul><li>24/7 support no matter where you are.</li><li>An experienced global ops and support team that
        can build and manage Postgres at scale.</li></ul>
        Want to try it out? <a href="https://www.tigerdata.com/self-managed-support">See how we can help</a>.
        </td>
    </tr>
</tbody>
Postgres, TimescaleDB support matrix
TimescaleDB and TimescaleDB Toolkit run on Postgres v10, v11, v12, v13, v14, v15, v16, and v17. Currently Postgres 15 and higher are supported.
| TimescaleDB version |Postgres 17|Postgres 16|Postgres 15|Postgres 14|Postgres 13|Postgres 12|Postgres 11|Postgres 10| |-----------------------|-|-|-|-|-|-|-|-| | 2.22.x |✅|✅|✅|❌|❌|❌|❌|❌|❌| | 2.21.x |✅|✅|✅|❌|❌|❌|❌|❌|❌| | 2.20.x |✅|✅|✅|❌|❌|❌|❌|❌|❌| | 2.17 - 2.19 |✅|✅|✅|✅|❌|❌|❌|❌|❌| | 2.16.x |❌|✅|✅|✅|❌|❌|❌|❌|❌|❌| | 2.13 - 2.15 |❌|✅|✅|✅|✅|❌|❌|❌|❌| | 2.12.x |❌|❌|✅|✅|✅|❌|❌|❌|❌| | 2.10.x |❌|❌|✅|✅|✅|✅|❌|❌|❌| | 2.5 - 2.9 |❌|❌|❌|✅|✅|✅|❌|❌|❌| | 2.4 |❌|❌|❌|❌|✅|✅|❌|❌|❌| | 2.1 - 2.3 |❌|❌|❌|❌|✅|✅|✅|❌|❌| | 2.0 |❌|❌|❌|❌|❌|✅|✅|❌|❌ | 1.7 |❌|❌|❌|❌|❌|✅|✅|✅|✅|
We recommend not using TimescaleDB with Postgres 17.1, 16.5, 15.9, 14.14, 13.17, 12.21. These minor versions [introduced a breaking binary interface change][postgres-breaking-change] that, once identified, was reverted in subsequent minor Postgres versions 17.2, 16.6, 15.10, 14.15, 13.18, and 12.22. When you build from source, best practice is to build with Postgres 17.2, 16.6, etc and higher. Users of Tiger Cloud and platform packages for Linux, Windows, MacOS, Docker, and Kubernetes are unaffected.
Supported operating system
You can deploy TimescaleDB and TimescaleDB Toolkit on the following systems:
| Operation system | Version |
|---|---|
| Debian | 13 Trixe, 12 Bookworm, 11 Bullseye |
| Ubuntu | 24.04 Noble Numbat, 22.04 LTS Jammy Jellyfish |
| Red Hat Enterprise | Linux 9, Linux 8 |
| Fedora | Fedora 35, Fedora 34, Fedora 33 |
| Rocky Linux | Rocky Linux 9 (x86_64), Rocky Linux 8 |
| ArchLinux (community-supported) | Check the [available packages][archlinux-packages] |
| Operation system | Version |
|---|---|
| Microsoft Windows | 10, 11 |
| Microsoft Windows Server | 2019, 2020 |
| Operation system | Version |
|---|---|
| macOS | From 10.15 Catalina to 14 Sonoma |
===== PAGE: https://docs.tigerdata.com/_partials/_migrate_install_psql_ec2_instance/ =====
Install the psql client tools on the intermediary instance
Connect to your intermediary EC2 instance. For example:
On your intermediary EC2 instance, install the Postgres client.
Keep this terminal open, you need it to connect to the RDS instance for migration.
Setup secure connectivity between your RDS and EC2 instances
- In https://console.aws.amazon.com/rds/home#databases:, select the RDS instance to migrate.
- Scroll down to
Security group rules (1)and select theEC2 Security Group - Inboundgroup. TheSecurity Groups (1)window opens. Click theSecurity group ID, then clickEdit inbound rules

- On your intermediary EC2 instance, get your local IP address:
Bear with me on this one, you need this IP address to enable access to your RDS instance,
- In
Edit inbound rules, clickAdd rule, then create aPostgreSQL,TCPrule granting access to the local IP address for your EC2 instance (told you :-)). Then clickSave rules.

Test the connection between your RDS and EC2 instances
- In https://console.aws.amazon.com/rds/home#databases:, select the RDS instance to migrate.
- On your intermediary EC2 instance, use the values of
Endpoint,Port,Master username, andDB nameto create the postgres connectivity string to theSOURCEvariable.

The value of Master password was supplied when this Postgres RDS instance was created.
- Test your connection:
You are connected to your RDS instance from your intermediary EC2 instance.
===== PAGE: https://docs.tigerdata.com/_partials/_migrate_live_setup_connection_strings/ =====
These variables hold the connection information for the source database and target Tiger Cloud service. In Terminal on your migration machine, set the following:
You find the connection information for your Tiger Cloud service in the configuration file you downloaded when you created the service.
Avoid using connection strings that route through connection poolers like PgBouncer or similar tools. This tool requires a direct connection to the database to function properly.
===== PAGE: https://docs.tigerdata.com/_partials/_psql-installation-windows/ =====
Install psql on Windows
The psql tool is installed by default on Windows systems when you install
Postgres, and this is the most effective way to install the tool. These
instructions use the interactive installer provided by Postgres and
EnterpriseDB.
Installing psql on Windows
- Download and run the Postgres installer from [www.enterprisedb.com][windows-installer].
- In the
Select Componentsdialog, checkCommand Line Tools, along with any other components you want to install, and clickNext. - Complete the installation wizard to install the package.
===== PAGE: https://docs.tigerdata.com/_partials/_migrate_live_run_live_migration/ =====
- Pull the live-migration docker image to you migration machine
To list the available commands, run:
To see the available flags for each command, run --help for that command. For example:
- Create a snapshot image of your source database in your Tiger Cloud service
This process checks that you have tuned your source database and target service correctly for replication, then creates a snapshot of your data on the migration machine:
Live-migration supplies information about updates you need to make to the source database and target service. For example:
If you have warnings, stop live-migration, make the suggested changes and start again.
- Synchronize data between your source database and your Tiger Cloud service
This command migrates data from the snapshot to your Tiger Cloud service, then streams
transactions from the source to the target.
If the source Postgres version is 17 or later, you need to pass additional
flag -e PGVERSION=17 to the migrate command.
After migrating the schema, live-migration prompts you to create hypertables for tables that
contain time-series data in your Tiger Cloud service. Run create_hypertable() to convert these
table. For more information, see the [Hypertable docs][Hypertable docs].
During this process, you see the migration process:
If migrate stops add --resume to start from where it left off.
Once the data in your target Tiger Cloud service has almost caught up with the source database, you see the following message:
Wait until replay_lag is down to a few kilobytes before you move to the next step. Otherwise, data
replication may not have finished.
Start app downtime
Stop your app writing to the source database, then let the the remaining transactions finish to fully sync with the target. You can use tools like the
pg_topCLI orpg_stat_activityto view the current transaction on the source database.Stop Live-migration.
Live-migration continues the remaining work. This includes copying
  TimescaleDB metadata, sequences, and run policies. When the migration completes,
  you see the following message:
===== PAGE: https://docs.tigerdata.com/_partials/_experimental/ =====
Experimental features could have bugs. They might not be backwards compatible, and could be removed in future releases. Use these features at your own risk, and do not use any experimental features in production.
===== PAGE: https://docs.tigerdata.com/_partials/_compression-intro/ =====
Compressing your time-series data allows you to reduce your chunk size by more than 90%. This saves on storage costs, and keeps your queries operating at lightning speed.
When you enable compression, the data in your hypertable is compressed chunk by chunk. When the chunk is compressed, multiple records are grouped into a single row. The columns of this row hold an array-like structure that stores all the data. This means that instead of using lots of rows to store the data, it stores the same data in a single row. Because a single row takes up less disk space than many rows, it decreases the amount of disk space required, and can also speed up your queries.
For example, if you had a table with data that looked a bit like this:
|Timestamp|Device ID|Device Type|CPU|Disk IO| |-|-|-|-|-| |12:00:01|A|SSD|70.11|13.4| |12:00:01|B|HDD|69.70|20.5| |12:00:02|A|SSD|70.12|13.2| |12:00:02|B|HDD|69.69|23.4| |12:00:03|A|SSD|70.14|13.0| |12:00:03|B|HDD|69.70|25.2|
You can convert this to a single row in array form, like this:
|Timestamp|Device ID|Device Type|CPU|Disk IO| |-|-|-|-|-| |[12:00:01, 12:00:01, 12:00:02, 12:00:02, 12:00:03, 12:00:03]|[A, B, A, B, A, B]|[SSD, HDD, SSD, HDD, SSD, HDD]|[70.11, 69.70, 70.12, 69.69, 70.14, 69.70]|[13.4, 20.5, 13.2, 23.4, 13.0, 25.2]|
===== PAGE: https://docs.tigerdata.com/_partials/_prereqs-cloud-only/ =====
To follow the steps on this page:
- Create a target [Tiger Cloud service][create-service] with real-time analytics enabled.
You need your [connection details][connection-info].
===== PAGE: https://docs.tigerdata.com/_partials/_hypercore_manual_workflow/ =====
- Stop the jobs that are automatically adding chunks to the columnstore
Retrieve the list of jobs from the [timescaledb_information.jobs][informational-views] view to find the job you need to [alter_job][alter_job].
Convert a chunk to update back to the rowstore
Update the data in the chunk you added to the rowstore
Best practice is to structure your [INSERT][insert] statement to include appropriate partition key values, such as the timestamp. TimescaleDB adds the data to the correct chunk:
Convert the updated chunks back to the columnstore
Restart the jobs that are automatically converting chunks to the columnstore
===== PAGE: https://docs.tigerdata.com/_partials/_migrate_dump_roles_schema_data_mst/ =====
- Dump the roles from your source database
Export your role-based security hierarchy. <db_name> has the same value as <db_name> in source.
I know, it confuses me as well.
MST does not allow you to export passwords with roles. You assign passwords to these roles when you have uploaded them to your Tiger Cloud service.
- Remove roles with superuser access
Tiger Cloud services do not support roles with superuser access. Run the following script
to remove statements, permissions and clauses that require superuser permissions from roles.sql:
- Dump the source database schema and data
The pg_dump flags remove superuser access and tablespaces from your data. When you run
pgdump, check the run time, [a long-running pg_dump can cause issues][long-running-pgdump].
To dramatically reduce the time taken to dump the source database, using multiple connections. For more information, see [dumping with concurrency][dumping-with-concurrency] and [restoring with concurrency][restoring-with-concurrency].
===== PAGE: https://docs.tigerdata.com/_partials/_migrate_live_migrate_data_timescaledb/ =====
Migrate your data, then start downtime
- Pull the live-migration docker image to you migration machine
To list the available commands, run:
To see the available flags for each command, run --help for that command. For example:
- Create a snapshot image of your source database in your Tiger Cloud service
This process checks that you have tuned your source database and target service correctly for replication, then creates a snapshot of your data on the migration machine:
Live-migration supplies information about updates you need to make to the source database and target service. For example:
If you have warnings, stop live-migration, make the suggested changes and start again.
- Synchronize data between your source database and your Tiger Cloud service
This command migrates data from the snapshot to your Tiger Cloud service, then streams
transactions from the source to the target.
If the source Postgres version is 17 or later, you need to pass additional
flag -e PGVERSION=17 to the migrate command.
During this process, you see the migration process:
If migrate stops add --resume to start from where it left off.
Once the data in your target Tiger Cloud service has almost caught up with the source database, you see the following message:
Wait until replay_lag is down to a few kilobytes before you move to the next step. Otherwise, data
replication may not have finished.
Start app downtime
Stop your app writing to the source database, then let the the remaining transactions finish to fully sync with the target. You can use tools like the
pg_topCLI orpg_stat_activityto view the current transaction on the source database.Stop Live-migration.
Live-migration continues the remaining work. This includes copying
  TimescaleDB metadata, sequences, and run policies. When the migration completes,
  you see the following message:
===== PAGE: https://docs.tigerdata.com/_partials/_prereqs-cloud-account-only/ =====
To follow the steps on this page:
- Create a target [Tiger Data account][create-account].
===== PAGE: https://docs.tigerdata.com/_partials/_migrate_set_up_database_first_steps/ =====
- Take the applications that connect to the source database offline
The duration of the migration is proportional to the amount of data stored in your database. By disconnection your app from your database you avoid and possible data loss.
- Set your connection strings
These variables hold the connection information for the source database and target Tiger Cloud service:
You find the connection information for your Tiger Cloud service in the configuration file you downloaded when you created the service.
===== PAGE: https://docs.tigerdata.com/_partials/_install-self-hosted-redhat/ =====
Install the latest Postgres packages
Add the TimescaleDB repository
Update your local repository list
Install TimescaleDB
To avoid errors, do not install TimescaleDB Apache 2 Edition and TimescaleDB Community Edition at the same time.
On Red Hat Enterprise Linux 8 and later, disable the built-in Postgres module:
sudo dnf -qy module disable postgresql
Initialize the Postgres instance
Tune your Postgres instance for TimescaleDB
This script is included with the timescaledb-tools package when you install TimescaleDB.
For more information, see [configuration][config].
Enable and start Postgres
Log in to Postgres as
postgres
You are now in the psql shell.
- Set the password for
postgres
When you have set the password, type \q to exit psql.
===== PAGE: https://docs.tigerdata.com/_partials/_chunk-interval/ =====
Postgres builds the index on the fly during ingestion. That means that to build a new entry on the index, a significant portion of the index needs to be traversed during every row insertion. When the index does not fit into memory, it is constantly flushed to disk and read back. This wastes IO resources which would otherwise be used for writing the heap/WAL data to disk.
The default chunk interval is 7 days. However, best practice is to set chunk_interval so that prior to processing,
the indexes for chunks currently being ingested into fit within 25% of main memory. For example, on a system with 64
GB of memory, if index growth is approximately 2 GB per day, a 1-week chunk interval is appropriate. If index growth is
around 10 GB per day, use a 1-day interval.
You set chunk_interval when you [create a hypertable][hypertable-create-table], or by calling
[set_chunk_time_interval][chunk_interval] on an existing hypertable.
===== PAGE: https://docs.tigerdata.com/_partials/_migrate_live_tune_source_database_mst/ =====
- Enable live-migration to replicate
DELETEandUPDATEoperations
Replica identity assists data replication by identifying the rows being modified. Your options are that each table and hypertable in the source database should either have:
- A primary key: data replication defaults to the primary key of the table being replicated. Nothing to do.
- A viable unique index: each table has a unique, non-partial, non-deferrable index that includes only columns
marked as
NOT NULL. If a UNIQUE index does not exist, create one to assist the migration. You can delete if after migration.
For each table, set REPLICA IDENTITY to the viable unique index:
- No primary key or viable unique index: use brute force.
For each table, set REPLICA IDENTITY to FULL:
For each UPDATE or DELETE statement, Postgres reads the whole table to find all matching rows. This results
in significantly slower replication. If you are expecting a large number of UPDATE or DELETE operations on the table,
best practice is to not use FULL.
===== PAGE: https://docs.tigerdata.com/_partials/_tutorials_hypertable_intro/ =====
Hypertables are Postgres tables in TimescaleDB that automatically partition your time-series data by time. Time-series data represents the way a system, process, or behavior changes over time. Hypertables enable TimescaleDB to work efficiently with time-series data. Each hypertable is made up of child tables called chunks. Each chunk is assigned a range of time, and only contains data from that range. When you run a query, TimescaleDB identifies the correct chunk and runs the query on it, instead of going through the entire table.
[Hypercore][hypercore] is the hybrid row-columnar storage engine in TimescaleDB used by hypertables. Traditional databases force a trade-off between fast inserts (row-based storage) and efficient analytics (columnar storage). Hypercore eliminates this trade-off, allowing real-time analytics without sacrificing transactional capabilities.
Hypercore dynamically stores data in the most efficient format for its lifecycle:
- Row-based storage for recent data: the most recent chunk (and possibly more) is always stored in the rowstore, ensuring fast inserts, updates, and low-latency single record queries. Additionally, row-based storage is used as a writethrough for inserts and updates to columnar storage.
- Columnar storage for analytical performance: chunks are automatically compressed into the columnstore, optimizing storage efficiency and accelerating analytical queries.
Unlike traditional columnar databases, hypercore allows data to be inserted or modified at any stage, making it a flexible solution for both high-ingest transactional workloads and real-time analytics—within a single database.
Because TimescaleDB is 100% Postgres, you can use all the standard Postgres tables, indexes, stored procedures, and other objects alongside your hypertables. This makes creating and working with hypertables similar to standard Postgres.
===== PAGE: https://docs.tigerdata.com/_partials/_hypertable-intro/ =====
Tiger Cloud supercharges your real-time analytics by letting you run complex queries continuously, with near-zero latency. Under the hood, this is achieved by using hypertables—Postgres tables that automatically partition your time-series data by time and optionally by other dimensions. When you run a query, Tiger Cloud identifies the correct partition, called chunk, and runs the query on it, instead of going through the entire table.

Hypertables offer the following benefits:
Efficient data management with [automated partitioning by time][chunk-size]: Tiger Cloud splits your data into chunks that hold data from a specific time range. For example, one day or one week. You can configure this range to better suit your needs.
Better performance with [strategic indexing][hypertable-indexes]: an index on time in the descending order is automatically created when you create a hypertable. More indexes are created on the chunk level, to optimize performance. You can create additional indexes, including unique indexes, on the columns you need.
Faster queries with [chunk skipping][chunk-skipping]: Tiger Cloud skips the chunks that are irrelevant in the context of your query, dramatically reducing the time and resources needed to fetch results. Even more—you can enable chunk skipping on non-partitioning columns.
Advanced data analysis with [hyperfunctions][hyperfunctions]: Tiger Cloud enables you to efficiently process, aggregate, and analyze significant volumes of data while maintaining high performance.
To top it all, there is no added complexity—you interact with hypertables in the same way as you would with regular Postgres tables. All the optimization magic happens behind the scenes.
Inheritance is not supported for hypertables and may lead to unexpected behavior.
===== PAGE: https://docs.tigerdata.com/_partials/_kubernetes-install-self-hosted/ =====
Running TimescaleDB on Kubernetes is similar to running Postgres. This procedure outlines the steps for a non-distributed system.
To connect your Kubernetes cluster to self-hosted TimescaleDB running in the cluster:
Create a default namespace for Tiger Data components
Create the Tiger Data namespace:
Set this namespace as the default for your session:
For more information, see [Kubernetes Namespaces][kubernetes-namespace].
- Set up a persistent volume claim (PVC) storage
To manually set up a persistent volume and claim for self-hosted Kubernetes, run the following command:
- Deploy TimescaleDB as a StatefulSet
By default, the [TimescaleDB Docker image][timescale-docker-image] you are installing on Kubernetes uses the default Postgres database, user and password. To deploy TimescaleDB on Kubernetes, run the following command:
Allow applications to connect by exposing TimescaleDB within Kubernetes
Create a Kubernetes secret to store the database credentials
Deploy an application that connects to TimescaleDB
Test the database connection
Create and run a pod to verify database connectivity using your [connection details][connection-info] saved in
timescale-secret:Launch the Postgres interactive shell within the created
test-pod:
You see the Postgres interactive terminal.
===== PAGE: https://docs.tigerdata.com/_partials/_caggs-migrate-permissions/ =====
You might get a permissions error when migrating a continuous aggregate from old
to new format using cagg_migrate. The user performing the migration must have
the following permissions:
- Select, insert, and update permissions on the tables
_timescale_catalog.continuous_agg_migrate_planand_timescale_catalog.continuous_agg_migrate_plan_step - Usage permissions on the sequence
_timescaledb_catalog.continuous_agg_migrate_plan_step_step_id_seq
To solve the problem, change to a user capable of granting permissions, and grant the following permissions to the user performing the migration:
===== PAGE: https://docs.tigerdata.com/_partials/_candlestick_intro/ =====
The financial sector regularly uses [candlestick charts][charts] to visualize the price change of an asset. Each candlestick represents a time period, such as one minute or one hour, and shows how the asset's price changed during that time.
Candlestick charts are generated from the open, high, low, close, and volume data for each financial asset during the time period. This is often abbreviated as OHLCV:
- Open: opening price
- High: highest price
- Low: lowest price
- Close: closing price
- Volume: volume of transactions
===== PAGE: https://docs.tigerdata.com/_partials/_start-coding-java/ =====
To follow the steps on this page:
- Create a target [Tiger Cloud service][create-service] with the Real-time analytics capability.
You need [your connection details][connection-info]. This procedure also works for [self-hosted TimescaleDB][enable-timescaledb].
- Install the [Java Development Kit (JDK)][jdk].
- Install the [PostgreSQL JDBC driver][pg-jdbc-driver].
All code in this quick start is for Java 16 and later. If you are working with older JDK versions, use legacy coding techniques.
Connect to your Tiger Cloud service
In this section, you create a connection to your service using an application in
a single file. You can use any of your favorite build tools, including gradle
or maven.
Create a directory containing a text file called
Main.java, with this content:From the command line in the current directory, run the application:
If the command is successful, Hello, World! line output is printed
to your console.
Import the PostgreSQL JDBC driver. If you are using a dependency manager, include the [PostgreSQL JDBC Driver][pg-jdbc-driver-dependency] as a dependency.
Download the [JAR artifact of the JDBC Driver][pg-jdbc-driver-artifact] and save it with the
Main.javafile.Import the
JDBC Driverinto the Java application and display a list of available drivers for the check:Run all the examples:
If the command is successful, a string similar to
org.postgresql.Driver@7f77e91b is printed to your console. This means that you
are ready to connect to TimescaleDB from Java.
- Locate your TimescaleDB credentials and use them to compose a connection string for JDBC.
- password
- username
- host URL
- port
- database name
- Compose your connection string variable, using this format:
For more information about creating connection strings, see the [JDBC documentation][pg-jdbc-driver-conn-docs].
This method of composing a connection string is for test or development
purposes only. For production, use environment variables for sensitive
details like your password, hostname, and port number.
If the command is successful, a string similar to
`{ApplicationName=PostgreSQL JDBC Driver}` is printed to your console.
Create a relational table
In this section, you create a table called sensors which holds the ID, type,
and location of your fictional sensors. Additionally, you create a hypertable
called sensor_data which holds the measurements of those sensors. The
measurements contain the time, sensor_id, temperature reading, and CPU
percentage of the sensors.
Compose a string which contains the SQL statement to create a relational table. This example creates a table called
sensors, with columnsid,typeandlocation:Create a statement, execute the query you created in the previous step, and check that the table was created successfully:
Create a hypertable
When you have created the relational table, you can create a hypertable. Creating tables and indexes, altering tables, inserting data, selecting data, and most other tasks are executed on the hypertable.
Create a
CREATE TABLESQL statement for your hypertable. Notice how the hypertable has the compulsory time column:Create a statement, execute the query you created in the previous step:
The by_range and by_hash dimension builder is an addition to TimescaleDB 2.13.
- Execute the two statements you created, and commit your changes to the database:
You can insert data into your hypertables in several different ways. In this section, you can insert single rows, or insert by batches of rows.
- Open a connection to the database, use prepared statements to formulate the
INSERTSQL statement, then execute the statement:
If you want to insert a batch of rows by using a batching mechanism. In this
example, you generate some sample time-series data to insert into the
sensor_data hypertable:
- Insert batches of rows:
This section covers how to execute queries against your database.
Execute queries on TimescaleDB
Define the SQL query you'd like to run on the database. This example combines time-series and relational data. It returns the average values for every 15 minute interval for sensors with specific type and location.
Execute the query with the prepared statement and read out the result set for all
a-type sensors located on thefloor:
If the command is successful, you'll see output like this:
Now that you're able to connect, read, and write to a TimescaleDB instance from your Java application, and generate the scaffolding necessary to build a new application from an existing TimescaleDB instance, be sure to check out these advanced TimescaleDB tutorials:
- [Continuous Aggregates][continuous-aggregates]
- [Migrate Your own Data][migrate]
Complete code samples
This section contains complete code samples.
Complete code sample
Execute more complex queries
===== PAGE: https://docs.tigerdata.com/_partials/_migrate_self_postgres_implement_migration_path/ =====
You cannot upgrade TimescaleDB and Postgres at the same time. You upgrade each product in the following steps:
Upgrade TimescaleDB
If your migration path dictates it, upgrade Postgres
Follow the procedure in [Upgrade Postgres][upgrade-pg]. The version of TimescaleDB installed in your Postgres deployment must be the same before and after the Postgres upgrade.
If your migration path dictates it, upgrade TimescaleDB again
Check that you have upgraded to the correct version of TimescaleDB
Postgres returns something like:
===== PAGE: https://docs.tigerdata.com/_partials/_migrate_dual_write_validate_production_load/ =====
Now that dual-writes have been in place for a while, the target database should be holding up to production write traffic. Now would be the right time to determine if the target database can serve all production traffic (both reads and writes). How exactly this is done is application-specific and up to you to determine.
===== PAGE: https://docs.tigerdata.com/_partials/_prereqs-cloud-no-connection/ =====
To follow the steps on this page:
- Create a target [Tiger Cloud service][create-service] with real-time analytics enabled.
===== PAGE: https://docs.tigerdata.com/_partials/_migrate_import_prerequisites/ =====
Best practice is to use an [Ubuntu EC2 instance][create-ec2-instance] hosted in the same region as your Tiger Cloud service as a migration machine. That is, the machine you run the commands on to move your data from your source database to your target Tiger Cloud service.
Before you migrate your data:
- Create a target [Tiger Cloud service][created-a-database-service-in-timescale].
Each Tiger Cloud service has a single database that supports the [most popular extensions][all-available-extensions]. Tiger Cloud services do not support tablespaces, and there is no superuser associated with a service. Best practice is to create a Tiger Cloud service with at least 8 CPUs for a smoother experience. A higher-spec instance can significantly reduce the overall migration window.
- To ensure that maintenance does not run during the process, [adjust the maintenance window][adjust-maintenance-window].
===== PAGE: https://docs.tigerdata.com/_partials/_hypercore-intro-short/ =====
[Hypercore][hypercore] is the hybrid row-columnar storage engine in TimescaleDB used by hypertables. Traditional databases force a trade-off between fast inserts (row-based storage) and efficient analytics (columnar storage). Hypercore eliminates this trade-off, allowing real-time analytics without sacrificing transactional capabilities.
Hypercore dynamically stores data in the most efficient format for its lifecycle:
- Row-based storage for recent data: the most recent chunk (and possibly more) is always stored in the rowstore, ensuring fast inserts, updates, and low-latency single record queries. Additionally, row-based storage is used as a writethrough for inserts and updates to columnar storage.
- Columnar storage for analytical performance: chunks are automatically compressed into the columnstore, optimizing storage efficiency and accelerating analytical queries.
Unlike traditional columnar databases, hypercore allows data to be inserted or modified at any stage, making it a flexible solution for both high-ingest transactional workloads and real-time analytics—within a single database.
===== PAGE: https://docs.tigerdata.com/_partials/_caggs-intro/ =====
In modern applications, data usually grows very quickly. This means that aggregating it into useful summaries can become very slow. If you are collecting data very frequently, you might want to aggregate your data into minutes or hours instead. For example, if an IoT device takes temperature readings every second, you might want to find the average temperature for each hour. Every time you run this query, the database needs to scan the entire table and recalculate the average. TimescaleDB makes aggregating data lightning fast, accurate, and easy with continuous aggregates.
Continuous aggregates in TimescaleDB are a kind of hypertable that is refreshed automatically in the background as new data is added, or old data is modified. Changes to your dataset are tracked, and the hypertable behind the continuous aggregate is automatically updated in the background.
Continuous aggregates have a much lower maintenance burden than regular Postgres materialized views, because the whole view is not created from scratch on each refresh. This means that you can get on with working your data instead of maintaining your database.
Because continuous aggregates are based on hypertables, you can query them in exactly the same way as your other tables. This includes continuous aggregates in the rowstore, compressed into the [columnstore][hypercore], or [tiered to object storage][data-tiering]. You can even create [continuous aggregates on top of your continuous aggregates][hierarchical-caggs], for an even more fine-tuned aggregation.
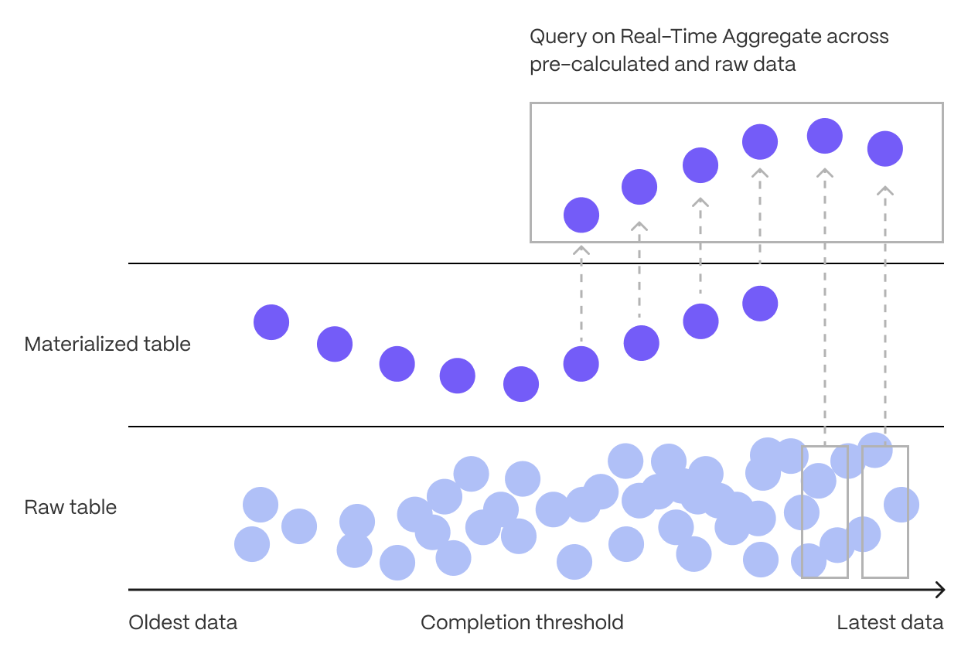
[Real-time aggregation][real-time-aggregation] enables you to combine pre-aggregated data from the materialized view with the most recent raw data. This gives you up-to-date results on every query. In TimescaleDB v2.13 and later, real-time aggregates are DISABLED by default. In earlier versions, real-time aggregates are ENABLED by default; when you create a continuous aggregate, queries to that view include the results from the most recent raw data.
===== PAGE: https://docs.tigerdata.com/_partials/_kubernetes-prereqs/ =====
- Install [self-managed Kubernetes][kubernetes-install] or sign up for a Kubernetes [Turnkey Cloud Solution][kubernetes-managed].
- Install [kubectl][kubectl] for command-line interaction with your cluster.
===== PAGE: https://docs.tigerdata.com/_partials/_high-availability-setup/ =====
- In [Tiger Cloud Console][cloud-login], select the service to enable replication for.
- Click
Operations, then selectHigh availability. - Choose your replication strategy, then click
Change configuration.
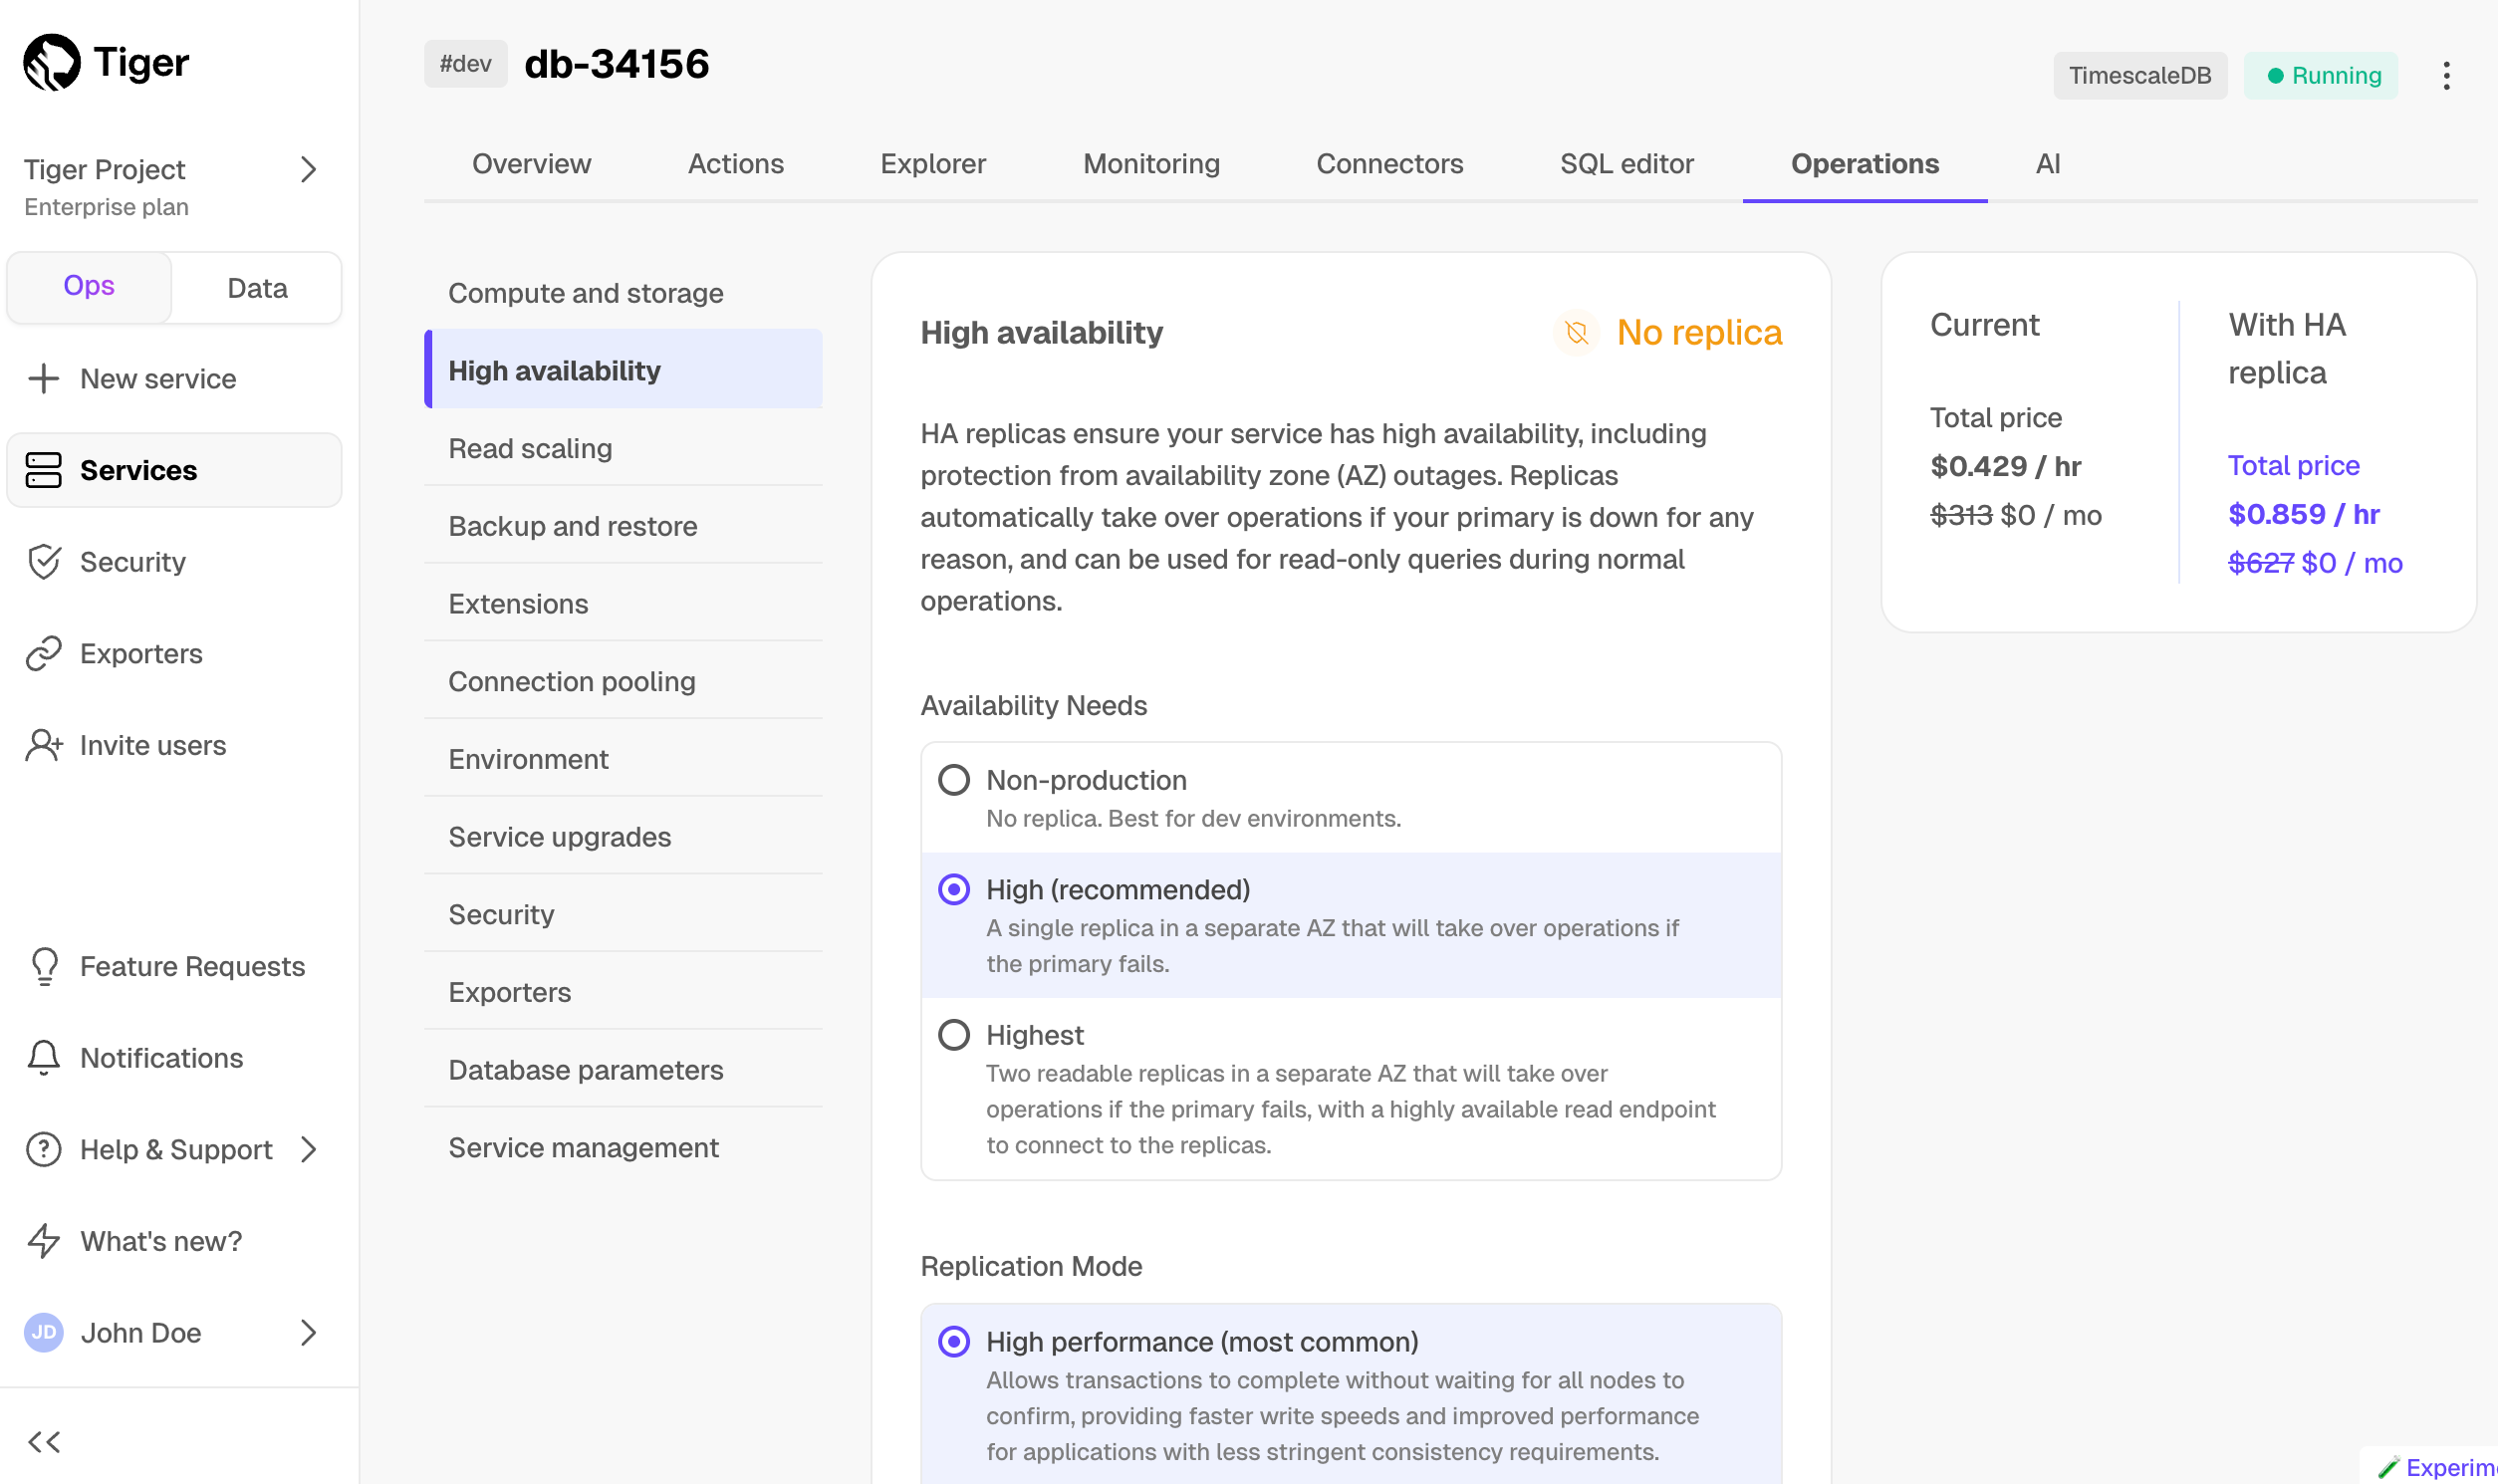
- In
Change high availability configuration, clickChange config.
===== PAGE: https://docs.tigerdata.com/_partials/_vpc-limitations/ =====
- You can attach:
- Up to 50 Customer VPCs to a Peering VPC.
- A Tiger Cloud service to a single Peering VPC at a time. The service and the Peering VPC must be in the same AWS region. However, you can peer a Customer VPC and a Peering VPC that are in different regions.
- Multiple Tiger Cloud services to the same Peering VPC.
- You cannot attach a Tiger Cloud service to multiple Peering VPCs at the same time.
The number of Peering VPCs you can create in your project depends on your [pricing plan][pricing-plans]. If you need another Peering VPC, either contact support@tigerdata.com or change your pricing plan in [Tiger Cloud Console][console-login].
===== PAGE: https://docs.tigerdata.com/_partials/_integration-apache-kafka-install/ =====
- Extract the Kafka binaries to a local folder
From now on, the folder where you extracted the Kafka binaries is called <KAFKA_HOME>.
- Configure and run Apache Kafka
Use the -daemon flag to run this process in the background.
- Create Kafka topics
In another Terminal window, navigate to , then call kafka-topics.sh and create the following topics:
accounts: publishes JSON messages that are consumed by the timescale-sink connector and inserted into your Tiger Cloud service.deadletter: stores messages that cause errors and that Kafka Connect workers cannot process.
Test that your topics are working correctly
Run
kafka-console-producerto send messages to theaccountstopic:Send some events. For example, type the following:
In another Terminal window, navigate to , then run
kafka-console-consumerto consume the events you just sent:
You see
Update the DB instance parameter group for your source database
In [https://console.aws.amazon.com/rds/home#databases:][databases], select the RDS instance to migrate.
Click
Configuration, scroll down and note theDB instance parameter group, then clickParameter groupsClick
Create parameter group, fill in the form with the following values, then clickCreate.- Parameter group name - whatever suits your fancy.
- Description - knock yourself out with this one.
- Engine type -
PostgreSQL - Parameter group family - the same as
DB instance parameter groupin yourConfiguration. - In
Parameter groups, select the parameter group you created, then clickEdit. - Update the following parameters, then click
Save changes.rds.logical_replicationset to1: record the information needed for logical decoding.wal_sender_timeoutset to0: disable the timeout for the sender process.
In RDS, navigate back to your [databases][databases], select the RDS instance to migrate, and click
Modify.Scroll down to
Database options, select your new parameter group, and clickContinue.- Click
Apply immediatelyor choose a maintenance window, then clickModify DB instance.
- Click
Verify that the settings are live in your database.
Enable replication
DELETEandUPDATEoperations- A primary key: data replication defaults to the primary key of the table being replicated. Nothing to do.
- A viable unique index: each table has a unique, non-partial, non-deferrable index that includes only columns
marked as
NOT NULL. If a UNIQUE index does not exist, create one to assist the migration. You can delete if after migration. - No primary key or viable unique index: use brute force.
- Other Tiger Cloud services
- Postgres databases outside of Tiger Cloud
- Create a target [Tiger Cloud service][create-service] with the Real-time analytics capability.
- Connect to your service
- Create a server
- Create user mapping
- Import a foreign schema (recommended) or create a foreign table
Import the whole schema:
Alternatively, import a limited number of tables:
Create a foreign table. Skip if you are importing a schema:
- Connect to your database
- Create a server
- Create user mapping
- Import a foreign schema (recommended) or create a foreign table
Import the whole schema:
Alternatively, import a limited number of tables:
Create a foreign table. Skip if you are importing a schema:
- [SELECT DISTINCT ON][select-distinct-on]
- [JOIN LATERAL][join-lateral]
- Download the dataset:
Use your file manager to decompress the downloaded dataset, and take a note of the path to the
nyc_data_rides.csvfile.At the psql prompt, copy the data from the
nyc_data_rides.csvfile into your hypertable. Make sure you point to the correct path, if it is not in your current working directory:-
Sign in to the{" "} Tiger Cloud Console and click
Create service. -
Choose if you want a Time-series or Dynamic Postgres service.
{props.demoData && (
-
Click
Get startedto create your service with demo data, and launch theAllmilk Factoryinteractive demo. You can exit the demo at any time, and revisit it from the same point later on. You can also re-run the demo after you have completed it. )}
)}
-
Click
Download the cheatsheetto download an SQL file that contains the login details for your new service. You can also copy the details directly from this page. When you have copied your password, clickI stored my password, go to service overviewat the bottom of the page. -
When your service is ready to use, is shows a green
Runninglabel in the Service Overview. You also receive an email confirming that your service is ready to use. - In [https://console.aws.amazon.com/rds/home#databases:][databases], select the RDS/Aurora Postgres instance to migrate.
- Click
Actions>Set up EC2 connection. PressCreate EC2 instanceand use the following settings:- AMI: Ubuntu Server.
- Key pair: use an existing pair or create a new one that you will use to access the intermediary machine.
- VPC: by default, this is the same as the database instance.
- Configure Storage: adjust the volume to at least the size of RDS/Aurora Postgres instance you are migrating from. You can reduce the space used by your data on Tiger Cloud using [Hypercore][hypercore].
- Click
Lauch instance. AWS creates your EC2 instance, then clickConnect to instance>SSH client. Follow the instructions to create the connection to your intermediary EC2 instance. Connect to your intermediary EC2 instance. For example:
On your intermediary EC2 instance, install the Postgres client.
- In [https://console.aws.amazon.com/rds/home#databases:][databases], select the RDS/Aurora Postgres instance to migrate.
- Scroll down to
Security group rules (1)and select theEC2 Security Group - Inboundgroup. TheSecurity Groups (1)window opens. Click theSecurity group ID, then clickEdit inbound rules - On your intermediary EC2 instance, get your local IP address:
- In
Edit inbound rules, clickAdd rule, then create aPostgreSQL,TCPrule granting access to the local IP address for your EC2 instance (told you :-)). Then clickSave rules. - In [https://console.aws.amazon.com/rds/home#databases:][databases], select the RDS/Aurora Postgres instance to migrate.
- On your intermediary EC2 instance, use the values of
Endpoint,Port,Master username, andDB nameto create the postgres connectivity string to theSOURCEvariable. - Test your connection:
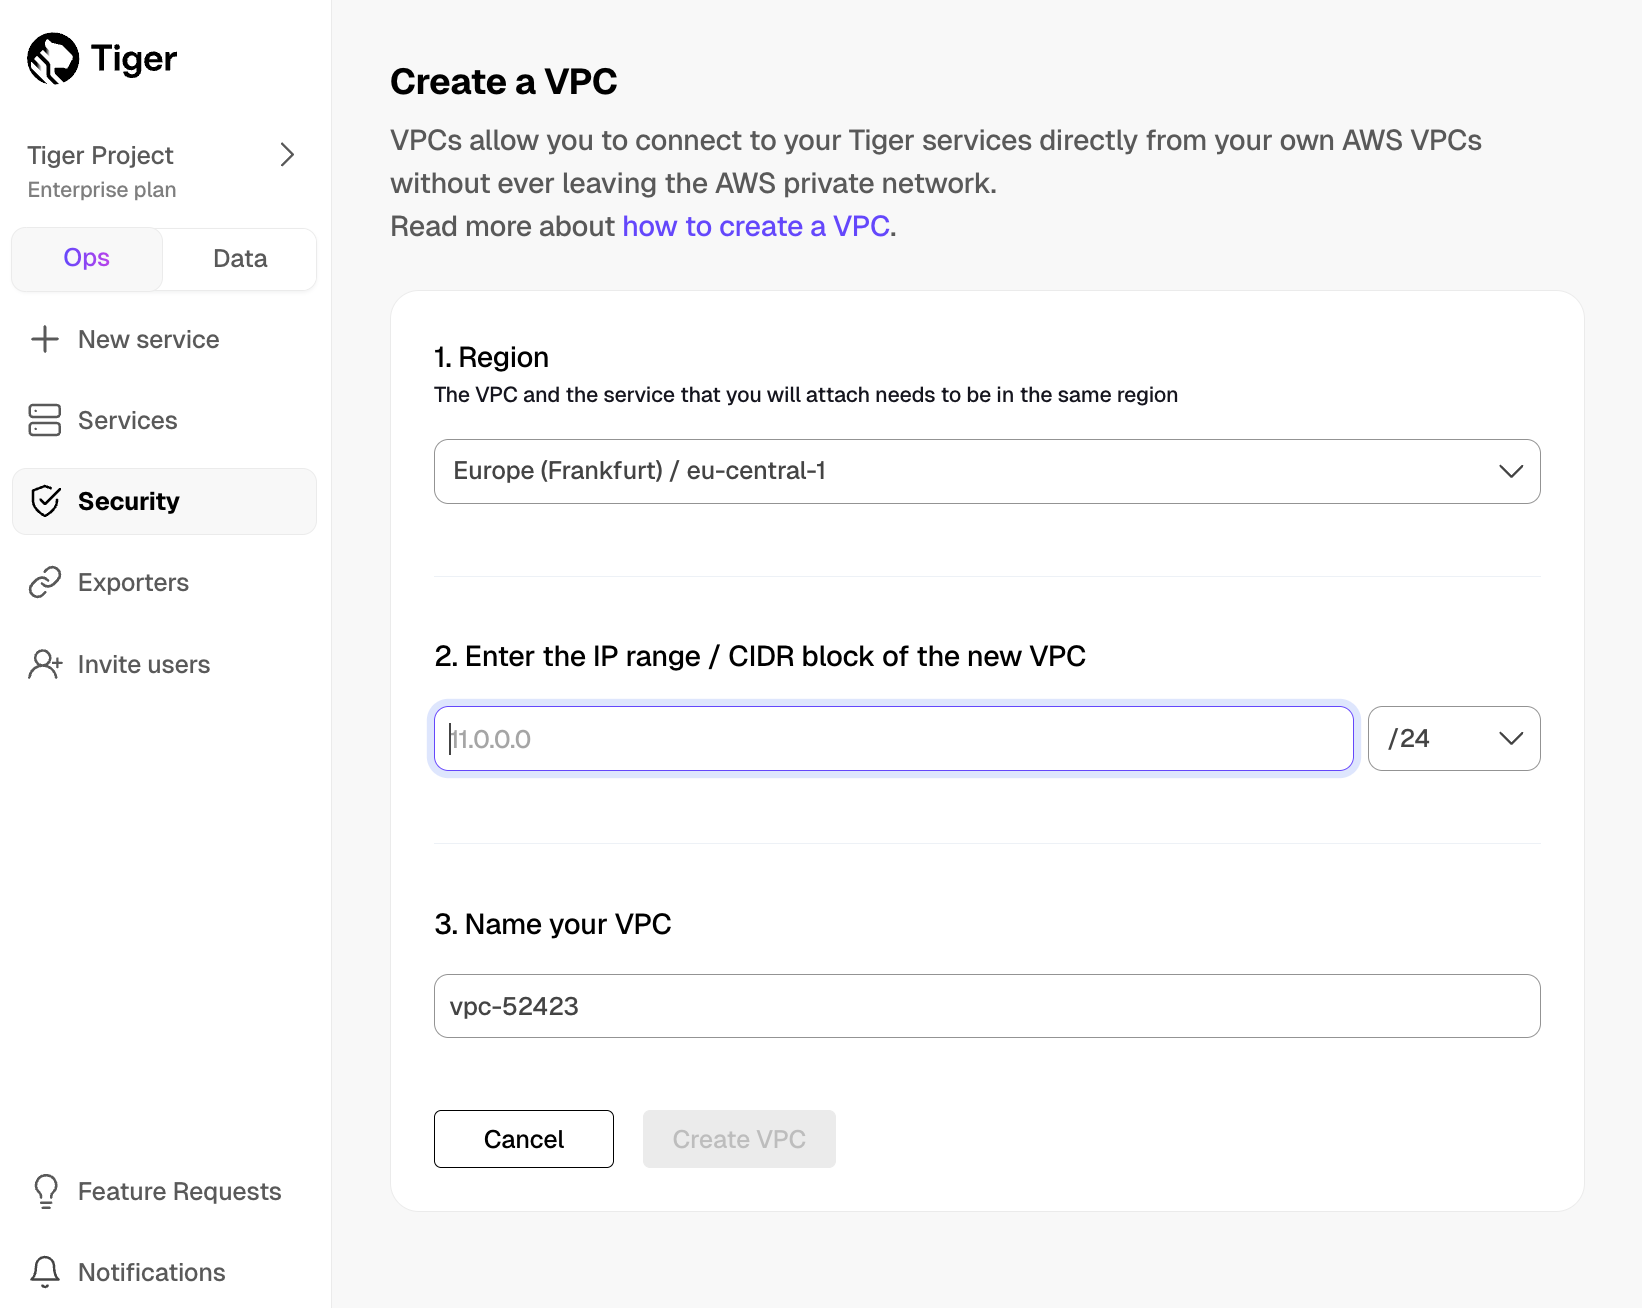
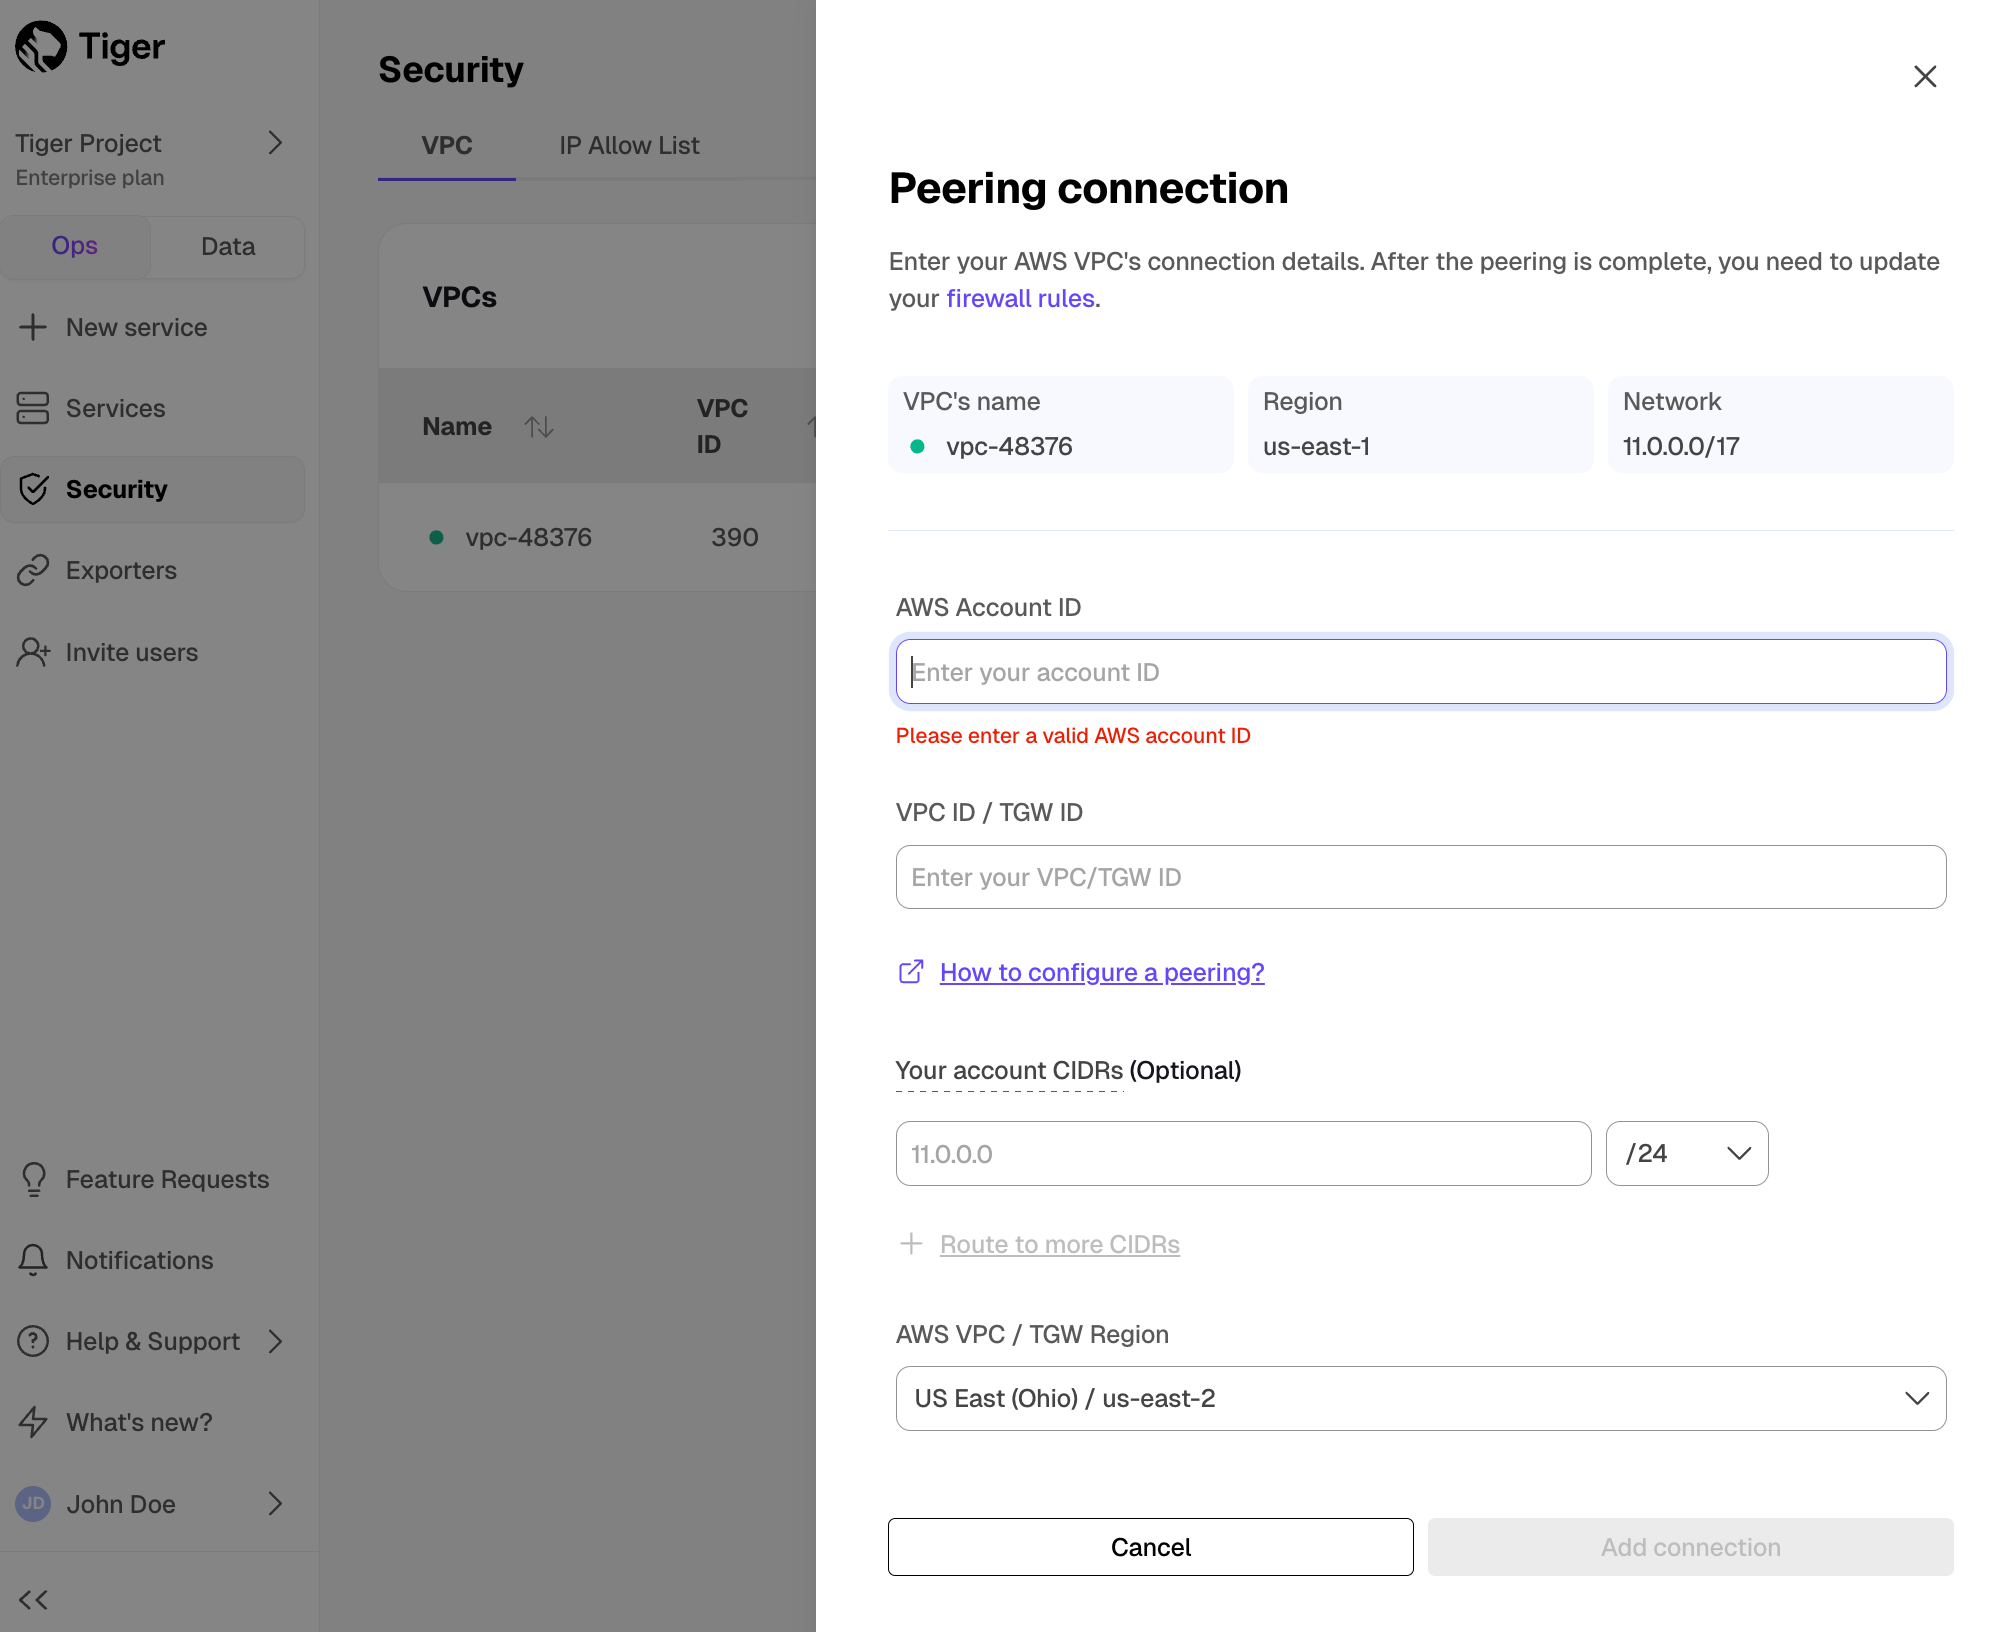
Create a Peering VPC in [Tiger Cloud Console][console-login]
In
Security>VPC, clickCreate a VPC:- Choose your region and IP range, name your VPC, then click
Create VPC: Add a peering connection:
In the
VPC Peeringcolumn, clickAdd.- Provide your AWS account ID, Transit Gateway ID, CIDR ranges, and AWS region. Tiger Cloud creates a new isolated connection for every unique Transit Gateway ID.
Click
Add connection.Accept and configure peering connection in your AWS account
Accept the peering request coming from Tiger Cloud. The request can take up to 5 min to arrive. Within 5 more minutes after accepting, the peering should appear as
Connectedin Tiger Cloud Console.Configure at least the following in your AWS account networking:
- Your subnet route table to route traffic to your Transit Gateway for the Peering VPC CIDRs.
- Your Transit Gateway route table to route traffic to the newly created Transit Gateway peering attachment for the Peering VPC CIDRs.
- Security groups to allow outbound TCP 5432.
Attach a Tiger Cloud service to the Peering VPC In [Tiger Cloud Console][console-services]
Select the service you want to connect to the Peering VPC.
- Click
Operations>Security>VPC. - Select the VPC, then click
Attach VPC.
- Click
- Create a target [Tiger Cloud service][create-service] with the Real-time analytics capability.
- Download the
real_time_stock_data.zipfile. The file contains two.csvfiles; one with company information, and one with real-time stock trades for the past month. Download: In a new terminal window, run this command to unzip the
.csvfiles:At the
psqlprompt, use theCOPYcommand to transfer data into your Tiger Cloud service. If the.csvfiles aren't in your current directory, specify the file paths in these commands:- Connect to your Tiger Cloud service
- Enable columnstore on a hypertable
- [Use
CREATE TABLEfor a hypertable][hypertable-create-table] [Use
ALTER MATERIALIZED VIEWfor a continuous aggregate][compression_continuous-aggregate]Before you say
huh, a continuous aggregate is a specialized hypertable.- Add a policy to convert chunks to the columnstore at a specific time interval
Check the columnstore policy
View your data space saving:
- View the policies that you set or the policies that already exist:
- Pause a columnstore policy
- Restart a columnstore policy
- Remove a columnstore policy
- Disable columnstore
- Dump the roles from your source database
- Remove roles with superuser access
- In the [Tiger Cloud Console][timescale-portal], click
Create service. - Click
Download the cheatsheetto download an SQL file that contains the login details for your new service. You can also copy the details directly from this page. When you have copied your password, clickI stored my password, go to service overviewat the bottom of the page. - On your local system, at the command prompt, connect to the service using
the
Service URLfrom the SQL file that you downloaded. When you are prompted, enter the password: - Create a target [Tiger Cloud service][create-service] with the Real-time analytics capability.
- Log in to Grafana
- Add your service as a data source
- Open
Connections>Data sources, then clickAdd new data source. - Select
PostgreSQLfrom the list. - Configure the connection:
Host URL,Database name,Username, andPassword
- Open
- Click
Save & test. - Create a [Tiger Data account][create-account].
The following works:
This does not:
Install the latest version of
libpqxx:[](#)View the files that were installed by
libpqxx:- [Install TimescaleDB][red-hat-install].
- Create a TimescaleDB repository in your
yumrepo.ddirectory. Set up the repository:
Update your local repository list:
Install TimescaleDB Toolkit:
[Connect to the database][connect] where you want to use Toolkit.
Create the Toolkit extension in the database:
Update your local repository list:
Install the latest version of TimescaleDB Toolkit:
[Connect to the database][connect] where you want to use the new version of Toolkit.
Update the Toolkit extension in the database:
--section=post-datais used to dump post-data items include definitions of indexes, triggers, rules, and constraints other than validated check constraints.--snapshotis used to specified the synchronized [snapshot][snapshot] when making a dump of the database.--no-tablespacesis required because Tiger Cloud does not support tablespaces other than the default. This is a known limitation.--no-owneris required because Tiger Cloud'stsdbadminuser is not a superuser and cannot assign ownership in all cases. This flag means that everything is owned by the user used to connect to the target, regardless of ownership in the source. This is a known limitation.--no-privilegesis required because thetsdbadminuser for your Tiger Cloud service is not a superuser and cannot assign privileges in all cases. This flag means that privileges assigned to other users must be reassigned in the target database as a manual clean-up task. This is a known limitation.- Row-based storage for recent data: the most recent chunk (and possibly more) is always stored in the rowstore, ensuring fast inserts, updates, and low-latency single record queries. Additionally, row-based storage is used as a writethrough for inserts and updates to columnar storage.
- Columnar storage for analytical performance: chunks are automatically compressed into the columnstore, optimizing storage efficiency and accelerating analytical queries.
- Connect to your service
- Create a Postgres table
--section=pre-datais used to dump only the definition of tables, sequences, check constraints and inheritance hierarchy. It excludes indexes, foreign key constraints, triggers and rules.--snapshotis used to specified the synchronized [snapshot][snapshot] when making a dump of the database.--no-tablespacesis required because Tiger Cloud does not support tablespaces other than the default. This is a known limitation.--no-owneris required because Tiger Cloud'stsdbadminuser is not a superuser and cannot assign ownership in all cases. This flag means that everything is owned by the user used to connect to the target, regardless of ownership in the source. This is a known limitation.--no-privilegesis required because thetsdbadminuser for your Tiger Cloud service is not a superuser and cannot assign privileges in all cases. This flag means that privileges assigned to other users must be reassigned in the target database as a manual clean-up task. This is a known limitation.
===== PAGE: https://docs.tigerdata.com/_partials/_migrate_live_tune_source_database_awsrds/ =====
Updating parameters on a Postgres instance will cause an outage. Choose a time that will cause the least issues to tune this database.
<img class="main-content__illustration"
  src="https://assets.timescale.com/docs/images/migrate/awsrds-parameter-groups.png"
  alt="Create security rule to enable RDS EC2 connection"/>
Changing parameters will cause an outage. Wait for the database instance to reboot before continuing.
Replica identity assists data replication by identifying the rows being modified. Your options are that each table and hypertable in the source database should either have:
For each table, set REPLICA IDENTITY to the viable unique index:
For each table, set REPLICA IDENTITY to FULL:
For each UPDATE or DELETE statement, Postgres reads the whole table to find all matching rows. This results
in significantly slower replication. If you are expecting a large number of UPDATE or DELETE operations on the table,
best practice is to not use FULL.
===== PAGE: https://docs.tigerdata.com/_partials/_foreign-data-wrappers/ =====
You use Postgres foreign data wrappers (FDWs) to query external data sources from a Tiger Cloud service. These external data sources can be one of the following:
If you are using VPC peering, you can create FDWs in your Customer VPC to query a service in your Tiger Cloud project. However, you can't create FDWs in your Tiger Cloud services to query a data source in your Customer VPC. This is because Tiger Cloud VPC peering uses AWS PrivateLink for increased security. See [VPC peering documentation][vpc-peering] for additional details.
Postgres FDWs are particularly useful if you manage multiple Tiger Cloud services with different capabilities, and need to seamlessly access and merge regular and time-series data.
To follow the steps on this page:
You need [your connection details][connection-info]. This procedure also works for [self-hosted TimescaleDB][enable-timescaledb].
Query another data source
To query another data source:
You create Postgres FDWs with the postgres_fdw extension, which is enabled by default in Tiger Cloud.
See [how to connect][connect].
Run the following command using your [connection details][connection-info]:
Run the following command using your [connection details][connection-info]:
A user with the tsdbadmin role assigned already has the required USAGE permission to create Postgres FDWs. You can enable another user, without the tsdbadmin role assigned, to query foreign data. To do so, explicitly grant the permission. For example, for a new grafana user:
You create Postgres FDWs with the postgres_fdw extension. See [documenation][enable-fdw-docs] on how to enable it.
Use [psql][psql] to connect to your database.
Run the following command using your [connection details][connection-info]:
Run the following command using your [connection details][connection-info]:
===== PAGE: https://docs.tigerdata.com/_partials/_cookbook-iot/ =====
This section contains recipes for IoT issues:
Work with columnar IoT data
Narrow and medium width tables are a great way to store IoT data. A lot of reasons are outlined in [Designing Your Database Schema: Wide vs. Narrow Postgres Tables][blog-wide-vs-narrow].
One of the key advantages of narrow tables is that the schema does not have to change when you add new sensors. Another big advantage is that each sensor can sample at different rates and times. This helps support things like hysteresis, where new values are written infrequently unless the value changes by a certain amount.
Narrow table format example
Working with narrow table data structures presents a few challenges. In the IoT world one concern is that many data analysis approaches - including machine learning as well as more traditional data analysis - require that your data is resampled and synchronized to a common time basis. Fortunately, TimescaleDB provides you with [hyperfunctions][hyperfunctions] and other tools to help you work with this data.
An example of a narrow table format is:
| ts | sensor_id | value |
|---|---|---|
| 2024-10-31 11:17:30.000 | 1007 | 23.45 |
Typically you would couple this with a sensor table:
| sensor_id | sensor_name | units |
|---|---|---|
| 1007 | temperature | degreesC |
| 1012 | heat_mode | on/off |
| 1013 | cooling_mode | on/off |
| 1041 | occupancy | number of people in room |
A medium table retains the generic structure but adds columns of various types so that you can use the same table to store float, int, bool, or even JSON (jsonb) data:
| ts | sensor_id | d | i | b | t | j |
|---|---|---|---|---|---|---|
| 2024-10-31 11:17:30.000 | 1007 | 23.45 | null | null | null | null |
| 2024-10-31 11:17:47.000 | 1012 | null | null | TRUE | null | null |
| 2024-10-31 11:18:01.000 | 1041 | null | 4 | null | null | null |
To remove all-null entries, use an optional constraint such as:
Get the last value of every sensor
There are several ways to get the latest value of every sensor. The following examples use the structure defined in [Narrow table format example][setup-a-narrow-table-format] as a reference:
SELECT DISTINCT ON
If you have a list of sensors, the easy way to get the latest value of every sensor is to use
SELECT DISTINCT ON:
The common table expression (CTE) used above is not strictly necessary. However, it is an elegant way to join to the sensor list to get a sensor name in the output. If this is not something you care about, you can leave it out:
It is important to take care when down-selecting this data. In the previous examples, the time that the query would scan back was limited. However, if there any sensors that have either not reported in a long time or in the worst case, never reported, this query devolves to a full table scan. In a database with 1000+ sensors and 41 million rows, an unconstrained query takes over an hour.
An alternative to [SELECT DISTINCT ON][select-distinct-on] is to use a JOIN LATERAL. By selecting your entire
sensor list from the sensors table rather than pulling the IDs out using SELECT DISTINCT, JOIN LATERAL can offer
some improvements in performance:
Limiting the time range is important, especially if you have a lot of data. Best practice is to use these kinds of queries for dashboards and quick status checks. To query over a much larger time range, encapsulate the previous example into a materialized query that refreshes infrequently, perhaps once a day.
Shoutout to Christopher Piggott for this recipe.
===== PAGE: https://docs.tigerdata.com/_partials/_migrate_from_timescaledb_version/ =====
It is very important that the version of the TimescaleDB extension is the same in the source and target databases. This requires upgrading the TimescaleDB extension in the source database before migrating.
You can determine the version of TimescaleDB in the target database with the following command:
To update the TimescaleDB extension in your source database, first ensure that the desired version is installed from your package repository. Then you can upgrade the extension with the following query:
For more information and guidance, consult the [Upgrade TimescaleDB] page.
===== PAGE: https://docs.tigerdata.com/_partials/_since_2_18_0/ =====
Since TimescaleDB v2.18.0
===== PAGE: https://docs.tigerdata.com/_partials/_add-data-nyctaxis/ =====
When you have your database set up, you can load the taxi trip data into the
rides hypertable.
This is a large dataset, so it might take a long time, depending on your network connection.
You can check that the data has been copied successfully with this command:
You should get five records that look like this:
===== PAGE: https://docs.tigerdata.com/_partials/_cloud-create-service/ =====
Create a Tiger Cloud service
===== PAGE: https://docs.tigerdata.com/_partials/_caggs-real-time-historical-data-refreshes/ =====
Real-time aggregates automatically add the most recent data when you query your continuous aggregate. In other words, they include data more recent than your last materialized bucket.
If you add new historical data to an already-materialized bucket, it won't be
reflected in a real-time aggregate. You should wait for the next scheduled
refresh, or manually refresh by calling refresh_continuous_aggregate. You can
think of real-time aggregates as being eventually consistent for historical
data.
===== PAGE: https://docs.tigerdata.com/_partials/_migrate_awsrds_connect_intermediary/ =====
Create an intermediary EC2 Ubuntu instance
Install the psql client tools on the intermediary instance
Keep this terminal open, you need it to connect to the RDS/Aurora Postgres instance for migration.
Set up secure connectivity between your RDS/Aurora Postgres and EC2 instances
Bear with me on this one, you need this IP address to enable access to your RDS/Aurora Postgres instance.
Test the connection between your RDS/Aurora Postgres and EC2 instances
The value of Master password was supplied when this RDS/Aurora Postgres instance was created.
You are connected to your RDS/Aurora Postgres instance from your intermediary EC2 instance.
===== PAGE: https://docs.tigerdata.com/_partials/_transit-gateway/ =====

Your service and Peering VPC must be in the same AWS region. The number of Peering VPCs you can create in your project depends on your [pricing plan][pricing-plans]. If you need another Peering VPC, either contact support@tigerdata.com or change your plan in [Tiger Cloud Console][console-login].
Once your peering connection appears as Processing, you can accept and configure it in AWS:
You cannot attach a Tiger Cloud service to multiple Tiger Cloud VPCs at the same time.
===== PAGE: https://docs.tigerdata.com/_partials/_cloud-intro-short/ =====
A Tiger Cloud service is a single optimised Postgres instance extended with innovations in the database engine such as TimescaleDB, in a cloud infrastructure that delivers speed without sacrifice.
A Tiger Cloud service is a radically faster Postgres database for transactional, analytical, and agentic workloads at scale.
It’s not a fork. It’s not a wrapper. It is Postgres—extended with innovations in the database engine and cloud infrastructure to deliver speed (10-1000x faster at scale) without sacrifice. A Tiger Cloud service brings together the familiarity and reliability of Postgres with the performance of purpose-built engines.
Tiger Cloud is the fastest Postgres cloud. It includes everything you need to run Postgres in a production-reliable, scalable, observable environment.
===== PAGE: https://docs.tigerdata.com/_partials/_since_2_22_0/ =====
Since TimescaleDB v2.22.0
===== PAGE: https://docs.tigerdata.com/_partials/_integration-prereqs/ =====
To follow the steps on this page:
You need [your connection details][connection-info]. This procedure also works for [self-hosted TimescaleDB][enable-timescaledb].
===== PAGE: https://docs.tigerdata.com/_partials/_cloud_self_configuration/ =====
Please refer to the [Grand Unified Configuration (GUC) parameters][gucs] for a complete list.
timescaledb.max_background_workers (int)
Max background worker processes allocated to TimescaleDB. Set to at least 1 + the number of databases loaded with the TimescaleDB extension in a Postgres instance. Default value is 16.
Tiger Cloud service tuning
timescaledb.disable_load (bool)
Disable the loading of the actual extension
===== PAGE: https://docs.tigerdata.com/_partials/_migrate_dual_write_step2/ =====
2. Modify the application to write to the target database
How exactly to do this is dependent on the language that your application is written in, and on how exactly your ingestion and application function. In the simplest case, you simply execute two inserts in parallel. In the general case, you must think about how to handle the failure to write to either the source or target database, and what mechanism you want to or can build to recover from such a failure.
Should your time-series data have foreign-key references into a plain table,
you must ensure that your application correctly maintains the foreign key
relations. If the referenced column is a *SERIAL type, the same row inserted
into the source and target may not obtain the same autogenerated id. If this
happens, the data backfilled from the source to the target is internally
inconsistent. In the best case it causes a foreign key violation, in the worst
case, the foreign key constraint is maintained, but the data references the
wrong foreign key. To avoid these issues, best practice is to follow
[live migration].
You may also want to execute the same read queries on the source and target database to evaluate the correctness and performance of the results which the queries deliver. Bear in mind that the target database spends a certain amount of time without all data being present, so you should expect that the results are not the same for some period (potentially a number of days).
===== PAGE: https://docs.tigerdata.com/_partials/_timescaledb_supported_linux/ =====
| Operation system | Version |
|---|---|
| Debian | 13 Trixe, 12 Bookworm, 11 Bullseye |
| Ubuntu | 24.04 Noble Numbat, 22.04 LTS Jammy Jellyfish |
| Red Hat Enterprise | Linux 9, Linux 8 |
| Fedora | Fedora 35, Fedora 34, Fedora 33 |
| Rocky Linux | Rocky Linux 9 (x86_64), Rocky Linux 8 |
| ArchLinux (community-supported) | Check the [available packages][archlinux-packages] |
===== PAGE: https://docs.tigerdata.com/_partials/_add-data-twelvedata-stocks/ =====
Load financial data
This tutorial uses real-time stock trade data, also known as tick data, from [Twelve Data][twelve-data]. A direct download link is provided below.
To ingest data into the tables that you created, you need to download the dataset and copy the data to your database.
Because there are millions of rows of data, the COPY process could take a
few minutes depending on your internet connection and local client
resources.
===== PAGE: https://docs.tigerdata.com/_partials/_hypercore_policy_workflow/ =====
In [Tiger Cloud Console][services-portal] open an [SQL editor][in-console-editors]. You can also connect to your service using [psql][connect-using-psql].
Create a [hypertable][hypertables-section] for your time-series data using [CREATE TABLE][hypertable-create-table].
For [efficient queries][secondary-indexes] on data in the columnstore, remember to segmentby the column you will
use most often to filter your data. For example:
If you are self-hosting TimescaleDB v2.19.3 and below, create a [Postgres relational table][pg-create-table], then convert it using [create_hypertable][create_hypertable]. You then enable hypercore with a call to [ALTER TABLE][alter_table_hypercore].
Create a [columnstore_policy][add_columnstore_policy] that automatically converts chunks in a hypertable to the columnstore at a specific time interval. For example, convert yesterday's crypto trading data to the columnstore:
TimescaleDB is optimized for fast updates on compressed data in the columnstore. To modify data in the columnstore, use standard SQL.
When you convert data to the columnstore, as well as being optimized for analytics, it is compressed by more than
  90%. This helps you save on storage costs and keeps your queries operating at lightning speed. To see the amount of space
  saved:
You see something like:
| before | after |
  |---------|--------|
  | 194 MB  |   24 MB |
See [timescaledb_information.jobs][informational-views].
See [alter_job][alter_job].
See [alter_job][alter_job].
See [remove_columnstore_policy][remove_columnstore_policy].
If your table has chunks in the columnstore, you have to [convert the chunks back to the rowstore][convert_to_rowstore] before you disable the columnstore.
See [alter_table_hypercore][alter_table_hypercore].
===== PAGE: https://docs.tigerdata.com/_partials/_migrate_dual_write_switch_production_workload/ =====
Once you've validated that all the data is present, and that the target database can handle the production workload, the final step is to switch to the target database as your primary. You may want to continue writing to the source database for a period, until you are certain that the target database is holding up to all production traffic.
===== PAGE: https://docs.tigerdata.com/_partials/_migrate_dump_roles_schema_data_multi_node/ =====
Export your role-based security hierarchy. If you only use the default postgres role, this step is not
necessary.
MST does not allow you to export passwords with roles. You assign passwords to these roles when you have uploaded them to your Tiger Cloud service.
Tiger Cloud services do not support roles with superuser access. Run the following script
to remove statements, permissions and clauses that require superuser permissions from roles.sql:
===== PAGE: https://docs.tigerdata.com/_partials/_cloud-create-connect-tutorials/ =====
A service in Tiger Cloud is a cloud instance which contains your database.
Each service contains a single database, named tsdb.
You can connect to a service from your local system using the psql
command-line utility. If you've used Postgres before, you might already have
psql installed. If not, check out the [installing psql][install-psql] section.
When your service is ready to use, is shows a green Running label in the
`Service Overview`. You also receive an email confirming that your service
is ready to use.
If your connection is successful, you'll see a message like this, followed
by the `psql` prompt:
===== PAGE: https://docs.tigerdata.com/_partials/_integration-prereqs-cloud-only/ =====
To follow the steps on this page:
You need your [connection details][connection-info].
===== PAGE: https://docs.tigerdata.com/_partials/_grafana-connect/ =====
Connect Grafana to Tiger Cloud
To visualize the results of your queries, enable Grafana to read the data in your service:
In your browser, log in to either:
- Self-hosted Grafana: at `http://localhost:3000/`. The default credentials are `admin`, `admin`.
- Grafana Cloud: use the URL and credentials you set when you created your account.
Configure using your [connection details][connection-info]. Host URL is in the format <host>:<port>.
  - `TLS/SSL Mode`: select `require`.
  - `PostgreSQL options`: enable `TimescaleDB`.
  - Leave the default setting for all other fields.
Grafana checks that your details are set correctly.
===== PAGE: https://docs.tigerdata.com/_partials/_prereqs-cloud-project-and-self/ =====
To follow the procedure on this page you need to:
This procedure also works for [self-hosted TimescaleDB][enable-timescaledb].
===== PAGE: https://docs.tigerdata.com/_partials/_caggs-function-support/ =====
The following table summarizes the aggregate functions supported in continuous aggregates:
| Function, clause, or feature |TimescaleDB 2.6 and earlier|TimescaleDB 2.7, 2.8, and 2.9|TimescaleDB 2.10 and later|
|------------------------------------------------------------|-|-|-|
| Parallelizable aggregate functions |✅|✅|✅|
| [Non-parallelizable SQL aggregates][postgres-parallel-agg] |❌|✅|✅|
| ORDER BY |❌|✅|✅|
| Ordered-set aggregates |❌|✅|✅|
| Hypothetical-set aggregates |❌|✅|✅|
| DISTINCT in aggregate functions |❌|✅|✅|
| FILTER in aggregate functions |❌|✅|✅|
| FROM clause supports JOINS |❌|❌|✅|
DISTINCT works in aggregate functions, not in the query definition. For example, for the table:
===== PAGE: https://docs.tigerdata.com/_partials/_psql-installation-macports/ =====
Installing psql using MacPorts
===== PAGE: https://docs.tigerdata.com/_partials/_toolkit-install-update-redhat-base/ =====
To follow this procedure:
Install TimescaleDB Toolkit
These instructions use the yum package manager.
Update TimescaleDB Toolkit
Update Toolkit by installing the latest version and running ALTER EXTENSION.
For some Toolkit versions, you might need to disconnect and reconnect active
sessions.
===== PAGE: https://docs.tigerdata.com/_partials/_cookbook-hypertables/ =====
Hypertable recipes
This section contains recipes about hypertables.
Remove duplicates from an existing hypertable
Looking to remove duplicates from an existing hypertable? One method is to run a PARTITION BY query to get
ROW_NUMBER() and then the ctid of rows where row_number>1. You then delete these rows. However,
you need to check tableoid and ctid. This is because ctid is not unique and might be duplicated in
different chunks. The following code example took 17 hours to process a table with 40 million rows:
Shoutout to Mathias Ose and Christopher Piggott for this recipe.
Get faster JOIN queries with Common Table Expressions
Imagine there is a query that joins a hypertable to another table on a shared key:
If you run EXPLAIN on this query, you see that the query planner performs a NestedJoin between these two tables, which means querying the hypertable multiple times. Even if the hypertable is well indexed, if it is also large, the query will be slow. How do you force a once-only lookup? Use materialized Common Table Expressions (CTEs).
If you split the query into two parts using CTEs, you can materialize the hypertable lookup and force Postgres to perform it only once.
Now if you run EXPLAIN once again, you see that this query performs only one lookup. Depending on the size of your hypertable, this could result in a multi-hour query taking mere seconds.
Shoutout to Rowan Molony for this recipe.
===== PAGE: https://docs.tigerdata.com/_partials/_experimental-private-beta/ =====
This feature is experimental and offered as part of a private beta. Do not use this feature in production.
===== PAGE: https://docs.tigerdata.com/_partials/_hypershift-alternatively/ =====
Alternatively, if you have data in an existing database, you can migrate it directly into your new Tiger Cloud service using hypershift. For more information about hypershift, including instructions for how to migrate your data, see the [Migrate and sync data to Tiger Cloud][migrate].
===== PAGE: https://docs.tigerdata.com/_partials/_timescaledb_supported_windows/ =====
| Operation system | Version |
|---|---|
| Microsoft Windows | 10, 11 |
| Microsoft Windows Server | 2019, 2020 |
===== PAGE: https://docs.tigerdata.com/_partials/_migrate_post_data_dump_source_schema/ =====
===== PAGE: https://docs.tigerdata.com/_partials/_create-hypertable/ =====
Hypertables are Postgres tables in TimescaleDB that automatically partition your time-series data by time. Time-series data represents the way a system, process, or behavior changes over time. Hypertables enable TimescaleDB to work efficiently with time-series data. Each hypertable is made up of child tables called chunks. Each chunk is assigned a range of time, and only contains data from that range. When you run a query, TimescaleDB identifies the correct chunk and runs the query on it, instead of going through the entire table.
[Hypercore][hypercore] is the hybrid row-columnar storage engine in TimescaleDB used by hypertables. Traditional databases force a trade-off between fast inserts (row-based storage) and efficient analytics (columnar storage). Hypercore eliminates this trade-off, allowing real-time analytics without sacrificing transactional capabilities.
Hypercore dynamically stores data in the most efficient format for its lifecycle:
Unlike traditional columnar databases, hypercore allows data to be inserted or modified at any stage, making it a flexible solution for both high-ingest transactional workloads and real-time analytics—within a single database.
Because TimescaleDB is 100% Postgres, you can use all the standard Postgres tables, indexes, stored procedures, and other objects alongside your hypertables. This makes creating and working with hypertables similar to standard Postgres.
To create a hypertable:
In Tiger Cloud Console, click Data, then select a service.
Copy the following into your query, then click Run:
If you are self-hosting TimescaleDB v2.19.3 and below, create a [Postgres relational table][pg-create-table], then convert it using [create_hypertable][create_hypertable]. You then enable hypercore with a call to [ALTER TABLE][alter_table_hypercore].
You see the result immediately:
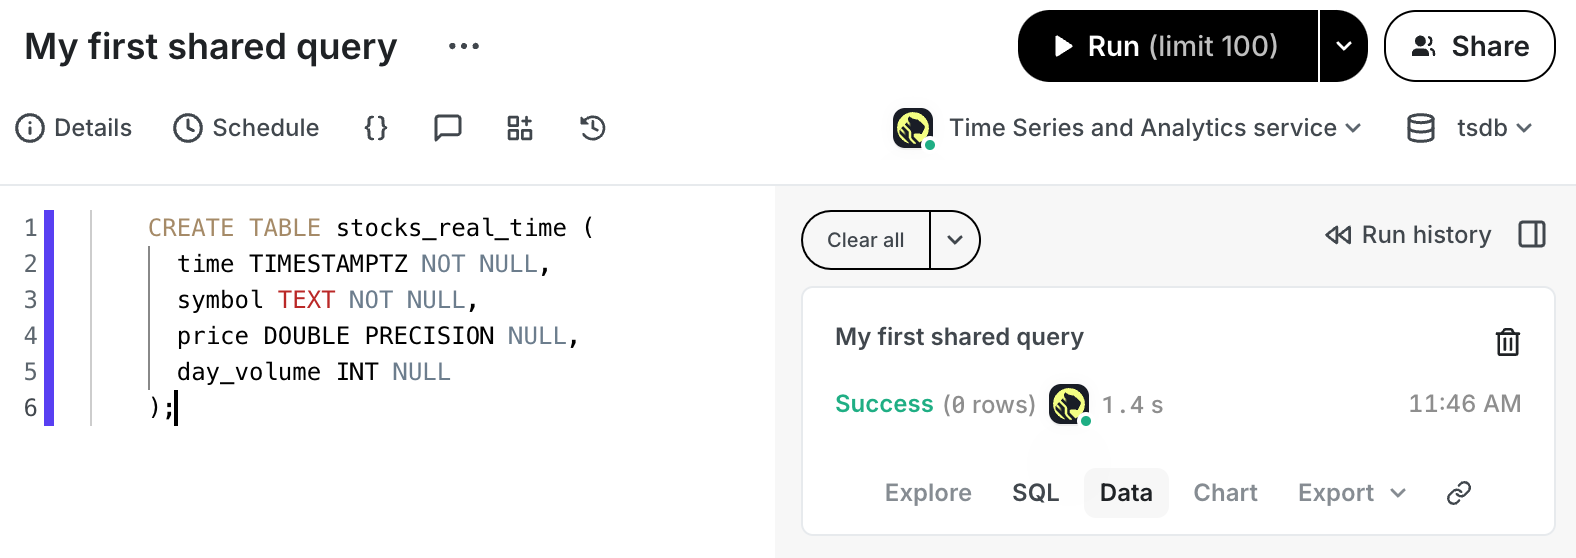
===== PAGE: https://docs.tigerdata.com/_partials/_migrate_pre_data_dump_source_schema/ =====
===== PAGE: https://docs.tigerdata.com/_partials/_hypertable-detailed-size-api/ =====
Examples:
Example 1 (bash):
rails new my_app -d=postgresql
    cd my_app
Example 2 (ruby):
gem 'timescaledb'
Example 3 (bash):
bundle install
Example 4 (yaml):
default: &default
         adapter: postgresql
         encoding: unicode
         pool: <%= ENV.fetch("RAILS_MAX_THREADS") { 5 } %>
         url: <%= ENV['DATABASE_URL'] %>
===== PAGE: https://docs.tigerdata.com/getting-started/try-key-features-timescale-products/ =====
URL: llms-txt#=====-page:-https://docs.tigerdata.com/getting-started/try-key-features-timescale-products/-=====