
installation.md 149 KB
TRANSLATED CONTENT:
Timescaledb - Installation
Pages: 37
Install TimescaleDB on Kubernetes
URL: llms-txt#install-timescaledb-on-kubernetes
Contents:
- Prerequisites
- Integrate TimescaleDB in a Kubernetes cluster
- Install with Postgres Kubernetes operators
You can run TimescaleDB inside Kubernetes using the TimescaleDB Docker container images.
The following instructions are for development and testing installations. For a production environment, we strongly recommend that you implement the following, many of which you can achieve using Postgres tooling:
- Incremental backup and database snapshots, with efficient point-in-time recovery.
- High availability replication, ideally with nodes across multiple availability zones.
- Automatic failure detection with fast restarts, for both non-replicated and replicated deployments.
- Asynchronous replicas for scaling reads when needed.
- Connection poolers for scaling client connections.
- Zero-down-time minor version and extension upgrades.
- Forking workflows for major version upgrades and other feature testing.
- Monitoring and observability.
Deploying for production? With a Tiger Cloud service we tune your database for performance and handle scalability, high availability, backups, and management, so you can relax.
To follow the steps on this page:
- Install [self-managed Kubernetes][kubernetes-install] or sign up for a Kubernetes [Turnkey Cloud Solution][kubernetes-managed].
- Install [kubectl][kubectl] for command-line interaction with your cluster.
Integrate TimescaleDB in a Kubernetes cluster
Running TimescaleDB on Kubernetes is similar to running Postgres. This procedure outlines the steps for a non-distributed system.
To connect your Kubernetes cluster to self-hosted TimescaleDB running in the cluster:
Create a default namespace for Tiger Data components
Create the Tiger Data namespace:
Set this namespace as the default for your session:
For more information, see [Kubernetes Namespaces][kubernetes-namespace].
- Set up a persistent volume claim (PVC) storage
To manually set up a persistent volume and claim for self-hosted Kubernetes, run the following command:
- Deploy TimescaleDB as a StatefulSet
By default, the [TimescaleDB Docker image][timescale-docker-image] you are installing on Kubernetes uses the default Postgres database, user and password. To deploy TimescaleDB on Kubernetes, run the following command:
Allow applications to connect by exposing TimescaleDB within Kubernetes
Create a Kubernetes secret to store the database credentials
Deploy an application that connects to TimescaleDB
Test the database connection
Create and run a pod to verify database connectivity using your [connection details][connection-info] saved in
timescale-secret:Launch the Postgres interactive shell within the created
test-pod:
You see the Postgres interactive terminal.
Install with Postgres Kubernetes operators
You can also use Postgres Kubernetes operators to simplify installation, configuration, and life cycle. The operators which our community members have told us work well are:
- [StackGres]stackgres
- [Postgres Operator (Patroni)][patroni]
- [PGO][pgo]
- [CloudNativePG][cnpg]
===== PAGE: https://docs.tigerdata.com/self-hosted/install/installation-source/ =====
Examples:
Example 1 (shell):
kubectl create namespace timescale
Example 2 (shell):
kubectl config set-context --current --namespace=timescale
Example 3 (yaml):
kubectl apply -f - <<EOF
   apiVersion: v1
   kind: PersistentVolumeClaim
   metadata:
     name: timescale-pvc
   spec:
     accessModes:
       - ReadWriteOnce
     resources:
       requests:
         storage: 10Gi
   EOF
Example 4 (yaml):
kubectl apply -f - <<EOF
    apiVersion: apps/v1
    kind: StatefulSet
    metadata:
      name: timescaledb
    spec:
      serviceName: timescaledb
      replicas: 1
      selector:
        matchLabels:
          app: timescaledb
      template:
        metadata:
          labels:
            app: timescaledb
        spec:
          containers:
            - name: timescaledb
              image: 'timescale/timescaledb:latest-pg17'
              env:
                - name: POSTGRES_USER
                  value: postgres
                - name: POSTGRES_PASSWORD
                  value: postgres
                - name: POSTGRES_DB
                  value: postgres
                - name: PGDATA
                  value: /var/lib/postgresql/data/pgdata
              ports:
                - containerPort: 5432
              volumeMounts:
                - mountPath: /var/lib/postgresql/data
                  name: timescale-storage
          volumes:
            - name: timescale-storage
              persistentVolumeClaim:
                claimName: timescale-pvc
    EOF
Uninstall TimescaleDB
URL: llms-txt#uninstall-timescaledb
Contents:
- Uninstalling TimescaleDB using Homebrew
- Uninstalling TimescaleDB using MacPorts
Postgres is designed to be easily extensible. The extensions loaded into the database can function just like features that are built in. TimescaleDB extends Postgres for time-series data, giving Postgres the high-performance, scalability, and analytical capabilities required by modern data-intensive applications. If you installed TimescaleDB with Homebrew or MacPorts, you can uninstall it without having to uninstall Postgres.
Uninstalling TimescaleDB using Homebrew
At the
psqlprompt, remove the TimescaleDB extension:At the command prompt, remove
timescaledbfromshared_preload_librariesin thepostgresql.confconfiguration file:Save the changes to the
postgresql.conffile.Restart Postgres:
Check that the TimescaleDB extension is uninstalled by using the
\dxcommand at thepsqlprompt. Output is similar to:Uninstall TimescaleDB:
Remove all the dependencies and related files:
Uninstalling TimescaleDB using MacPorts
At the
psqlprompt, remove the TimescaleDB extension:At the command prompt, remove
timescaledbfromshared_preload_librariesin thepostgresql.confconfiguration file:Save the changes to the
postgresql.conffile.Restart Postgres:
Check that the TimescaleDB extension is uninstalled by using the
\dxcommand at thepsqlprompt. Output is similar to:Uninstall TimescaleDB and the related dependencies:
===== PAGE: https://docs.tigerdata.com/self-hosted/upgrades/about-upgrades/ =====
Examples:
Example 1 (sql):
DROP EXTENSION timescaledb;
Example 2 (bash):
nano /opt/homebrew/var/postgresql@14/postgresql.conf
    shared_preload_libraries = ''
Example 3 (bash):
brew services restart postgresql
Example 4 (sql):
tsdb-# \dx
                                          List of installed extensions
        Name     | Version |   Schema   |                            Description
    -------------+---------+------------+-------------------------------------------------------------------
     plpgsql     | 1.0     | pg_catalog | PL/pgSQL procedural language
    (1 row)
Migrate data to self-hosted TimescaleDB from the same Postgres instance
URL: llms-txt#migrate-data-to-self-hosted-timescaledb-from-the-same-postgres-instance
Contents:
- Prerequisites
- Migrate data
- Migrating data
You can migrate data into a TimescaleDB hypertable from a regular Postgres table. This method assumes that you have TimescaleDB set up in the same database instance as your existing table.
Before beginning, make sure you have [installed and set up][install] TimescaleDB.
You also need a table with existing data. In this example, the source table is
named old_table. Replace the table name with your actual table name. The
example also names the destination table new_table, but you might want to use
a more descriptive name.
Migrate your data into TimescaleDB from within the same database.
- Call [CREATE TABLE][hypertable-create-table] to make a new table based on your existing table.
You can create your indexes at the same time, so you don't have to recreate them manually. Or you can
create the table without indexes, which makes data migration faster.
If you are self-hosting TimescaleDB v2.19.3 and below, create a [Postgres relational table][pg-create-table], then convert it using [create_hypertable][create_hypertable]. You then enable hypercore with a call to [ALTER TABLE][alter_table_hypercore].
Insert data from the old table to the new table.
If you created your new table without indexes, recreate your indexes now.
===== PAGE: https://docs.tigerdata.com/_troubleshooting/mst/corrupt-index-duplicate/ =====
Examples:
Example 1 (sql):
CREATE TABLE new_table (
        LIKE old_table INCLUDING DEFAULTS INCLUDING CONSTRAINTS INCLUDING INDEXES
    ) WITH (
        tsdb.hypertable,
        tsdb.partition_column='<the name of the time column>'
    );
Example 2 (sql):
CREATE TABLE new_table (
        LIKE old_table INCLUDING DEFAULTS INCLUDING CONSTRAINTS EXCLUDING INDEXES
    ) WITH (
        tsdb.hypertable,
        tsdb.partition_column='<the name of the time column>'
    );
Example 3 (sql):
INSERT INTO new_table
      SELECT * FROM old_table;
Migrate from self-hosted TimescaleDB to Managed Service for TimescaleDB
URL: llms-txt#migrate-from-self-hosted-timescaledb-to-managed-service-for-timescaledb
Contents:
- Prerequisites
- Migrate your data to a service
- Troubleshooting
You can migrate your data from self-hosted TimescaleDB to Managed Service for TimescaleDB and automate most of the common operational tasks.
Each service has a database named defaultdb, and a default user account named tsdbadmin. You use
MST Console to create additional users and databases using the Users and Databases tabs.
You can switch between different plan sizes in Managed Service for TimescaleDB. However, during the migration process, choose a plan size that has the same storage size or slightly larger than the currently allocated plan. This allows you to limit the downtime during the migration process and have sufficient compute and storage resources.
Depending on your database size and network speed, migration can take a very long time. During this time, any new writes that happen during the migration process are not included. To prevent data loss, turn off all the writes to the source self-hosted TimescaleDB database before you start migration.
Before migrating for production, do a cold run without turning off writes to the source self-hosted TimescaleDB database. This gives you an estimate of the time the migration process takes, and helps you to practice migrating without causing downtime to your customers.
If you prefer the features of Tiger Cloud, you can easily [migrate your data][migrate-live] from an service to a Tiger Cloud service.
Before you migrate your data, do the following:
- Set up the migration machine:
You run the migration commands on the migration machine. It must have enough disk space to hold the dump file.
Install the Postgres [
pg_dump][pg_dump] and [pg_restore][pg_restore] utilities on a migration machine.Install a client to connect to self-hosted TimescaleDB and Managed Service for TimescaleDB.
These instructions use [psql][psql], but any client works.
- Create a target service:
For more information, see the [Install Managed Service for TimescaleDB][install-mst]. Provision your target service with enough
space for all your data.
- On the source self-hosted TimescaleDB and the target service, ensure that you are running:
- The same major version of Postgres.
For information, see [upgrade Postgres][upgrading-postgresql-self-hosted].
- The same major version of TimescaleDB
For more information, see [Upgrade TimescaleDB to a major version][upgrading-timescaledb].
Migrate your data to a service
To move your data from self-hosted TimescaleDB instance to a service, run the following commands from your migration machine:
- Take offline the applications that connect to the source self-hosted TimescaleDB instance
The duration of migration is proportional to the amount of data stored in your database. By disconnecting your app from your database, you avoid possible data loss.
- Set your connection strings
These variables hold the connection information for the source self-hosted TimescaleDB instance and the target service:
Dump the data from your source Tiger Cloud service
Put your target service in the right state for restoring
Upload your data to the target service
The --jobs option specifies the number of CPUs to use to dump and restore the database concurrently.
Return your target service to normal operations
Connect to your new database and update your table statistics by running [
ANALYZE] [analyze] on your entire dataset:
To migrate from multiple databases, you repeat this migration procedure one database after another.
If you see the following errors during migration, you can safely ignore them. The migration still runs successfully.
===== PAGE: https://docs.tigerdata.com/mst/restapi/ =====
Examples:
Example 1 (bash):
export SOURCE="postgres://<user>:<password>@<source host>:<source port>/<db_name>"
   export TARGET="postgres://tsdbadmin:<password>@<host>:<port>/defaultdb?sslmode=require"
Example 2 (bash):
pg_dump -d "source" --no-owner -Fc -v -f dump.bak
Example 3 (bash):
psql -d "target" -c "SELECT timescaledb_pre_restore();"
Example 4 (bash):
pg_restore -d "target" --jobs 4 -Fc dump.bak
Install TimescaleDB on Windows
URL: llms-txt#install-timescaledb-on-windows
Contents:
- Prerequisites
- Install and configure TimescaleDB on Postgres
- Add the TimescaleDB extension to your database
- Supported platforms
- Where to next
TimescaleDB is a Postgres extension for time series and demanding workloads that ingest and query high volumes of data.
This section shows you how to:
- [Install and configure TimescaleDB on Postgres][install-timescaledb]: set up a self-hosted Postgres instance to efficiently run TimescaleDB.
- [Add the TimescaleDB extension to your database][add-timescledb-extension]: enable TimescaleDB features and performance improvements on a database.
The following instructions are for development and testing installations. For a production environment, we strongly recommend that you implement the following, many of which you can achieve using Postgres tooling:
- Incremental backup and database snapshots, with efficient point-in-time recovery.
- High availability replication, ideally with nodes across multiple availability zones.
- Automatic failure detection with fast restarts, for both non-replicated and replicated deployments.
- Asynchronous replicas for scaling reads when needed.
- Connection poolers for scaling client connections.
- Zero-down-time minor version and extension upgrades.
- Forking workflows for major version upgrades and other feature testing.
- Monitoring and observability.
Deploying for production? With a Tiger Cloud service we tune your database for performance and handle scalability, high availability, backups, and management, so you can relax.
To install TimescaleDB on your Windows device, you need:
For TimescaleDB v2.14.1 only, you need to install OpenSSL v1.1.1.
- [Visual C++ Redistributable for Visual Studio 2015][ms-download]
Install and configure TimescaleDB on Postgres
This section shows you how to install the latest version of Postgres and TimescaleDB on a [supported platform][supported-platforms] using the packages supplied by Tiger Data.
If you have previously installed Postgres without a package manager, you may encounter errors following these install instructions. Best practice is to full remove any existing Postgres installations before you begin.
To keep your current Postgres installation, [Install from source][install-from-source].
Install the latest version of Postgres and psql
Download [Postgres][pg-download], then run the installer.
In the
Select Componentsdialog, checkCommand Line Tools, along with any other componentsyou want to install, and click `Next`.Complete the installation wizard.
Check that you can run
pg_config.If you cannot run `pg_config` from the command line, in the Windows Search tool, enter `system environment variables`. The path should be `C:\Program Files\PostgreSQL\<version>\bin`.Install TimescaleDB
Unzip the [TimescaleDB installer][supported-platforms] to
<install_dir>, that is, your selected directory.
Best practice is to use the latest version.
In
<install_dir>\timescaledb, right-clicksetup.exe, then chooseRun as Administrator.Complete the installation wizard.
If you see an error like could not load library "C:/Program Files/PostgreSQL/17/lib/timescaledb-2.17.2.dll": The specified module could not be found., use
[Dependencies][dependencies] to ensure that your system can find the compatible DLLs for this release of TimescaleDB.
- Tune your Postgres instance for TimescaleDB
Run the timescaledb-tune script included in the timescaledb-tools package with TimescaleDB. For more
information, see [configuration][config].
- Log in to Postgres as
postgres
You are in the psql shell.
- Set the password for
postgres
When you have set the password, type \q to exit psql.
Add the TimescaleDB extension to your database
For improved performance, you enable TimescaleDB on each database on your self-hosted Postgres instance.
This section shows you how to enable TimescaleDB for a new database in Postgres using psql from the command line.
- Connect to a database on your Postgres instance
In Postgres, the default user and database are both postgres. To use a
different database, set <database-name> to the name of that database:
Add TimescaleDB to the database
Check that TimescaleDB is installed
You see the list of installed extensions:
Press q to exit the list of extensions.
And that is it! You have TimescaleDB running on a database on a self-hosted instance of Postgres.
Supported platforms
The latest TimescaleDB releases for Postgres are:
Postgres 17: TimescaleDB release
Postgres 16: TimescaleDB release
Postgres 15: TimescaleDB release
You can deploy TimescaleDB on the following systems:
| Operation system | Version |
|---|---|
| Microsoft Windows | 10, 11 |
| Microsoft Windows Server | 2019, 2020 |
For release information, see the [GitHub releases page][gh-releases] and the [release notes][release-notes].
What next? [Try the key features offered by Tiger Data][try-timescale-features], see the [tutorials][tutorials], interact with the data in your Tiger Cloud service using [your favorite programming language][connect-with-code], integrate your Tiger Cloud service with a range of [third-party tools][integrations], plain old [Use Tiger Data products][use-timescale], or dive into the [API reference][use-the-api].
===== PAGE: https://docs.tigerdata.com/self-hosted/install/installation-cloud-image/ =====
Examples:
Example 1 (bash):
sudo -u postgres psql
Example 2 (bash):
\password postgres
Example 3 (bash):
psql -d "postgres://<username>:<password>@<host>:<port>/<database-name>"
Example 4 (sql):
CREATE EXTENSION IF NOT EXISTS timescaledb;
TimescaleDB API reference
URL: llms-txt#timescaledb-api-reference
Contents:
- APIReference
TimescaleDB provides many SQL functions and views to help you interact with and manage your data. See a full list below or search by keyword to find reference documentation for a specific API.
Refer to the installation documentation for detailed setup instructions.
===== PAGE: https://docs.tigerdata.com/api/rollup/ =====
Upgrade TimescaleDB
URL: llms-txt#upgrade-timescaledb
A major upgrade is when you update from TimescaleDB X.<minor version> to Y.<minor version>.
A minor upgrade is when you update from TimescaleDB <major version>.x, to TimescaleDB <major version>.y.
You upgrade your self-hosted TimescaleDB installation in-place.
Tiger Cloud is a fully managed service with automatic backup and restore, high availability with replication, seamless scaling and resizing, and much more. You can try Tiger Cloud free for thirty days.
This section shows you how to:
- Upgrade self-hosted TimescaleDB to a new [minor version][upgrade-minor].
- Upgrade self-hosted TimescaleDB to a new [major version][upgrade-major].
- Upgrade self-hosted TimescaleDB running in a [Docker container][upgrade-docker] to a new minor version.
- Upgrade [Postgres][upgrade-pg] to a new version.
- Downgrade self-hosted TimescaleDB to the [previous minor version][downgrade].
===== PAGE: https://docs.tigerdata.com/self-hosted/uninstall/ =====
Ongoing physical backups with Docker & WAL-E
URL: llms-txt#ongoing-physical-backups-with-docker-&-wal-e
Contents:
- Run the TimescaleDB container in Docker
- Running the TimescaleDB container in Docker
- Perform the backup using the WAL-E sidecar
- Performing the backup using the WAL-E sidecar
- Recovery
- Restoring database files from backup
- Relaunch the recovered database
When you run TimescaleDB in a containerized environment, you can use
[continuous archiving][pg archiving] with a [WAL-E][wale official] container.
These containers are sometimes referred to as sidecars, because they run
alongside the main container. A [WAL-E sidecar image][wale image]
works with TimescaleDB as well as regular Postgres. In this section, you
can set up archiving to your local filesystem with a main TimescaleDB
container called timescaledb, and a WAL-E sidecar called wale. When you are
ready to implement this in your production deployment, you can adapt the
instructions here to do archiving against cloud providers such as AWS S3, and
run it in an orchestration framework such as Kubernetes.
Tiger Cloud is a fully managed service with automatic backup and restore, high availability with replication, seamless scaling and resizing, and much more. You can try Tiger Cloud free for thirty days.
Run the TimescaleDB container in Docker
To make TimescaleDB use the WAL-E sidecar for archiving, the two containers need
to share a network. To do this, you need to create a Docker network and then
launch TimescaleDB with archiving turned on, using the newly created network.
When you launch TimescaleDB, you need to explicitly set the location of the
write-ahead log (POSTGRES_INITDB_WALDIR) and data directory (PGDATA) so that
you can share them with the WAL-E sidecar. Both must reside in a Docker volume,
by default a volume is created for /var/lib/postgresql/data. When you have
started TimescaleDB, you can log in and create tables and data.
This section describes a feature that is deprecated. We strongly recommend that you do not use this feature in a production environment. If you need more information, contact us.
Running the TimescaleDB container in Docker
Create the docker container:
Launch TimescaleDB, with archiving turned on:
Run TimescaleDB within Docker:
Perform the backup using the WAL-E sidecar
The [WAL-E Docker image][wale image] runs a web endpoint that accepts WAL-E commands across an HTTP API. This allows Postgres to communicate with the WAL-E sidecar over the internal network to trigger archiving. You can also use the container to invoke WAL-E directly. The Docker image accepts standard WAL-E environment variables to configure the archiving backend, so you can issue commands from services such as AWS S3. For information about configuring, see the official [WAL-E documentation][wale official].
To enable the WAL-E docker image to perform archiving, it needs to use the same
network and data volumes as the TimescaleDB container. It also needs to know the
location of the write-ahead log and data directories. You can pass all this
information to WAL-E when you start it. In this example, the WAL-E image listens
for commands on the timescaledb-net internal network at port 80, and writes
backups to ~/backups on the Docker host.
Performing the backup using the WAL-E sidecar
Start the WAL-E container with the required information about the container. In this example, the container is called
timescaledb-wale:Start the backup:
Alternatively, you can start the backup using the sidecar's HTTP endpoint.
This requires exposing the sidecar's port 80 on the Docker host by mapping
it to an open port. In this example, it is mapped to port 8080:
You should do base backups at regular intervals daily, to minimize the amount of WAL-E replay, and to make recoveries faster. To make new base backups, re-trigger a base backup as shown here, either manually or on a schedule. If you run TimescaleDB on Kubernetes, there is built-in support for scheduling cron jobs that can invoke base backups using the WAL-E container's HTTP API.
To recover the database instance from the backup archive, create a new TimescaleDB container, and restore the database and configuration files from the base backup. Then you can relaunch the sidecar and the database.
Restoring database files from backup
Create the docker container:
Restore the database files from the base backup:
Recreate the configuration files. These are backed up from the original database instance:
Create a
recovery.conffile that tells Postgres how to recover:
When you have recovered the data and the configuration files, and have created a recovery configuration file, you can relaunch the sidecar. You might need to remove the old one first. When you relaunch the sidecar, it replays the last WAL segments that might be missing from the base backup. The you can relaunch the database, and check that recovery was successful.
Relaunch the recovered database
Relaunch the WAL-E sidecar:
Relaunch the TimescaleDB docker container:
Verify that the database started up and recovered successfully:
Don't worry if you see some archive recovery errors in the log at this
stage. This happens because the recovery is not completely finalized until
no more files can be found in the archive. See the Postgres documentation
on [continuous archiving][pg archiving] for more information.
===== PAGE: https://docs.tigerdata.com/self-hosted/uninstall/uninstall-timescaledb/ =====
Examples:
Example 1 (bash):
docker network create timescaledb-net
Example 2 (bash):
docker run \
      --name timescaledb \
      --network timescaledb-net \
      -e POSTGRES_PASSWORD=insecure \
      -e POSTGRES_INITDB_WALDIR=/var/lib/postgresql/data/pg_wal \
      -e PGDATA=/var/lib/postgresql/data/pg_data \
      timescale/timescaledb:latest-pg10 postgres \
      -cwal_level=archive \
      -carchive_mode=on \
      -carchive_command="/usr/bin/wget wale/wal-push/%f -O -" \
      -carchive_timeout=600 \
      -ccheckpoint_timeout=700 \
      -cmax_wal_senders=1
Example 3 (bash):
docker exec -it timescaledb psql -U postgres
Example 4 (bash):
docker run \
      --name wale \
      --network timescaledb-net \
      --volumes-from timescaledb \
      -v ~/backups:/backups \
      -e WALE_LOG_DESTINATION=stderr \
      -e PGWAL=/var/lib/postgresql/data/pg_wal \
      -e PGDATA=/var/lib/postgresql/data/pg_data \
      -e PGHOST=timescaledb \
      -e PGPASSWORD=insecure \
      -e PGUSER=postgres \
      -e WALE_FILE_PREFIX=file://localhost/backups \
      timescale/timescaledb-wale:latest
Install TimescaleDB on Docker
URL: llms-txt#install-timescaledb-on-docker
Contents:
- Prerequisites
- Install and configure TimescaleDB on Postgres
- More Docker options
- View logs in Docker
- More Docker options
- View logs in Docker
- Where to next
TimescaleDB is a Postgres extension for time series and demanding workloads that ingest and query high volumes of data. You can install a TimescaleDB instance on any local system from a pre-built Docker container.
This section shows you how to Install and configure TimescaleDB on Postgres.
The following instructions are for development and testing installations. For a production environment, we strongly recommend that you implement the following, many of which you can achieve using Postgres tooling:
- Incremental backup and database snapshots, with efficient point-in-time recovery.
- High availability replication, ideally with nodes across multiple availability zones.
- Automatic failure detection with fast restarts, for both non-replicated and replicated deployments.
- Asynchronous replicas for scaling reads when needed.
- Connection poolers for scaling client connections.
- Zero-down-time minor version and extension upgrades.
- Forking workflows for major version upgrades and other feature testing.
- Monitoring and observability.
Deploying for production? With a Tiger Cloud service we tune your database for performance and handle scalability, high availability, backups, and management, so you can relax.
To run, and connect to a Postgres installation on Docker, you need to install:
- [Docker][docker-install]
- [psql][install-psql]
Install and configure TimescaleDB on Postgres
This section shows you how to install the latest version of Postgres and TimescaleDB on a supported platform using containers supplied by Tiger Data.
- Run the TimescaleDB Docker image
The TimescaleDB HA Docker image offers the most complete
TimescaleDB experience. It uses [Ubuntu][ubuntu], includes
[TimescaleDB Toolkit](https://github.com/timescale/timescaledb-toolkit), and support for PostGIS and Patroni.
To install the latest release based on Postgres 17:
TimescaleDB is pre-created in the default Postgres database and is added by default to any new database you create in this image.
- Run the container
Replace </a/local/data/folder> with the path to the folder you want to keep your data in the following command.
If you are running multiple container instances, change the port each Docker instance runs on.
On UNIX-based systems, Docker modifies Linux IP tables to bind the container. If your system uses Linux Uncomplicated Firewall (UFW), Docker may
[override your UFW port binding settings][override-binding]. To prevent this, add `DOCKER_OPTS="--iptables=false"` to `/etc/default/docker`.
- Connect to a database on your Postgres instance
The default user and database are both postgres. You set the password in POSTGRES_PASSWORD in the previous step. The default command to connect to Postgres is:
- Check that TimescaleDB is installed
You see the list of installed extensions:
Press q to exit the list of extensions.
More Docker options
If you want to access the container from the host but avoid exposing it to the
outside world, you can bind to 127.0.0.1 instead of the public interface, using this command:
If you don't want to install psql and other Postgres client tools locally,
or if you are using a Microsoft Windows host system, you can connect using the
version of psql that is bundled within the container with this command:
When you install TimescaleDB using a Docker container, the Postgres settings
are inherited from the container. In most cases, you do not need to adjust them.
However, if you need to change a setting, you can add -c setting=value to your
Docker run command. For more information, see the
[Docker documentation][docker-postgres].
The link provided in these instructions is for the latest version of TimescaleDB on Postgres 17. To find other Docker tags you can use, see the [Dockerhub repository][dockerhub].
View logs in Docker
If you have TimescaleDB installed in a Docker container, you can view your logs
using Docker, instead of looking in /var/lib/logs or /var/logs. For more
information, see the [Docker documentation on logs][docker-logs].
- Run the TimescaleDB Docker image
The light-weight TimescaleDB Docker image uses [Alpine][alpine] and does not contain TimescaleDB Toolkit or support for PostGIS and Patroni.
To install the latest release based on Postgres 17:
TimescaleDB is pre-created in the default Postgres database and added by default to any new database you create in this image.
- Run the container
If you are running multiple container instances, change the port each Docker instance runs on.
On UNIX-based systems, Docker modifies Linux IP tables to bind the container. If your system uses Linux Uncomplicated Firewall (UFW), Docker may [override your UFW port binding settings][override-binding]. To prevent this, add DOCKER_OPTS="--iptables=false" to /etc/default/docker.
- Connect to a database on your Postgres instance
The default user and database are both postgres. You set the password in POSTGRES_PASSWORD in the previous step. The default command to connect to Postgres in this image is:
- Check that TimescaleDB is installed
You see the list of installed extensions:
Press q to exit the list of extensions.
More Docker options
If you want to access the container from the host but avoid exposing it to the
outside world, you can bind to 127.0.0.1 instead of the public interface, using this command:
If you don't want to install psql and other Postgres client tools locally,
or if you are using a Microsoft Windows host system, you can connect using the
version of psql that is bundled within the container with this command:
Existing containers can be stopped using docker stop and started again with
docker start while retaining their volumes and data. When you create a new
container using the docker run command, by default you also create a new data
volume. When you remove a Docker container with docker rm, the data volume
persists on disk until you explicitly delete it. You can use the docker volume
ls command to list existing docker volumes. If you want to store the data from
your Docker container in a host directory, or you want to run the Docker image
on top of an existing data directory, you can specify the directory to mount a
data volume using the -v flag:
When you install TimescaleDB using a Docker container, the Postgres settings
are inherited from the container. In most cases, you do not need to adjust them.
However, if you need to change a setting, you can add -c setting=value to your
Docker run command. For more information, see the
[Docker documentation][docker-postgres].
The link provided in these instructions is for the latest version of TimescaleDB on Postgres 16. To find other Docker tags you can use, see the [Dockerhub repository][dockerhub].
View logs in Docker
If you have TimescaleDB installed in a Docker container, you can view your logs
using Docker, instead of looking in /var/log. For more
information, see the [Docker documentation on logs][docker-logs].
And that is it! You have TimescaleDB running on a database on a self-hosted instance of Postgres.
What next? [Try the key features offered by Tiger Data][try-timescale-features], see the [tutorials][tutorials], interact with the data in your Tiger Cloud service using [your favorite programming language][connect-with-code], integrate your Tiger Cloud service with a range of [third-party tools][integrations], plain old [Use Tiger Data products][use-timescale], or dive into the [API reference][use-the-api].
===== PAGE: https://docs.tigerdata.com/self-hosted/replication-and-ha/configure-replication/ =====
Examples:
Example 1 (unknown):
docker pull timescale/timescaledb-ha:pg17
Example 2 (unknown):
docker run -d --name timescaledb -p 5432:5432 -v </a/local/data/folder>:/pgdata -e PGDATA=/pgdata -e POSTGRES_PASSWORD=password timescale/timescaledb-ha:pg17
Example 3 (bash):
psql -d "postgres://postgres:password@localhost/postgres"
Example 4 (sql):
\dx
Physical backups
URL: llms-txt#physical-backups
For full instance physical backups (which are especially useful for starting up
new [replicas][replication-tutorial]), [pg_basebackup][postgres-pg_basebackup]
works with all TimescaleDB installation types. You can also use any of several
external backup and restore managers such as [pg_backrest][pg-backrest], or [barman][pg-barman]. For ongoing physical backups, you can use
[wal-e][wale], although this method is now deprecated. These tools all allow
you to take online, physical backups of your entire instance, and many offer
incremental backups and other automation options.
Tiger Cloud is a fully managed service with automatic backup and restore, high availability with replication, seamless scaling and resizing, and much more. You can try Tiger Cloud free for thirty days.
===== PAGE: https://docs.tigerdata.com/self-hosted/backup-and-restore/docker-and-wale/ =====
Can't access file "timescaledb" after installation
URL: llms-txt#can't-access-file-"timescaledb"-after-installation
If your Postgres logs have this error preventing it from starting up,
you should double check that the TimescaleDB files have been installed
to the correct location. Our installation methods use pg_config to
get Postgres's location. However if you have multiple versions of
Postgres installed on the same machine, the location pg_config
points to may not be for the version you expect. To check which
version TimescaleDB used:
If that is the correct version, double check that the installation path is
the one you'd expect. For example, for Postgres 11.0 installed via
Homebrew on macOS it should be /usr/local/Cellar/postgresql/11.0/bin:
If either of those steps is not the version you are expecting, you need
to either (a) uninstall the incorrect version of Postgres if you can or
(b) update your PATH environmental variable to have the correct
path of pg_config listed first, that is, by prepending the full path:
Then, reinstall TimescaleDB and it should find the correct installation path.
===== PAGE: https://docs.tigerdata.com/_troubleshooting/self-hosted/update-error-third-party-tool/ =====
Examples:
Example 1 (bash):
$ pg_config --version
PostgreSQL 12.3
Example 2 (bash):
$ pg_config --bindir
/usr/local/Cellar/postgresql/11.0/bin
Example 3 (bash):
export PATH = /usr/local/Cellar/postgresql/11.0/bin:$PATH
Install TimescaleDB on macOS
URL: llms-txt#install-timescaledb-on-macos
Contents:
- Prerequisites
- Install and configure TimescaleDB on Postgres
- Add the TimescaleDB extension to your database
- Supported platforms
- Where to next
TimescaleDB is a Postgres extension for time series and demanding workloads that ingest and query high volumes of data. You can host TimescaleDB on macOS device.
This section shows you how to:
- Install and configure TimescaleDB on Postgres - set up a self-hosted Postgres instance to efficiently run TimescaleDB.
- Add the TimescaleDB extension to your database - enable TimescaleDB features and performance improvements on a database.
The following instructions are for development and testing installations. For a production environment, we strongly recommend that you implement the following, many of which you can achieve using Postgres tooling:
- Incremental backup and database snapshots, with efficient point-in-time recovery.
- High availability replication, ideally with nodes across multiple availability zones.
- Automatic failure detection with fast restarts, for both non-replicated and replicated deployments.
- Asynchronous replicas for scaling reads when needed.
- Connection poolers for scaling client connections.
- Zero-down-time minor version and extension upgrades.
- Forking workflows for major version upgrades and other feature testing.
- Monitoring and observability.
Deploying for production? With a Tiger Cloud service we tune your database for performance and handle scalability, high availability, backups, and management, so you can relax.
To install TimescaleDB on your MacOS device, you need:
- [Postgres][install-postgresql]: for the latest functionality, install Postgres v16
If you have already installed Postgres using a method other than Homebrew or MacPorts, you may encounter errors following these install instructions. Best practice is to full remove any existing Postgres installations before you begin.
To keep your current Postgres installation, [Install from source][install-from-source].
Install and configure TimescaleDB on Postgres
This section shows you how to install the latest version of Postgres and TimescaleDB on a supported platform using the packages supplied by Tiger Data.
- Install Homebrew, if you don't already have it:
For more information about Homebrew, including installation instructions,
see the [Homebrew documentation][homebrew].
At the command prompt, add the TimescaleDB Homebrew tap:
Install TimescaleDB and psql:
Update your path to include psql.
On Intel chips, the symbolic link is added to /usr/local/bin. On Apple
Silicon, the symbolic link is added to `/opt/homebrew/bin`.
Run the
timescaledb-tunescript to configure your database:Change to the directory where the setup script is located. It is typically, located at
/opt/homebrew/Cellar/timescaledb/<VERSION>/bin/, where<VERSION>is the version oftimescaledbthat you installed:Run the setup script to complete installation.
Log in to Postgres as
postgres
You are in the psql shell.
- Set the password for
postgres
When you have set the password, type \q to exit psql.
- Install MacPorts by downloading and running the package installer.
For more information about MacPorts, including installation instructions,
see the [MacPorts documentation][macports].
- Install TimescaleDB and psql:
To view the files installed, run:
MacPorts does not install the timescaledb-tools package or run the timescaledb-tune
script. For more information about tuning your database, see the [TimescaleDB tuning tool][timescale-tuner].
- Log in to Postgres as
postgres
You are in the psql shell.
- Set the password for
postgres
When you have set the password, type \q to exit psql.
Add the TimescaleDB extension to your database
For improved performance, you enable TimescaleDB on each database on your self-hosted Postgres instance.
This section shows you how to enable TimescaleDB for a new database in Postgres using psql from the command line.
- Connect to a database on your Postgres instance
In Postgres, the default user and database are both postgres. To use a
different database, set <database-name> to the name of that database:
Add TimescaleDB to the database
Check that TimescaleDB is installed
You see the list of installed extensions:
Press q to exit the list of extensions.
And that is it! You have TimescaleDB running on a database on a self-hosted instance of Postgres.
Supported platforms
You can deploy TimescaleDB on the following systems:
| Operation system | Version |
|---|---|
| macOS | From 10.15 Catalina to 14 Sonoma |
For the latest functionality, install MacOS 14 Sonoma.
What next? [Try the key features offered by Tiger Data][try-timescale-features], see the [tutorials][tutorials], interact with the data in your Tiger Cloud service using [your favorite programming language][connect-with-code], integrate your Tiger Cloud service with a range of [third-party tools][integrations], plain old [Use Tiger Data products][use-timescale], or dive into the [API reference][use-the-api].
===== PAGE: https://docs.tigerdata.com/self-hosted/install/installation-kubernetes/ =====
Examples:
Example 1 (bash):
/bin/bash -c "$(curl -fsSL https://raw.githubusercontent.com/Homebrew/install/HEAD/install.sh)"
Example 2 (bash):
brew tap timescale/tap
Example 3 (bash):
brew install timescaledb libpq
Example 4 (bash):
brew link --force libpq
Install TimescaleDB from source
URL: llms-txt#install-timescaledb-from-source
Contents:
- Prerequisites
- Install and configure TimescaleDB on Postgres
- Add the TimescaleDB extension to your database
- Where to next
TimescaleDB is a Postgres extension for time series and demanding workloads that ingest and query high volumes of data. You can install a TimescaleDB instance on any local system, from source.
This section shows you how to:
- Install and configure TimescaleDB on Postgres - set up a self-hosted Postgres instance to efficiently run TimescaleDB1.
- Add the TimescaleDB extension to your database - enable TimescaleDB features and performance improvements on a database.
The following instructions are for development and testing installations. For a production environment, we strongly recommend that you implement the following, many of which you can achieve using Postgres tooling:
- Incremental backup and database snapshots, with efficient point-in-time recovery.
- High availability replication, ideally with nodes across multiple availability zones.
- Automatic failure detection with fast restarts, for both non-replicated and replicated deployments.
- Asynchronous replicas for scaling reads when needed.
- Connection poolers for scaling client connections.
- Zero-down-time minor version and extension upgrades.
- Forking workflows for major version upgrades and other feature testing.
- Monitoring and observability.
Deploying for production? With a Tiger Cloud service we tune your database for performance and handle scalability, high availability, backups, and management, so you can relax.
To install TimescaleDB from source, you need the following on your developer environment:
Install a [supported version of Postgres][compatibility-matrix] using the [Postgres installation instructions][postgres-download].
We recommend not using TimescaleDB with Postgres 17.1, 16.5, 15.9, 14.14, 13.17, 12.21.
These minor versions [introduced a breaking binary interface change][postgres-breaking-change] that,
once identified, was reverted in subsequent minor Postgres versions 17.2, 16.6, 15.10, 14.15, 13.18, and 12.22.
When you build from source, best practice is to build with Postgres 17.2, 16.6, etc and higher.
Users of [Tiger Cloud](https://console.cloud.timescale.com/) and Platform packages built and
distributed by Tiger Data are unaffected.
- [CMake version 3.11 or later][cmake-download]
- C language compiler for your operating system, such as
gccorclang.
- C language compiler for your operating system, such as
If you are using a Microsoft Windows system, you can install Visual Studio 2015
  or later instead of CMake and a C language compiler. Ensure you install the
  Visual Studio components for CMake and Git when you run the installer.
Install and configure TimescaleDB on Postgres
This section shows you how to install the latest version of Postgres and TimescaleDB on a supported platform using source supplied by Tiger Data.
Install the latest Postgres source
At the command prompt, clone the TimescaleDB GitHub repository:
Change into the cloned directory:
Checkout the latest release. You can find the latest release tag on
our [Releases page][gh-releases]:
This command produces an error that you are now in detached head state. It
    is expected behavior, and it occurs because you have checked out a tag, and
    not a branch. Continue with the steps in this procedure as normal.
Build the source
Bootstrap the build system:
For installation on Microsoft Windows, you might need to add the pg_config
    and `cmake` file locations to your path. In the Windows Search tool, search
    for `system environment variables`. The path for `pg_config` should be
    `C:\Program Files\PostgreSQL\<version>\bin`. The path for `cmake` is within
    the Visual Studio directory.
- Build the extension:
- Install TimescaleDB
- Configure Postgres
If you have more than one version of Postgres installed, TimescaleDB can only
be associated with one of them. The TimescaleDB build scripts use `pg_config` to
find out where Postgres stores its extension files, so you can use `pg_config`
to find out which Postgres installation TimescaleDB is using.
Locate the
postgresql.confconfiguration file:Open the
postgresql.conffile and updateshared_preload_librariesto:
If you use other preloaded libraries, make sure they are comma separated.
- Tune your Postgres instance for TimescaleDB
This script is included with the timescaledb-tools package when you install TimescaleDB.
For more information, see [configuration][config].
- Restart the Postgres instance:
Set the user password
Log in to Postgres as
postgres
You are in the psql shell.
- Set the password for
postgres
When you have set the password, type \q to exit psql.
Add the TimescaleDB extension to your database
For improved performance, you enable TimescaleDB on each database on your self-hosted Postgres instance.
This section shows you how to enable TimescaleDB for a new database in Postgres using psql from the command line.
- Connect to a database on your Postgres instance
In Postgres, the default user and database are both postgres. To use a
different database, set <database-name> to the name of that database:
Add TimescaleDB to the database
Check that TimescaleDB is installed
You see the list of installed extensions:
Press q to exit the list of extensions.
And that is it! You have TimescaleDB running on a database on a self-hosted instance of Postgres.
What next? [Try the key features offered by Tiger Data][try-timescale-features], see the [tutorials][tutorials], interact with the data in your Tiger Cloud service using [your favorite programming language][connect-with-code], integrate your Tiger Cloud service with a range of [third-party tools][integrations], plain old [Use Tiger Data products][use-timescale], or dive into the [API reference][use-the-api].
===== PAGE: https://docs.tigerdata.com/self-hosted/install/installation-linux/ =====
Examples:
Example 1 (bash):
git clone https://github.com/timescale/timescaledb
Example 2 (bash):
cd timescaledb
Example 3 (bash):
git checkout 2.17.2
Example 4 (bash):
./bootstrap
Integrate Tableau and Tiger
URL: llms-txt#integrate-tableau-and-tiger
Contents:
- Prerequisites
- Add your Tiger Cloud service as a virtual connection
[Tableau][tableau] is a popular analytics platform that helps you gain greater intelligence about your business. You can use it to visualize data stored in Tiger Cloud.
To follow the steps on this page:
- Create a target [Tiger Cloud service][create-service] with the Real-time analytics capability.
You need [your connection details][connection-info]. This procedure also works for [self-hosted TimescaleDB][enable-timescaledb].
- Install [Tableau Server][tableau-server] or sign up for [Tableau Cloud][tableau-cloud].
Add your Tiger Cloud service as a virtual connection
To connect the data in your Tiger Cloud service to Tableau:
Log in to Tableau
- Tableau Cloud: [sign in][tableau-login], then click
Exploreand select a project. - Tableau Desktop: sign in, then open a workbook.
- Tableau Cloud: [sign in][tableau-login], then click
Configure Tableau to connect to your Tiger Cloud service
- Add a new data source:
- Tableau Cloud: click
New>Virtual Connection. - Tableau Desktop: click
Data>New Data Source.
- Tableau Cloud: click
- Search for and select
PostgreSQL.
- Add a new data source:
For Tableau Desktop download the driver and restart Tableau.
1. Configure the connection:
    - `Server`, `Port`, `Database`, `Username`, `Password`: configure using your [connection details][connection-info].
    - `Require SSL`: tick the checkbox.
- Click
Sign Inand connect Tableau to your service
You have successfully integrated Tableau with Tiger Cloud.
===== PAGE: https://docs.tigerdata.com/integrations/apache-kafka/ =====
High availability with multi-node
URL: llms-txt#high-availability-with-multi-node
Contents:
- Native replication
- Automation
- Configuring native replication
- Node failures
[Multi-node support is sunsetted][multi-node-deprecation].
TimescaleDB v2.13 is the last release that includes multi-node support for Postgres versions 13, 14, and 15.
A multi-node installation of TimescaleDB can be made highly available by setting up one or more standbys for each node in the cluster, or by natively replicating data at the chunk level.
Using standby nodes relies on streaming replication and you set it up in a similar way to [configuring single-node HA][single-ha], although the configuration needs to be applied to each node independently.
To replicate data at the chunk level, you can use the built-in capabilities of multi-node TimescaleDB to avoid having to replicate entire data nodes. The access node still relies on a streaming replication standby, but the data nodes need no additional configuration. Instead, the existing pool of data nodes share responsibility to host chunk replicas and handle node failures.
There are advantages and disadvantages to each approach. Setting up standbys for each node in the cluster ensures that standbys are identical at the instance level, and this is a tried and tested method to provide high availability. However, it also requires more setting up and maintenance for the mirror cluster.
Native replication typically requires less resources, nodes, and configuration, and takes advantage of built-in capabilities, such as adding and removing data nodes, and different replication factors on each distributed hypertable. However, only chunks are replicated on the data nodes.
The rest of this section discusses native replication. To set up standbys for each node, follow the instructions for [single node HA][single-ha].
Native replication
Native replication is a set of capabilities and APIs that allow you to build a highly available multi-node TimescaleDB installation. At the core of native replication is the ability to write copies of a chunk to multiple data nodes in order to have alternative chunk replicas in case of a data node failure. If one data node fails, its chunks should be available on at least one other data node. If a data node is permanently lost, a new data node can be added to the cluster, and lost chunk replicas can be re-replicated from other data nodes to reach the number of desired chunk replicas.
Native replication in TimescaleDB is under development and currently lacks functionality for a complete high-availability solution. Some functionality described in this section is still experimental. For production environments, we recommend setting up standbys for each node in a multi-node cluster.
Similar to how high-availability configurations for single-node Postgres uses a system like Patroni for automatically handling fail-over, native replication requires an external entity to orchestrate fail-over, chunk re-replication, and data node management. This orchestration is not provided by default in TimescaleDB and therefore needs to be implemented separately. The sections below describe how to enable native replication and the steps involved to implement high availability in case of node failures.
Configuring native replication
The first step to enable native replication is to configure a standby for the access node. This process is identical to setting up a [single node standby][single-ha].
The next step is to enable native replication on a distributed
hypertable. Native replication is governed by the
replication_factor, which determines how many data nodes a chunk is
replicated to. This setting is configured separately for each
hypertable, which means the same database can have some distributed
hypertables that are replicated and others that are not.
By default, the replication factor is set to 1, so there is no
native replication. You can increase this number when you create the
hypertable. For example, to replicate the data across a total of three
data nodes:
Alternatively, you can use the
[set_replication_factor][set_replication_factor] call to change the
replication factor on an existing distributed hypertable. Note,
however, that only new chunks are replicated according to the
updated replication factor. Existing chunks need to be re-replicated
by copying those chunks to new data nodes (see the node
failures section below).
When native replication is enabled, the replication happens whenever
you write data to the table. On every INSERT and COPY call, each
row of the data is written to multiple data nodes. This means that you
don't need to do any extra steps to have newly ingested data
replicated. When you query replicated data, the query planner only
includes one replica of each chunk in the query plan.
When a data node fails, inserts that attempt to write to the failed
node result in an error. This is to preserve data consistency in
case the data node becomes available again. You can use the
[alter_data_node][alter_data_node] call to mark a failed data node
as unavailable by running this query:
Setting available => false means that the data node is no longer
used for reads and writes queries.
To fail over reads, the [alter_data_node][alter_data_node] call finds
all the chunks for which the unavailable data node is the primary query
target and fails over to a chunk replica on another data node.
However, if some chunks do not have a replica to fail over to, a warning
is raised. Reads continue to fail for chunks that do not have a chunk
replica on any other data nodes.
To fail over writes, any activity that intends to write to the failed node marks the involved chunk as stale for the specific failed node by changing the metadata on the access node. This is only done for natively replicated chunks. This allows you to continue to write to other chunk replicas on other data nodes while the failed node has been marked as unavailable. Writes continue to fail for chunks that do not have a chunk replica on any other data nodes. Also note that chunks on the failed node which do not get written into are not affected.
When you mark a chunk as stale, the chunk becomes under-replicated.
When the failed data node becomes available then such chunks can be
re-balanced using the [copy_chunk][copy_chunk] API.
If waiting for the data node to come back is not an option, either because it takes too long or the node is permanently failed, one can delete it instead. To be able to delete a data node, all of its chunks must have at least one replica on other data nodes. For example:
Use the force option when you delete the data node if the deletion
means that the cluster no longer achieves the desired replication
factor. This would be the normal case unless the data node has no
chunks or the distributed hypertable has more chunk replicas than the
configured replication factor.
You cannot force the deletion of a data node if it would mean that a multi-node cluster permanently loses data.
When you have successfully removed a failed data node, or marked a failed data node unavailable, some data chunks might lack replicas but queries and inserts work as normal again. However, the cluster stays in a vulnerable state until all chunks are fully replicated.
When you have restored a failed data node or marked it available again, you can see the chunks that need to be replicated with this query:
The output from this query looks like this:
With the information from the chunk replication status view, an under-replicated chunk can be copied to a new node to ensure the chunk has the sufficient number of replicas. For example:
When you restore chunk replication, the operation uses more than one transaction. This means that it cannot be automatically rolled back. If you cancel the operation before it is completed, an operation ID for the copy is logged. You can use this operation ID to clean up any state left by the cancelled operation. For example:
===== PAGE: https://docs.tigerdata.com/self-hosted/multinode-timescaledb/multinode-setup/ =====
Examples:
Example 1 (sql):
SELECT create_distributed_hypertable('conditions', 'time', 'location',
 replication_factor => 3);
Example 2 (sql):
SELECT alter_data_node('data_node_2', available => false);
Example 3 (sql):
SELECT delete_data_node('data_node_2', force => true);
WARNING:  distributed hypertable "conditions" is under-replicated
Example 4 (sql):
SELECT chunk_schema, chunk_name, replica_nodes, non_replica_nodes
FROM timescaledb_experimental.chunk_replication_status
WHERE hypertable_name = 'conditions' AND num_replicas < desired_num_replicas;
Upload a file into your service using the terminal
URL: llms-txt#upload-a-file-into-your-service-using-the-terminal
Contents:
- Prerequisites
- Import data into your service
- Prerequisites
- Import data into your service
- Prerequisites
- Import data into your service
This page shows you how to upload CSV, MySQL, and Parquet files from a source machine into your service using the terminal.
The CSV file format is widely used for data migration. This page shows you how to import data into your Tiger Cloud service from a CSV file using the terminal.
To follow the procedure on this page you need to:
- Create a [target Tiger Cloud service][create-service].
This procedure also works for [self-hosted TimescaleDB][enable-timescaledb].
Install Go v1.13 or later
Install [timescaledb-parallel-copy][install-parallel-copy]
[timescaledb-parallel-copy][parallel importer] improves performance for large datasets by parallelizing the import process. It also preserves row order and uses a round-robin approach to optimize memory management and disk operations.
To verify your installation, run timescaledb-parallel-copy --version.
- Ensure that the time column in the CSV file uses the
TIMESTAMPZdata type.
For faster data transfer, best practice is that your target service and the system running the data import are in the same region.
Import data into your service
To import data from a CSV file:
- Set up your service connection string
This variable holds the connection information for the target Tiger Cloud service.
In the terminal on the source machine, set the following:
See where to [find your connection details][connection-info].
- Create a [hypertable][hypertable-docs] to hold your data
Create a hypertable with a schema that is compatible with the data in your parquet file. For example, if your parquet file contains the columns ts, location, and temperature with typesTIMESTAMP, STRING, and DOUBLE:
- TimescaleDB v2.20 and above:
sql
     psql target -c  "CREATE TABLE  ( \
        ts          TIMESTAMPTZ         NOT NULL,  \
        location    TEXT                NOT NULL,  \
        temperature DOUBLE PRECISION    NULL  \
     );"
     sql
     psql target -c  "SELECT create_hypertable('', by_range('<COLUMN_NAME>'))"
     bash
    timescaledb-parallel-copy \
    --connection target \
    --table  \
    --file <FILE_NAME>.csv \
    --workers <NUM_WORKERS> \
    --reporting-period 30s
  bash
   psql target
   \c <DATABASE_NAME>
   \COPY  FROM <FILENAME>.csv CSV"
   bash
export TARGET=postgres://tsdbadmin:@:/tsdb?sslmode=require bash SOURCE="mysql://:@:/?sslmode=require" docker
docker run -it ghcr.io/dimitri/pgloader:latest pgloader
--no-ssl-cert-verification \
"source" \
"target"
bash
export TARGET=postgres://tsdbadmin:@:/tsdb?sslmode=require sql
  psql target -c "CREATE TABLE  ( \
  ts          TIMESTAMPTZ         NOT NULL, \
  location    TEXT                NOT NULL, \
  temperature DOUBLE PRECISION    NULL \
  ) WITH (timescaledb.hypertable, timescaledb.partition_column = 'ts');"
- TimescaleDB v2.19.3 and below:
Create a new regular table:
Convert the empty table to a hypertable:
In the following command, replace with the name of the table you just created, and `<COLUMN_NAME>` with the partitioning column in.
Set up a DuckDB connection to your service
In a terminal on the source machine with your Parquet files, start a new DuckDB interactive session:
Connect to your service in your DuckDB session:
target is the connection string you used to connect to your service using psql.
Import data from Parquet to your service
In DuckDB, upload the table data to your service
Where:
- `
: the hypertable you created to import data to
    -
`: the Parquet file to import data from Exit the DuckDB session:
Verify the data was imported correctly into your service
In your psql session, view the data in ``:
And that is it, you have imported your data from a Parquet file to your Tiger Cloud service.
===== PAGE: https://docs.tigerdata.com/migrate/pg-dump-and-restore/ =====
Examples:
Example 1 (bash):
export TARGET=postgres://tsdbadmin:<PASSWORD>@<HOST>:<PORT>/tsdb?sslmode=require
Example 2 (sql):
psql target -c "CREATE TABLE  ( \
     ts          TIMESTAMPTZ         NOT NULL, \
     location    TEXT                NOT NULL, \
     temperature DOUBLE PRECISION    NULL \
     ) WITH (timescaledb.hypertable, timescaledb.partition_column = 'ts');"

   - TimescaleDB v2.19.3 and below:

     1.  Create a new regular table:
Example 3 (unknown):
1.  Convert the empty table to a hypertable:

         In the following command, replace `` with the name of the table you just created, and `<COLUMN_NAME>` with the partitioning column in ``.
Example 4 (unknown):
1. **Import your data**

   In the folder containing your CSV files, either:

    - Use [timescaledb-parallel-copy][install-parallel-copy]:
Distributed hypertables ( Sunsetted v2.14.x )
URL: llms-txt#distributed-hypertables-(-sunsetted-v2.14.x-)
[Multi-node support is sunsetted][multi-node-deprecation].
TimescaleDB v2.13 is the last release that includes multi-node support for Postgres versions 13, 14, and 15.
Distributed hypertables are an extension of regular hypertables, available when using a [multi-node installation][getting-started-multi-node] of TimescaleDB. Distributed hypertables provide the ability to store data chunks across multiple data nodes for better scale-out performance.
Most management APIs used with regular hypertable chunks also work with distributed hypertables as documented in this section. There are a number of APIs for specifically dealing with data nodes and a special API for executing SQL commands on data nodes.
===== PAGE: https://docs.tigerdata.com/self-hosted/install/ =====
TimescaleDB configuration and tuning
URL: llms-txt#timescaledb-configuration-and-tuning
Contents:
- Query Planning and Execution
timescaledb.enable_chunkwise_aggregation (bool)timescaledb.vectorized_aggregation (bool)timescaledb.enable_merge_on_cagg_refresh (bool)
- Policies
timescaledb.max_background_workers (int)
- Tiger Cloud service tuning
timescaledb.disable_load (bool)
- Administration
timescaledb.restoring (bool)
Just as you can tune settings in Postgres, TimescaleDB provides a number of configuration
settings that may be useful to your specific installation and performance needs. These can
also be set within the postgresql.conf file or as command-line parameters
when starting Postgres.
Query Planning and Execution
timescaledb.enable_chunkwise_aggregation (bool)
If enabled, aggregations are converted into partial aggregations during query planning. The first part of the aggregation is executed on a per-chunk basis. Then, these partial results are combined and finalized. Splitting aggregations decreases the size of the created hash tables and increases data locality, which speeds up queries.
timescaledb.vectorized_aggregation (bool)
Enables or disables the vectorized optimizations in the query executor. For
example, the sum() aggregation function on compressed chunks can be optimized
in this way.
timescaledb.enable_merge_on_cagg_refresh (bool)
Set to ON to dramatically decrease the amount of data written on a continuous aggregate
in the presence of a small number of changes, reduce the i/o cost of refreshing a
[continuous aggregate][continuous-aggregates], and generate fewer Write-Ahead Logs (WAL). Only works for continuous aggregates that don't have compression enabled.
Please refer to the [Grand Unified Configuration (GUC) parameters][gucs] for a complete list.
timescaledb.max_background_workers (int)
Max background worker processes allocated to TimescaleDB. Set to at least 1 + the number of databases loaded with the TimescaleDB extension in a Postgres instance. Default value is 16.
Tiger Cloud service tuning
timescaledb.disable_load (bool)
Disable the loading of the actual extension
timescaledb.restoring (bool)
Set TimescaleDB in restoring mode. It is disabled by default.
timescaledb.license (string)
Change access to features based on the TimescaleDB license in use. For example,
setting timescaledb.license to apache limits TimescaleDB to features that
are implemented under the Apache 2 license. The default value is timescale,
which allows access to all features.
timescaledb.telemetry_level (enum)
Telemetry settings level. Level used to determine which telemetry to
send. Can be set to off or basic. Defaults to basic.
timescaledb.last_tuned (string)
Records last time timescaledb-tune ran.
timescaledb.last_tuned_version (string)
Version of timescaledb-tune used to tune when it runs.
===== PAGE: https://docs.tigerdata.com/api/configuration/gucs/ =====
Additional tooling
URL: llms-txt#additional-tooling
Get the most from TimescaleDB with open source tools that help you perform common tasks.
- Automatically configure your TimescaleDB instance with
[
timescaledb-tune][tstune] - Install [TimescaleDB Toolkit][tstoolkit] to access more hyperfunctions and function pipelines
===== PAGE: https://docs.tigerdata.com/self-hosted/upgrades/ =====
Migrate your Postgres database to self-hosted TimescaleDB
URL: llms-txt#migrate-your-postgres-database-to-self-hosted-timescaledb
Contents:
- Choose a migration method
- Migrate an active database
You can migrate your existing Postgres database to self-hosted TimescaleDB.
There are several methods for migrating your data:
- If the database you want to migrate is smaller than 100 GB, [migrate your entire database at once][migrate-entire]: This method directly transfers all data and schemas, including Timescale-specific features. Your hypertables, continuous aggregates, and policies are automatically available in the new self-hosted TimescaleDB instance.
- For databases larger than 100GB, [migrate your schema and data separately][migrate-separately]: With this method, you migrate your tables one by one for easier failure recovery. If migration fails mid-way, you can restart from the failure point rather than from the beginning. However, Timescale-specific features won't be automatically migrated. Follow the instructions to restore your hypertables, continuous aggregates, and policies.
- If you need to move data from Postgres tables into hypertables within an existing self-hosted TimescaleDB instance, [migrate within the same database][migrate-same-db]: This method assumes that you have TimescaleDB set up in the same database instance as your existing table.
- If you have data in an InfluxDB database, [migrate using Outflux][outflux]: Outflux pipes exported data directly to your self-hosted TimescaleDB instance, and manages schema discovery, validation, and creation. Outflux works with earlier versions of InfluxDB. It does not work with InfluxDB version 2 and later.
Choose a migration method
Which method you choose depends on your database size, network upload and download speeds, existing continuous aggregates, and tolerance for failure recovery.
If you are migrating from an Amazon RDS service, Amazon charges for the amount of data transferred out of the service. You could be charged by Amazon for all data egressed, even if the migration fails.
If your database is smaller than 100 GB, choose to migrate your entire database at once. You can also migrate larger databases using this method, but the copying process must keep running, potentially over days or weeks. If the copy is interrupted, the process needs to be restarted. If you think an interruption in the copy is possible, choose to migrate your schema and data separately instead.
Migrating your schema and data separately does not retain continuous aggregates calculated using already-deleted data. For example, if you delete raw data after a month but retain downsampled data in a continuous aggregate for a year, the continuous aggregate loses any data older than a month upon migration. If you must keep continuous aggregates calculated using deleted data, migrate your entire database at once regardless of database size.
If you aren't sure which method to use, try copying the entire database at once to estimate the time required. If the time estimate is very long, stop the migration and switch to the other method.
Migrate an active database
If your database is actively ingesting data, take precautions to ensure that your self-hosted TimescaleDB instance contains the data that is ingested while the migration is happening. Begin by running ingest in parallel on the source and target databases. This ensures that the newest data is written to both databases. Then backfill your data with one of the two migration methods.
===== PAGE: https://docs.tigerdata.com/self-hosted/manage-storage/ =====
Configuration with Docker
URL: llms-txt#configuration-with-docker
Contents:
- Edit the Postgres configuration file inside Docker
- Editing the Postgres configuration file inside Docker
- Setting parameters at the command prompt
If you are running TimescaleDB in a [Docker container][docker], there are two different ways to modify your Postgres configuration. You can edit the Postgres configuration file inside the Docker container, or you can set parameters at the command prompt.
Edit the Postgres configuration file inside Docker
You can start the Dockert container, and then use a text editor to edit the
Postgres configuration file directly. The configuration file requires one
parameter per line. Blank lines are ignored, and you can use a # symbol at the
beginning of a line to denote a comment.
Editing the Postgres configuration file inside Docker
Start your Docker instance:
Open the configuration file in
Vieditor or your preferred text editor.Restart the container to reload the configuration:
Setting parameters at the command prompt
If you don't want to open the configuration file to make changes, you can also
set parameters directly from the command prompt inside your Docker container,
using the -c option. For example:
===== PAGE: https://docs.tigerdata.com/self-hosted/configuration/configuration/ =====
Examples:
Example 1 (bash):
docker start timescaledb
Example 2 (bash):
docker exec -i -t timescaledb /bin/bash
Example 3 (bash):
vi /var/lib/postgresql/data/postgresql.conf
Example 4 (bash):
docker restart timescaledb
Integrate Prometheus with Tiger
URL: llms-txt#integrate-prometheus-with-tiger
Contents:
- Prerequisites
- Export Tiger Cloud service telemetry to Prometheus
[Prometheus][prometheus] is an open-source monitoring system with a dimensional data model, flexible query language, and a modern alerting approach.
This page shows you how to export your service telemetry to Prometheus:
- For Tiger Cloud, using a dedicated Prometheus exporter in Tiger Cloud Console.
- For self-hosted TimescaleDB, using [Postgres Exporter][postgresql-exporter].
To follow the steps on this page:
- [Download and run Prometheus][install-prometheus].
- For Tiger Cloud:
Create a target [Tiger Cloud service][create-service] with the time-series and analytics capability enabled.
- For self-hosted TimescaleDB:
- Create a target [self-hosted TimescaleDB][enable-timescaledb] instance. You need your [connection details][connection-info].
- [Install Postgres Exporter][install-exporter]. To reduce latency and potential data transfer costs, install Prometheus and Postgres Exporter on a machine in the same AWS region as your Tiger Cloud service.
Export Tiger Cloud service telemetry to Prometheus
To export your data, do the following:
To export metrics from a Tiger Cloud service, you create a dedicated Prometheus exporter in Tiger Cloud Console, attach it to your service, then configure Prometheus to scrape metrics using the exposed URL. The Prometheus exporter exposes the metrics related to the Tiger Cloud service like CPU, memory, and storage. To scrape other metrics, use Postgres Exporter as described for self-hosted TimescaleDB. The Prometheus exporter is available for [Scale and Enterprise][pricing-plan-features] pricing plans.
Create a Prometheus exporter
In [Tiger Cloud Console][open-console], click
Exporters>+ New exporter.Select
Metricsfor data type andPrometheusfor provider.
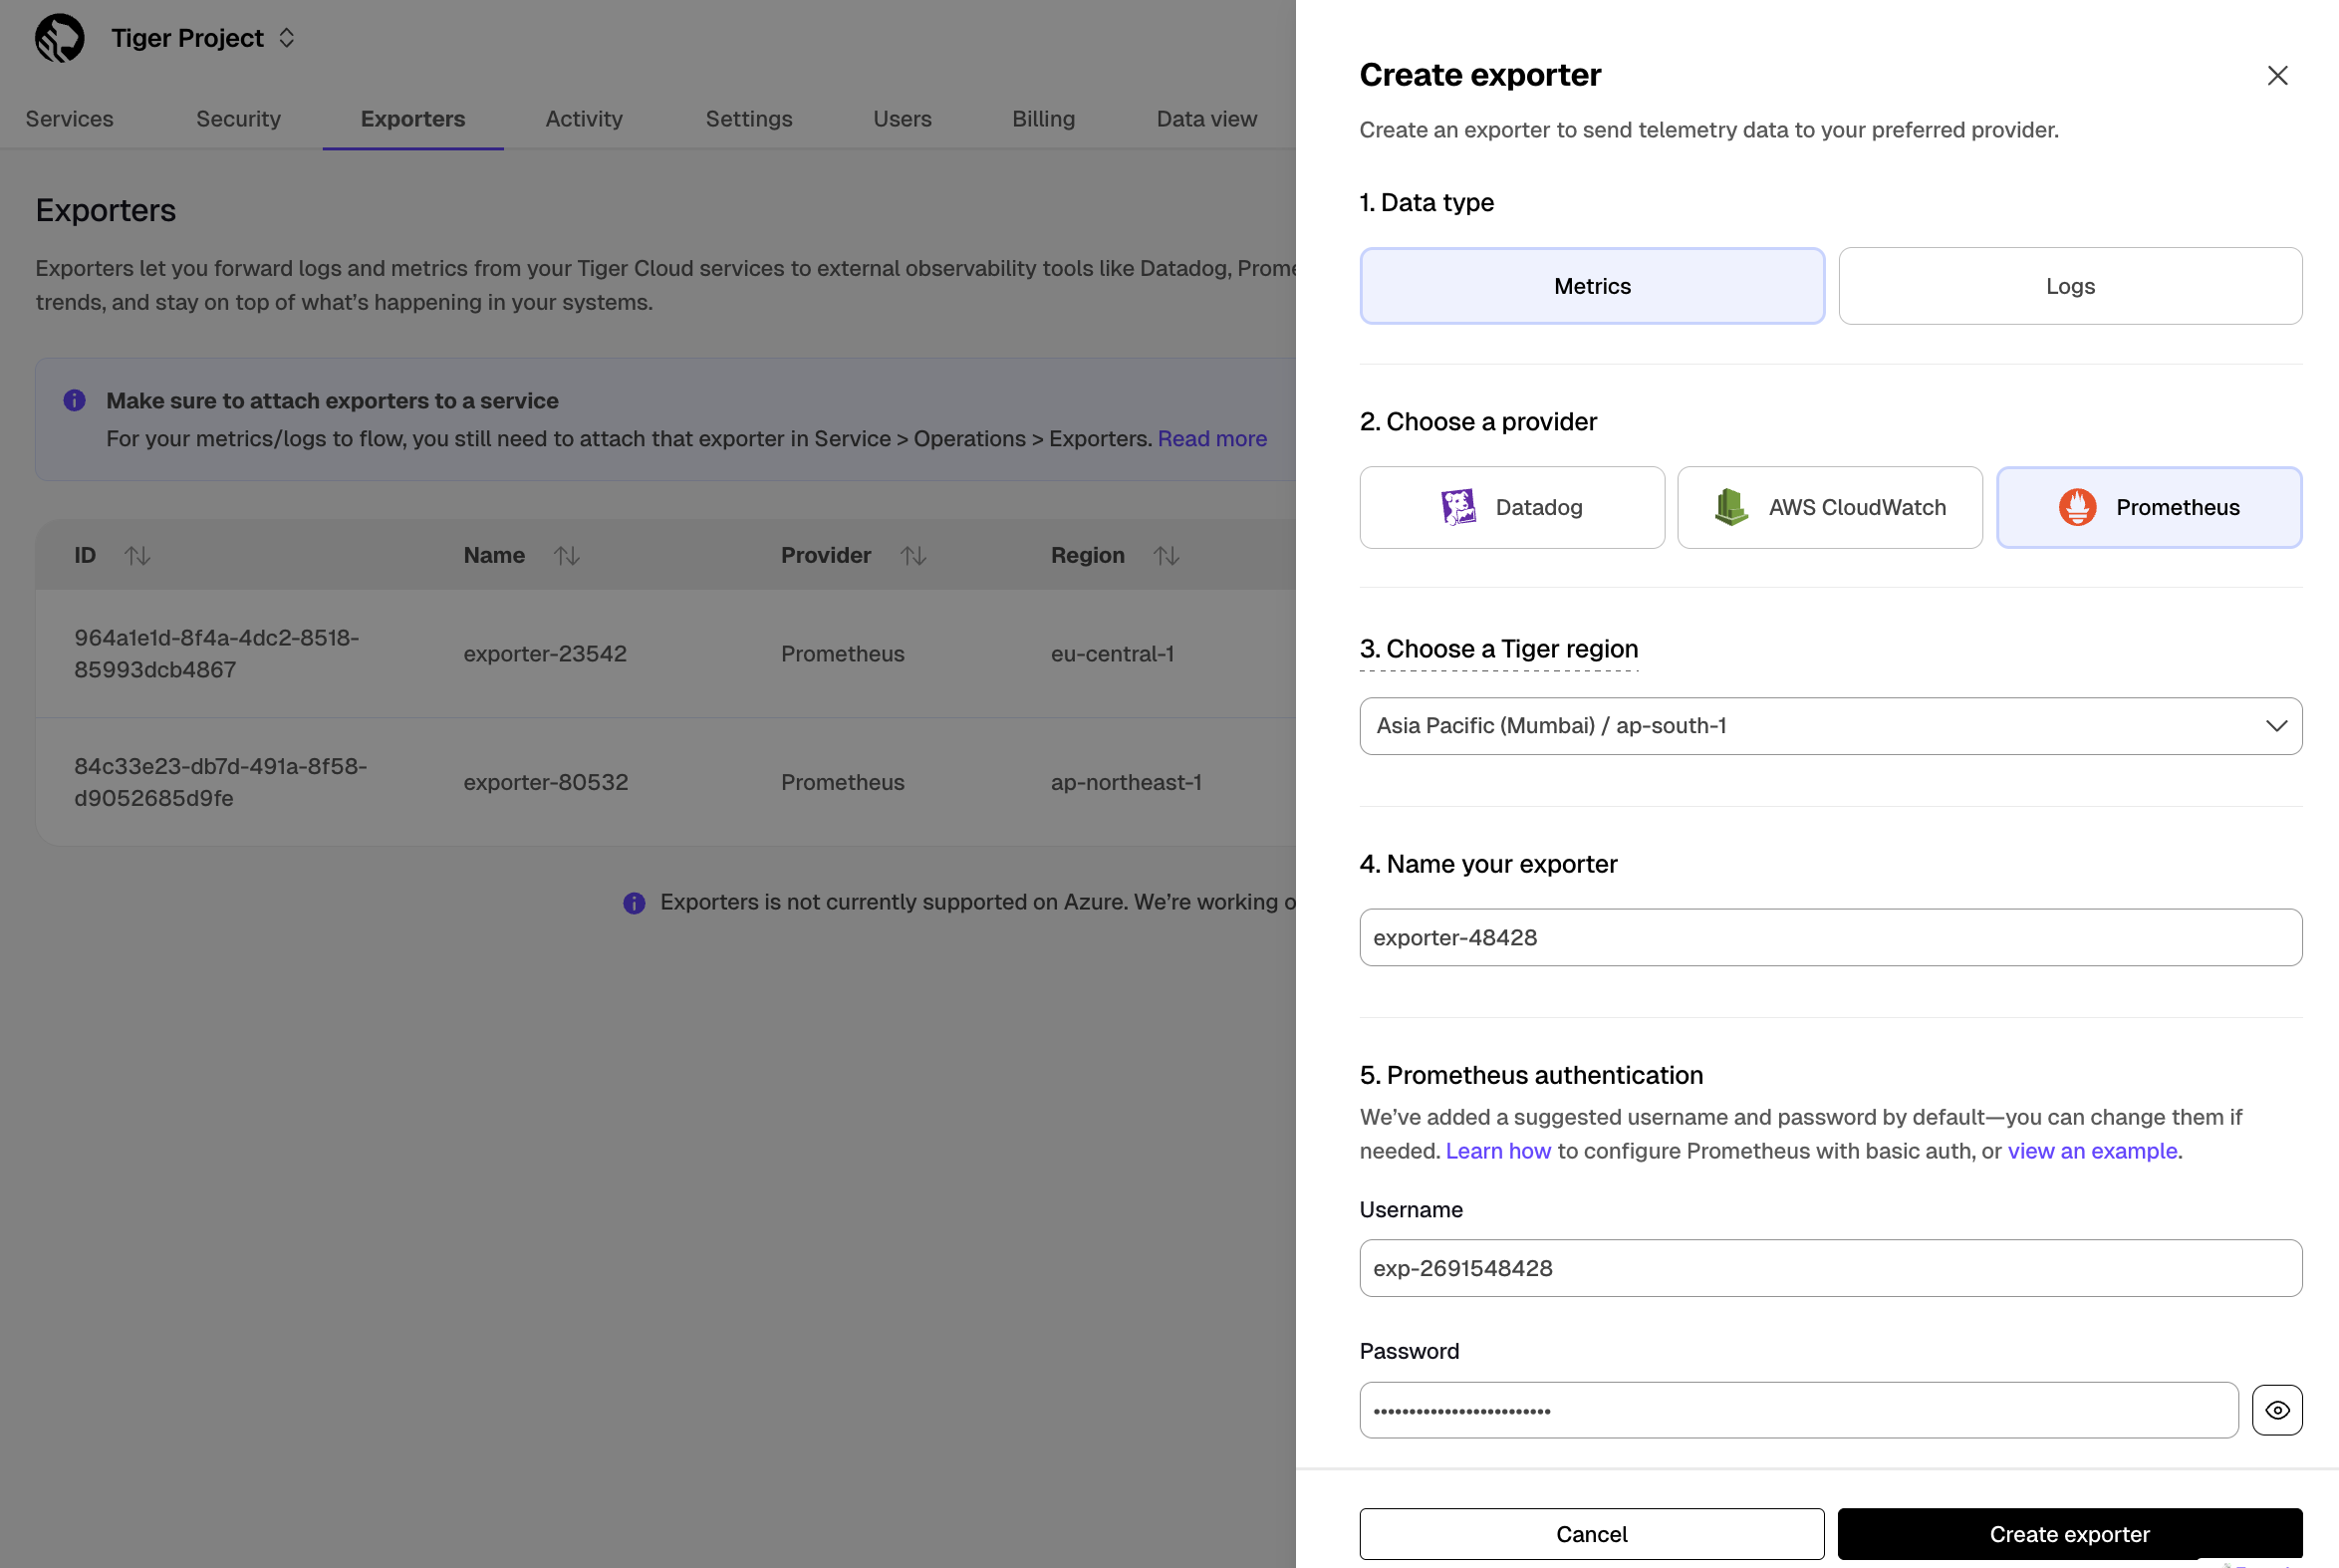
Choose the region for the exporter. Only services in the same project and region can be attached to this exporter.
Name your exporter.
Change the auto-generated Prometheus credentials, if needed. See [official documentation][prometheus-authentication] on basic authentication in Prometheus.
Attach the exporter to a service
Select a service, then click
Operations>Exporters.Select the exporter in the drop-down, then click
Attach exporter.
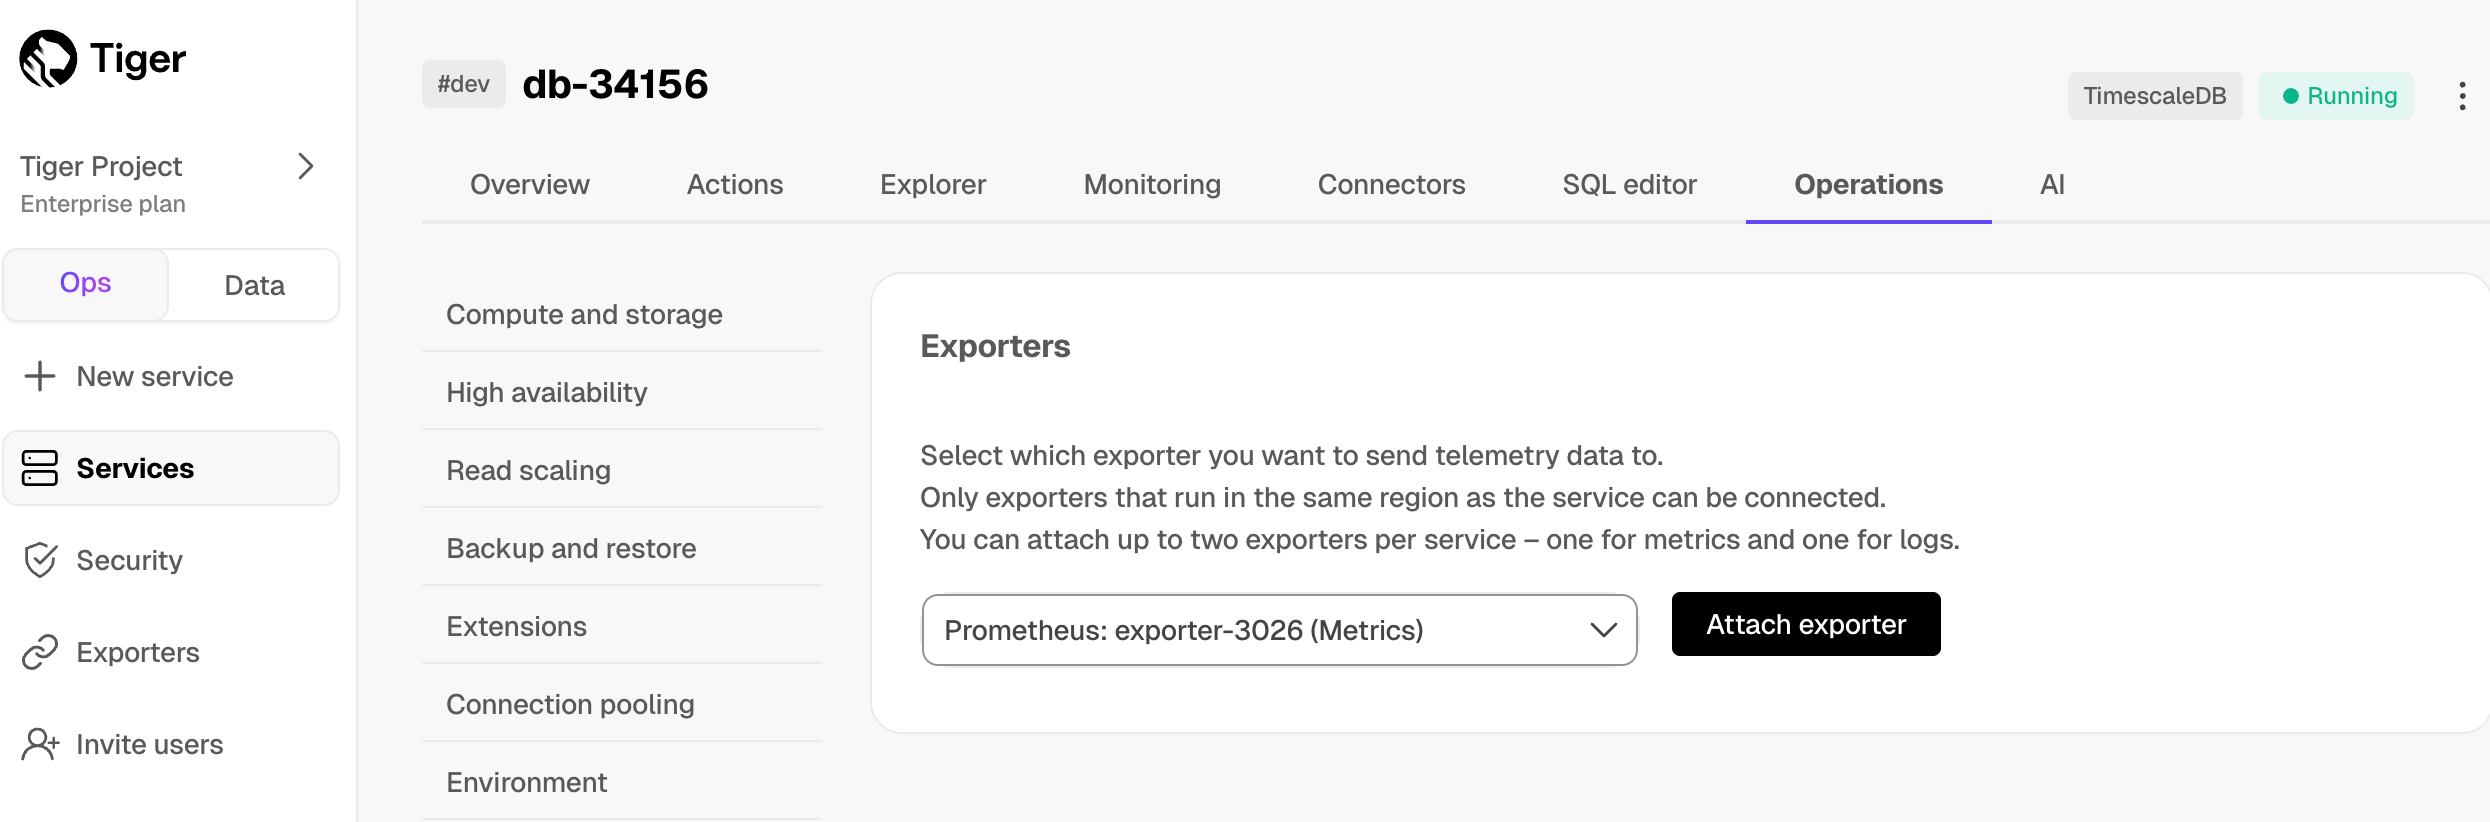
The exporter is now attached to your service. To unattach it, click the trash icon in the exporter list.
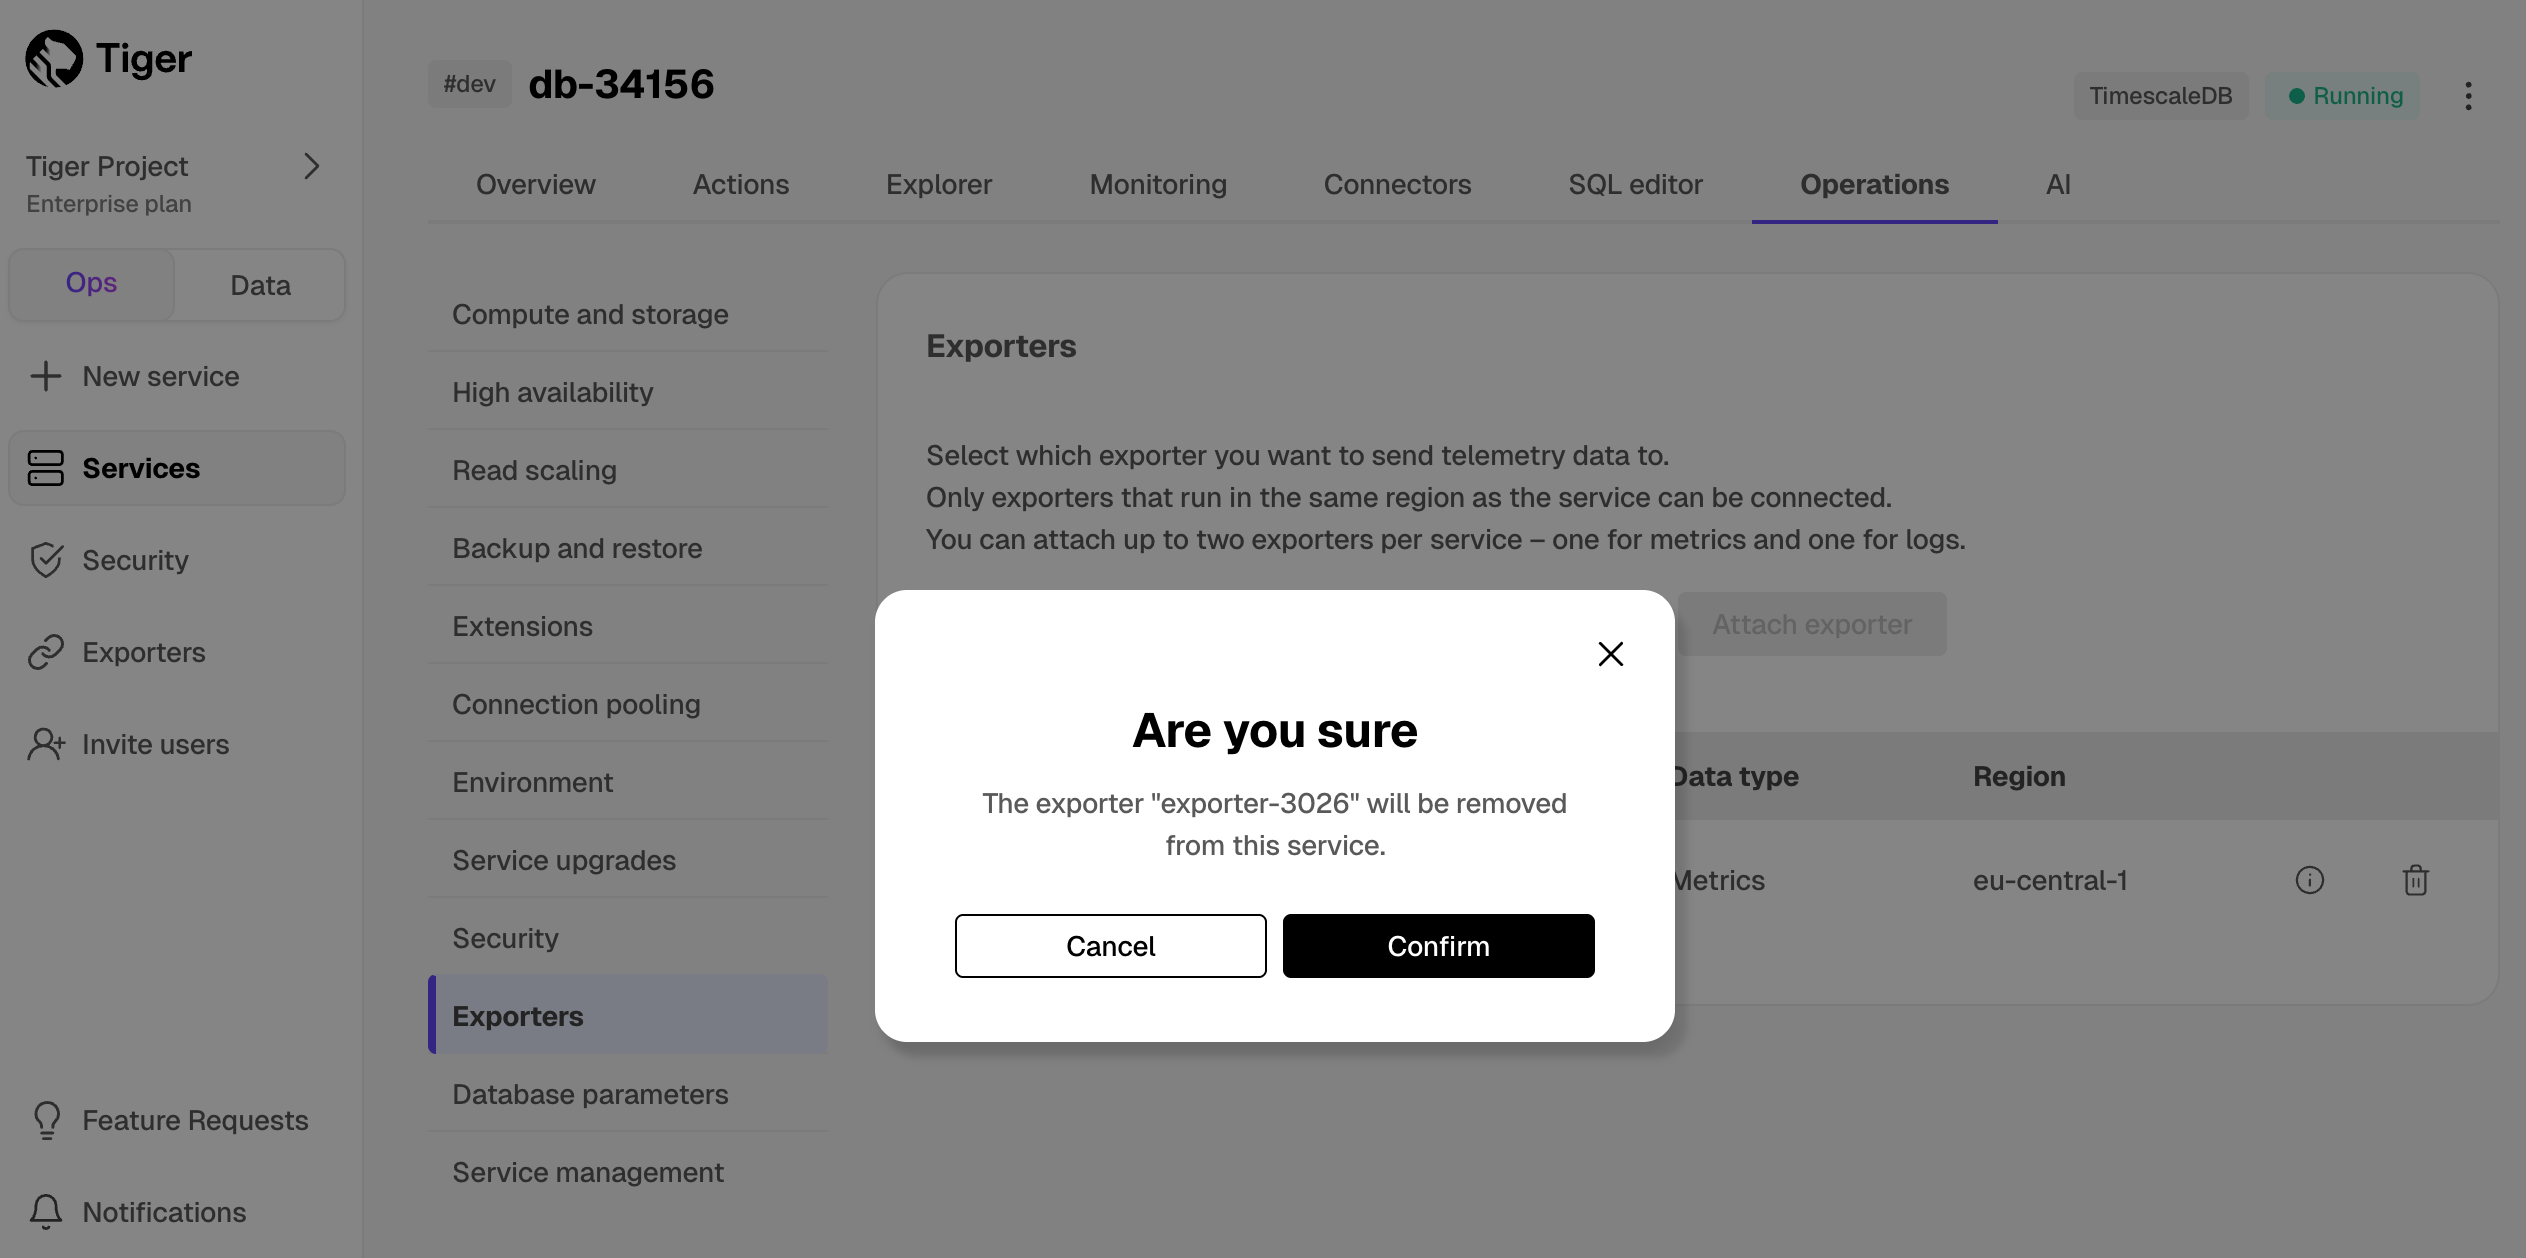
Configure the Prometheus scrape target
Select your service, then click
Operations>Exportersand click the information icon next to the exporter. You see the exporter details.
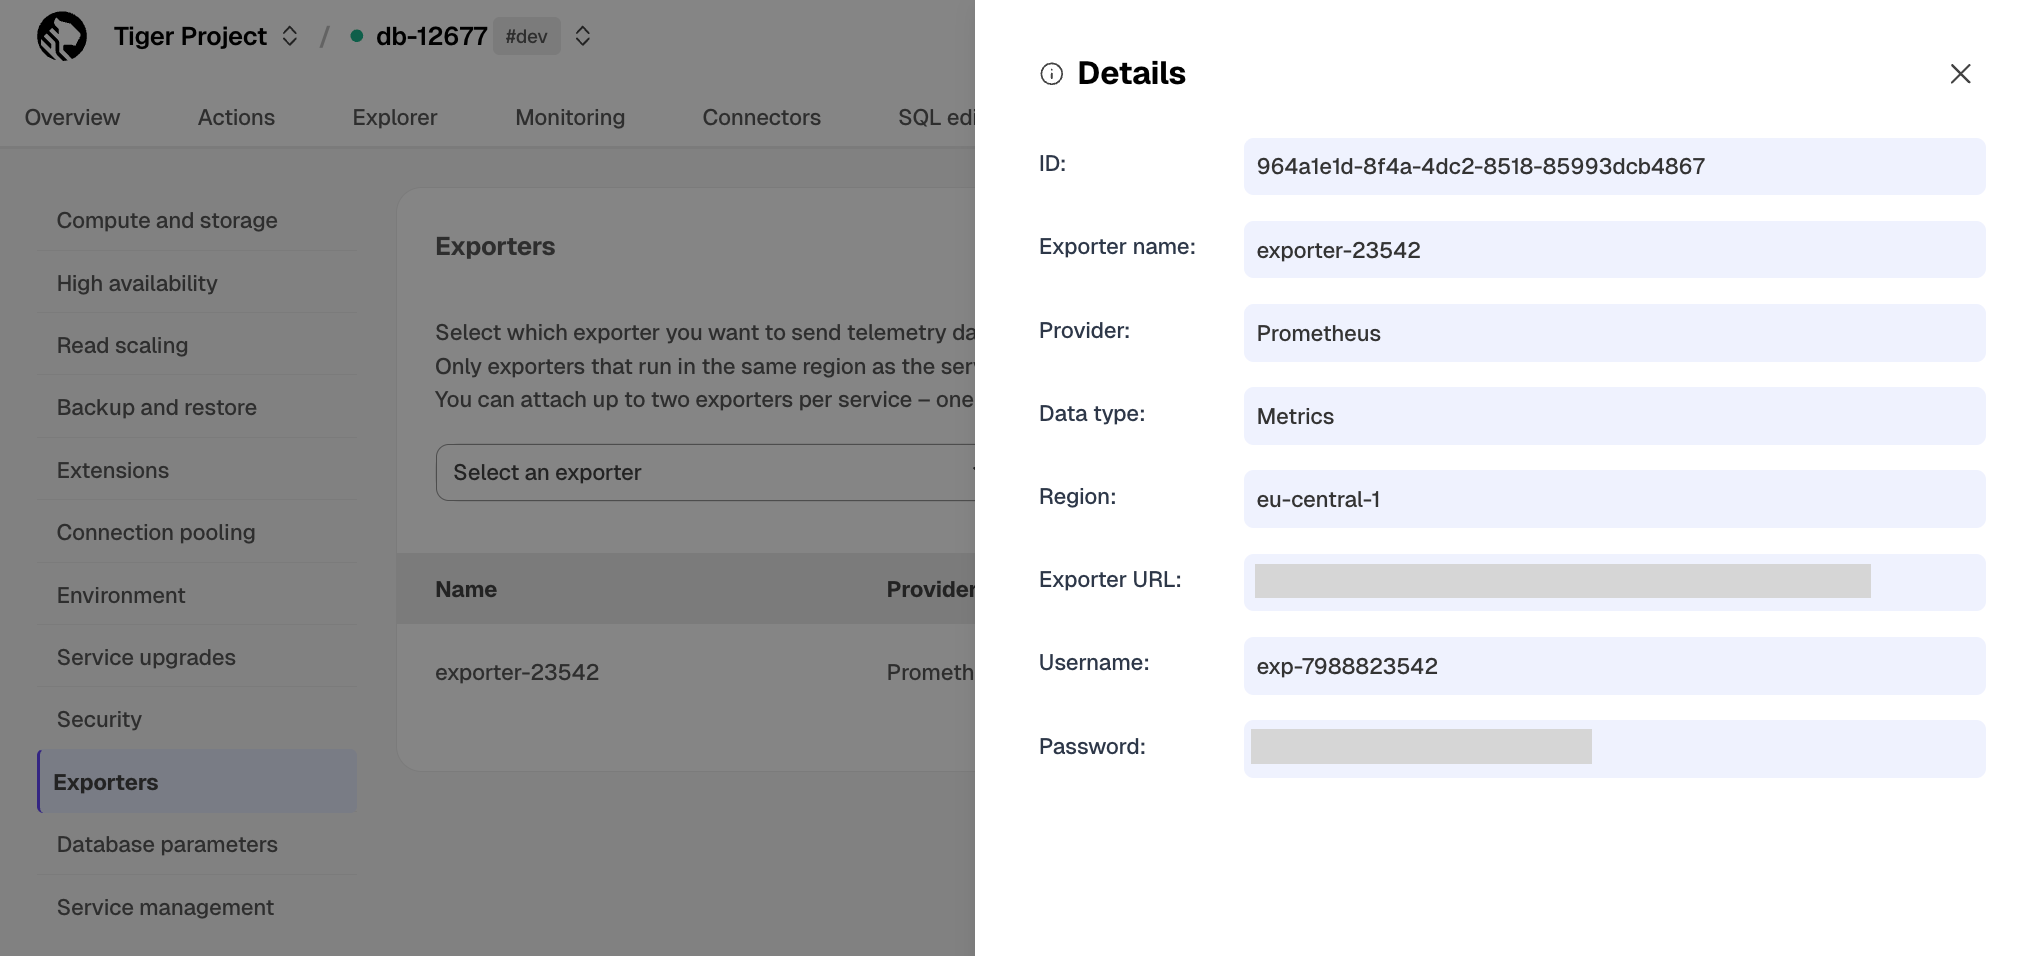
Copy the exporter URL.
In your Prometheus installation, update
prometheus.ymlto point to the exporter URL as a scrape target:
See the [Prometheus documentation][scrape-targets] for details on configuring scrape targets.
You can now monitor your service metrics. Use the following metrics to check the service is running correctly:
timescale.cloud.system.cpu.usage.millicorestimescale.cloud.system.cpu.total.millicorestimescale.cloud.system.memory.usage.bytestimescale.cloud.system.memory.total.bytestimescale.cloud.system.disk.usage.bytestimescale.cloud.system.disk.total.bytes
Additionally, use the following tags to filter your results.
|Tag|Example variable| Description |
  |-|-|----------------------------|
  |`host`|`us-east-1.timescale.cloud`|                            |
  |`project-id`||                            |
  |`service-id`||                            |
  |`region`|`us-east-1`| AWS region                 |
  |`role`|`replica` or `primary`| For service with replicas |
To export metrics from self-hosted TimescaleDB, you import telemetry data about your database to Postgres Exporter, then configure Prometheus to scrape metrics from it. Postgres Exporter exposes metrics that you define, excluding the system metrics.
Create a user to access telemetry data about your database
Connect to your database in [
psql][psql] using your [connection details][connection-info].Create a user named
monitoringwith a secure password:Grant the
pg_read_all_statspermission to themonitoringuser:Import telemetry data about your database to Postgres Exporter
Connect Postgres Exporter to your database:
Use your [connection details][connection-info] to import telemetry data about your database. You connect as
the `monitoring` user:
Local installation:
- Docker:
- Check the metrics for your database in the Prometheus format:
Navigate to http://<exporter-host>:9187/metrics.
Configure Prometheus to scrape metrics
In your Prometheus installation, update
prometheus.ymlto point to your Postgres Exporter instance as a scrape target. In the following example, you replace<exporter-host>with the hostname or IP address of the PostgreSQL Exporter.
If prometheus.yml has not been created during installation, create it manually. If you are using Docker, you can
find the IPAddress in `Inspect` > `Networks` for the container running Postgres Exporter.
Restart Prometheus.
Check the Prometheus UI at
http://<prometheus-host>:9090/targetsandhttp://<prometheus-host>:9090/tsdb-status.
You see the Postgres Exporter target and the metrics scraped from it.
You can further [visualize your data][grafana-prometheus] with Grafana. Use the [Grafana Postgres dashboard][postgresql-exporter-dashboard] or [create a custom dashboard][grafana] that suits your needs.
===== PAGE: https://docs.tigerdata.com/integrations/psql/ =====
Examples:
Example 1 (yml):
scrape_configs:
       - job_name: "timescaledb-exporter"
         scheme: https
         static_configs:
           - targets: ["my-exporter-url"]
         basic_auth:
           username: "user"
           password: "pass"
Example 2 (sql):
CREATE USER monitoring WITH PASSWORD '<password>';
Example 3 (sql):
GRANT pg_read_all_stats to monitoring;
Example 4 (shell):
export DATA_SOURCE_NAME="postgres://<user>:<password>@<host>:<port>/<database>?sslmode=<sslmode>"
           ./postgres_exporter
Upgrade TimescaleDB running in Docker
URL: llms-txt#upgrade-timescaledb-running-in-docker
Contents:
- Determine the mount point type
- Upgrade TimescaleDB within Docker
If you originally installed TimescaleDB using Docker, you can upgrade from within the Docker container. This allows you to upgrade to the latest TimescaleDB version while retaining your data.
The timescale/timescaledb-ha* images have the files necessary to run previous versions. Patch releases
only contain bugfixes so should always be safe. Non-patch releases may rarely require some extra steps.
These steps are mentioned in the [release notes][relnotes] for the version of TimescaleDB
that you are upgrading to.
After you upgrade the docker image, you run ALTER EXTENSION for all databases using TimescaleDB.
Tiger Cloud is a fully managed service with automatic backup and restore, high availability with replication, seamless scaling and resizing, and much more. You can try Tiger Cloud free for thirty days.
The examples in this page use a Docker instance called timescaledb. If you
have given your Docker instance a different name, replace it when you issue the
commands.
Determine the mount point type
When you start your upgraded Docker container, you need to be able to point the new Docker image to the location that contains the data from your previous version. To do this, you need to work out where the current mount point is. The current mount point varies depending on whether your container is using volume mounts, or bind mounts.
- Find the mount type used by your Docker container:
This returns either volume or bind.
- Note the volume or bind used by your container:
Docker returns the <volume ID>. You see something like this:
Docker returns the <bind path>. You see something like this:
You use this value when you perform the upgrade.
Upgrade TimescaleDB within Docker
To upgrade TimescaleDB within Docker, you need to download the upgraded image, stop the old container, and launch the new container pointing to your existing data.
- Pull the latest TimescaleDB image
This command pulls the latest version of TimescaleDB running on Postgres 17:
If you're using another version of Postgres, look for the relevant tag in the TimescaleDB HA repository on Docker Hub.
Stop the old container, and remove it
Launch a new container with the upgraded Docker image
Launch based on your mount point type:
Connect to the upgraded instance using
psqlwith the-XflagAt the psql prompt, use the
ALTERcommand to upgrade the extension
The [TimescaleDB Toolkit][toolkit] extension is packaged with TimescaleDB HA, it includes additional hyperfunctions to help you with queries and data analysis.
If you have multiple databases, update each database separately.
- Pull the latest TimescaleDB image
This command pulls the latest version of TimescaleDB running on Postgres 17.
If you're using another version of Postgres, look for the relevant tag in the TimescaleDB light repository on Docker Hub.
Stop the old container, and remove it
Launch a new container with the upgraded Docker image
Launch based on your mount point type:
Connect to the upgraded instance using
psqlwith the-XflagAt the psql prompt, use the
ALTERcommand to upgrade the extension
If you have multiple databases, you need to update each database separately.
===== PAGE: https://docs.tigerdata.com/self-hosted/upgrades/major-upgrade/ =====
Examples:
Example 1 (bash):
docker inspect timescaledb --format='{{range .Mounts }}{{.Type}}{{end}}'
Example 2 (bash):
docker inspect timescaledb --format='{{range .Mounts }}{{.Name}}{{end}}'
Example 3 (unknown):
069ba64815f0c26783b81a5f0ca813227fde8491f429cf77ed9a5ae3536c0b2c
Example 4 (bash):
docker inspect timescaledb --format='{{range .Mounts }}{{.Source}}{{end}}'
Export metrics to Prometheus
URL: llms-txt#export-metrics-to-prometheus
Contents:
- Prerequisites
- Export Tiger Cloud service telemetry to Prometheus
[Prometheus][prometheus] is an open-source monitoring system with a dimensional data model, flexible query language, and a modern alerting approach.
This page shows you how to export your service telemetry to Prometheus:
- For Tiger Cloud, using a dedicated Prometheus exporter in Tiger Cloud Console.
- For self-hosted TimescaleDB, using [Postgres Exporter][postgresql-exporter].
To follow the steps on this page:
- [Download and run Prometheus][install-prometheus].
- For Tiger Cloud:
Create a target [Tiger Cloud service][create-service] with the time-series and analytics capability enabled.
- For self-hosted TimescaleDB:
- Create a target [self-hosted TimescaleDB][enable-timescaledb] instance. You need your [connection details][connection-info].
- [Install Postgres Exporter][install-exporter]. To reduce latency and potential data transfer costs, install Prometheus and Postgres Exporter on a machine in the same AWS region as your Tiger Cloud service.
Export Tiger Cloud service telemetry to Prometheus
To export your data, do the following:
To export metrics from a Tiger Cloud service, you create a dedicated Prometheus exporter in Tiger Cloud Console, attach it to your service, then configure Prometheus to scrape metrics using the exposed URL. The Prometheus exporter exposes the metrics related to the Tiger Cloud service like CPU, memory, and storage. To scrape other metrics, use Postgres Exporter as described for self-hosted TimescaleDB. The Prometheus exporter is available for [Scale and Enterprise][pricing-plan-features] pricing plans.
Create a Prometheus exporter
In [Tiger Cloud Console][open-console], click
Exporters>+ New exporter.Select
Metricsfor data type andPrometheusfor provider.
Choose the region for the exporter. Only services in the same project and region can be attached to this exporter.
Name your exporter.
Change the auto-generated Prometheus credentials, if needed. See [official documentation][prometheus-authentication] on basic authentication in Prometheus.
Attach the exporter to a service
Select a service, then click
Operations>Exporters.Select the exporter in the drop-down, then click
Attach exporter.
The exporter is now attached to your service. To unattach it, click the trash icon in the exporter list.
Configure the Prometheus scrape target
Select your service, then click
Operations>Exportersand click the information icon next to the exporter. You see the exporter details.
Copy the exporter URL.
In your Prometheus installation, update
prometheus.ymlto point to the exporter URL as a scrape target:
See the [Prometheus documentation][scrape-targets] for details on configuring scrape targets.
You can now monitor your service metrics. Use the following metrics to check the service is running correctly:
timescale.cloud.system.cpu.usage.millicorestimescale.cloud.system.cpu.total.millicorestimescale.cloud.system.memory.usage.bytestimescale.cloud.system.memory.total.bytestimescale.cloud.system.disk.usage.bytestimescale.cloud.system.disk.total.bytes
Additionally, use the following tags to filter your results.
|Tag|Example variable| Description |
  |-|-|----------------------------|
  |`host`|`us-east-1.timescale.cloud`|                            |
  |`project-id`||                            |
  |`service-id`||                            |
  |`region`|`us-east-1`| AWS region                 |
  |`role`|`replica` or `primary`| For service with replicas |
To export metrics from self-hosted TimescaleDB, you import telemetry data about your database to Postgres Exporter, then configure Prometheus to scrape metrics from it. Postgres Exporter exposes metrics that you define, excluding the system metrics.
Create a user to access telemetry data about your database
Connect to your database in [
psql][psql] using your [connection details][connection-info].Create a user named
monitoringwith a secure password:Grant the
pg_read_all_statspermission to themonitoringuser:Import telemetry data about your database to Postgres Exporter
Connect Postgres Exporter to your database:
Use your [connection details][connection-info] to import telemetry data about your database. You connect as
the `monitoring` user:
Local installation:
- Docker:
- Check the metrics for your database in the Prometheus format:
Navigate to http://<exporter-host>:9187/metrics.
Configure Prometheus to scrape metrics
In your Prometheus installation, update
prometheus.ymlto point to your Postgres Exporter instance as a scrape target. In the following example, you replace<exporter-host>with the hostname or IP address of the PostgreSQL Exporter.
If prometheus.yml has not been created during installation, create it manually. If you are using Docker, you can
find the IPAddress in `Inspect` > `Networks` for the container running Postgres Exporter.
Restart Prometheus.
Check the Prometheus UI at
http://<prometheus-host>:9090/targetsandhttp://<prometheus-host>:9090/tsdb-status.
You see the Postgres Exporter target and the metrics scraped from it.
You can further [visualize your data][grafana-prometheus] with Grafana. Use the [Grafana Postgres dashboard][postgresql-exporter-dashboard] or [create a custom dashboard][grafana] that suits your needs.
===== PAGE: https://docs.tigerdata.com/use-timescale/metrics-logging/monitoring/ =====
Examples:
Example 1 (yml):
scrape_configs:
       - job_name: "timescaledb-exporter"
         scheme: https
         static_configs:
           - targets: ["my-exporter-url"]
         basic_auth:
           username: "user"
           password: "pass"
Example 2 (sql):
CREATE USER monitoring WITH PASSWORD '<password>';
Example 3 (sql):
GRANT pg_read_all_stats to monitoring;
Example 4 (shell):
export DATA_SOURCE_NAME="postgres://<user>:<password>@<host>:<port>/<database>?sslmode=<sslmode>"
           ./postgres_exporter
Install and update TimescaleDB Toolkit
URL: llms-txt#install-and-update-timescaledb-toolkit
Contents:
- Prerequisites
- Install TimescaleDB Toolkit
- Update TimescaleDB Toolkit
- Prerequisites
- Install TimescaleDB Toolkit
- Update TimescaleDB Toolkit
- Prerequisites
- Install TimescaleDB Toolkit
- Update TimescaleDB Toolkit
- Prerequisites
Some hyperfunctions are included by default in TimescaleDB. For additional hyperfunctions, you need to install the TimescaleDB Toolkit Postgres extension.
If you're using [Tiger Cloud][cloud], the TimescaleDB Toolkit is already installed. If you're hosting the TimescaleDB extension on your self-hosted database, you can install Toolkit by:
- Using the TimescaleDB high-availability Docker image
- Using a package manager such as
yum,apt, orbrewon platforms where pre-built binaries are available - Building from source. For more information, see the [Toolkit developer documentation][toolkit-gh-docs]
To follow this procedure:
- [Install TimescaleDB][debian-install].
- Add the TimescaleDB repository and the GPG key.
Install TimescaleDB Toolkit
These instructions use the apt package manager.
Update your local repository list:
Install TimescaleDB Toolkit:
[Connect to the database][connect] where you want to use Toolkit.
Create the Toolkit extension in the database:
Update TimescaleDB Toolkit
Update Toolkit by installing the latest version and running ALTER EXTENSION.
Update your local repository list:
Install the latest version of TimescaleDB Toolkit:
[Connect to the database][connect] where you want to use the new version of Toolkit.
Update the Toolkit extension in the database:
For some Toolkit versions, you might need to disconnect and reconnect active
sessions.
To follow this procedure:
- [Install TimescaleDB][red-hat-install].
- Create a TimescaleDB repository in your
yumrepo.ddirectory.
Install TimescaleDB Toolkit
These instructions use the yum package manager.
Set up the repository:
Update your local repository list:
Install TimescaleDB Toolkit:
[Connect to the database][connect] where you want to use Toolkit.
Create the Toolkit extension in the database:
Update TimescaleDB Toolkit
Update Toolkit by installing the latest version and running ALTER EXTENSION.
Update your local repository list:
Install the latest version of TimescaleDB Toolkit:
[Connect to the database][connect] where you want to use the new version of Toolkit.
Update the Toolkit extension in the database:
For some Toolkit versions, you might need to disconnect and reconnect active
sessions.
Install TimescaleDB Toolkit
Best practice for Toolkit installation is to use the
TimescaleDB Docker image.
To get Toolkit, use the high availability image, timescaledb-ha:
For more information on running TimescaleDB using Docker, see [Install TimescaleDB from a Docker container][docker-install].
Update TimescaleDB Toolkit
To get the latest version of Toolkit, [update][update-docker] the TimescaleDB HA docker image.
To follow this procedure:
- [Install TimescaleDB][macos-install].
Install TimescaleDB Toolkit
These instructions use the brew package manager. For more information on
installing or using Homebrew, see [the brew homepage][brew-install].
Tap the Tiger Data formula repository, which also contains formulae for TimescaleDB and
timescaledb-tune.Update your local brew installation:
Install TimescaleDB Toolkit:
[Connect to the database][connect] where you want to use Toolkit.
Create the Toolkit extension in the database:
Update TimescaleDB Toolkit
Update Toolkit by installing the latest version and running ALTER EXTENSION.
Update your local repository list:
Install the latest version of TimescaleDB Toolkit:
[Connect to the database][connect] where you want to use the new version of Toolkit.
Update the Toolkit extension in the database:
For some Toolkit versions, you might need to disconnect and reconnect active
sessions.
===== PAGE: https://docs.tigerdata.com/self-hosted/tooling/about-timescaledb-tune/ =====
Examples:
Example 1 (bash):
sudo apt update
Example 2 (bash):
sudo apt install timescaledb-toolkit-postgresql-17
Example 3 (sql):
CREATE EXTENSION timescaledb_toolkit;
Example 4 (bash):
apt update
Install self-hosted TimescaleDB
URL: llms-txt#install-self-hosted-timescaledb
Contents:
- Installation
Refer to the installation documentation for detailed setup instructions.
===== PAGE: https://docs.tigerdata.com/self-hosted/install/installation-docker/ =====
Configure replication
URL: llms-txt#configure-replication
Contents:
- Configure the primary database
- Configuring the primary database
- Configure replication parameters
- Configuring replication parameters
- Create replication slots
- Creating replication slots
- Configure host-based authentication parameters
- Configuring host-based authentication parameters
- Create a base backup on the replica
- Creating a base backup on the replica
This section outlines how to set up asynchronous streaming replication on one or more database replicas.
Tiger Cloud is a fully managed service with automatic backup and restore, high availability with replication, seamless scaling and resizing, and much more. You can try Tiger Cloud free for thirty days.
Before you begin, make sure you have at least two separate instances of TimescaleDB running. If you installed TimescaleDB using a Docker container, use a [Postgres entry point script][docker-postgres-scripts] to run the configuration. For more advanced examples, see the [TimescaleDB Helm Charts repository][timescale-streamrep-helm].
To configure replication on self-hosted TimescaleDB, you need to perform these procedures:
- [Configure the primary database][configure-primary-db]
- [Configure replication parameters][configure-params]
- [Create replication slots][create-replication-slots]
- [Configure host-based authentication parameters][configure-pghba]
- [Create a base backup on the replica][create-base-backup]
- [Configure replication and recovery settings][configure-replication]
- [Verify that the replica is working][verify-replica]
Configure the primary database
To configure the primary database, you need a Postgres user with a role that allows it to initialize streaming replication. This is the user each replica uses to stream from the primary database.
Configuring the primary database
On the primary database, as a user with superuser privileges, such as the
postgresuser, set the password encryption level toscram-sha-256:Create a new user called
repuser:
The scram-sha-256 encryption level is the most secure password-based authentication available in Postgres. It is only available in Postgres 10 and later.
Configure replication parameters
There are several replication settings that need to be added or edited in the
postgresql.conf configuration file.
Configuring replication parameters
- Set the
synchronous_commitparameter tooff. - Set the
max_wal_sendersparameter to the total number of concurrent connections from replicas or backup clients. As a minimum, this should equal the number of replicas you intend to have. - Set the
wal_levelparameter to the amount of information written to the Postgres write-ahead log (WAL). For replication to work, there needs to be enough data in the WAL to support archiving and replication. The default value is usually appropriate. - Set the
max_replication_slotsparameter to the total number of replication slots the primary database can support. - Set the
listen_addressesparameter to the address of the primary database. Do not leave this parameter as the local loopback address, because the remote replicas must be able to connect to the primary to stream the WAL. - Restart Postgres to pick up the changes. This must be done before you create replication slots.
The most common streaming replication use case is asynchronous replication with one or more replicas. In this example, the WAL is streamed to the replica, but the primary server does not wait for confirmation that the WAL has been written to disk on either the primary or the replica. This is the most performant replication configuration, but it does carry the risk of a small amount of data loss in the event of a system failure. It also makes no guarantees that the replica is fully up to date with the primary, which could cause inconsistencies between read queries on the primary and the replica. The example configuration for this use case:
If you need stronger consistency on the replicas, or if your query load is heavy enough to cause significant lag between the primary and replica nodes in asynchronous mode, consider a synchronous replication configuration instead. For more information about the different replication modes, see the [replication modes section][replication-modes].
Create replication slots
When you have configured postgresql.conf and restarted Postgres, you can
create a [replication slot][postgres-rslots-docs] for each replica. Replication
slots ensure that the primary does not delete segments from the WAL until they
have been received by the replicas. This is important in case a replica goes
down for an extended time. The primary needs to verify that a WAL segment has
been consumed by a replica, so that it can safely delete data. You can use
[archiving][postgres-archive-docs] for this purpose, but replication slots
provide the strongest protection for streaming replication.
Creating replication slots
At the
psqlslot, create the first replication slot. The name of the slot is arbitrary. In this example, it is calledreplica_1_slot:Repeat for each required replication slot.
Configure host-based authentication parameters
There are several replication settings that need to be added or edited to the
pg_hba.conf configuration file. In this example, the settings restrict
replication connections to traffic coming from REPLICATION_HOST_IP as the
Postgres user repuser with a valid password. REPLICATION_HOST_IP can
initiate streaming replication from that machine without additional credentials.
You can change the address and method values to match your security and
network settings.
For more information about pg_hba.conf, see the
[pg_hba documentation][pg-hba-docs].
Configuring host-based authentication parameters
Open the
pg_hba.confconfiguration file and add or edit this line:Restart Postgres to pick up the changes.
Create a base backup on the replica
Replicas work by streaming the primary server's WAL log and replaying its transactions in Postgres recovery mode. To do this, the replica needs to be in a state where it can replay the log. You can do this by restoring the replica from a base backup of the primary instance.
Creating a base backup on the replica
- Stop Postgres services.
- If the replica database already contains data, delete it before you run the backup, by removing the Postgres data directory:
If you don't know the location of the data directory, find it with the
`show data_directory;` command.
- Restore from the base backup, using the IP address of the primary database and the replication username:
The -W flag prompts you for a password. If you are using this command in an
automated setup, you might need to use a [pgpass file][pgpass-file].
- When the backup is complete, create a
[standby.signal][postgres-recovery-docs] file in your data directory. When
Postgres finds a
standby.signalfile in its data directory, it starts in recovery mode and streams the WAL through the replication protocol:
Configure replication and recovery settings
When you have successfully created a base backup and a standby.signal file, you
can configure the replication and recovery settings.
Configuring replication and recovery settings
In the replica's
postgresql.conffile, add details for communicating with the primary server. If you are using streaming replication, theapplication_nameinprimary_conninfoshould be the same as the name used in the primary'ssynchronous_standby_namessettings:Add details to mirror the configuration of the primary database. If you are using asynchronous replication, use these settings:
The hot_standby parameter must be set to on to allow read-only queries
on the replica. In Postgres 10 and later, this setting is `on` by default.
- Restart Postgres to pick up the changes.
Verify that the replica is working
At this point, your replica should be fully synchronized with the primary database and prepared to stream from it. You can verify that it is working properly by checking the logs on the replica, which should look like this:
Any client can perform reads on the replica. You can verify this by running inserts, updates, or other modifications to your data on the primary database, and then querying the replica to ensure they have been properly copied over.
In most cases, asynchronous streaming replication is sufficient. However, you
might require greater consistency between the primary and replicas, especially
if you have a heavy workload. Under heavy workloads, replicas can lag far behind
the primary, providing stale data to clients reading from the replicas.
Additionally, in cases where any data loss is fatal, asynchronous replication
might not provide enough of a durability guarantee. The Postgres
[synchronous_commit][postgres-synchronous-commit-docs] feature has several
options with varying consistency and performance tradeoffs.
In the postgresql.conf file, set the synchronous_commit parameter to:
on: This is the default value. The server does not returnsuccessuntil the WAL transaction has been written to disk on the primary and any replicas.off: The server returnssuccesswhen the WAL transaction has been sent to the operating system to write to the WAL on disk on the primary, but does not wait for the operating system to actually write it. This can cause a small amount of data loss if the server crashes when some data has not been written, but it does not result in data corruption. Turningsynchronous_commitoff is a well-known Postgres optimization for workloads that can withstand some data loss in the event of a system crash.local: Enforcesonbehavior only on the primary server.remote_write: The database returnssuccessto a client when the WAL record has been sent to the operating system for writing to the WAL on the replicas, but before confirmation that the record has actually been persisted to disk. This is similar to asynchronous commit, except it waits for the replicas as well as the primary. In practice, the extra wait time incurred waiting for the replicas significantly decreases replication lag.remote_apply: Requires confirmation that the WAL records have been written to the WAL and applied to the databases on all replicas. This provides the strongest consistency of any of thesynchronous_commitoptions. In this mode, replicas always reflect the latest state of the primary, and replication lag is nearly non-existent.
If synchronous_standby_names is empty, the settings on, remote_apply,
remote_write and local all provide the same synchronization level, and
transaction commits wait for the local flush to disk.
This matrix shows the level of consistency provided by each mode:
|Mode|WAL Sent to OS (Primary)|WAL Persisted (Primary)|WAL Sent to OS (Primary & Replicas)|WAL Persisted (Primary & Replicas)|Transaction Applied (Primary & Replicas)| |-|-|-|-|-|-| |Off|✅|❌|❌|❌|❌| |Local|✅|✅|❌|❌|❌| |Remote Write|✅|✅|✅|❌|❌| |On|✅|✅|✅|✅|❌| |Remote Apply|✅|✅|✅|✅|✅|
The synchronous_standby_names setting is a complementary setting to
synchronous_commit. It lists the names of all replicas the primary database
supports for synchronous replication, and configures how the primary database
waits for them. The synchronous_standby_names setting supports these formats:
FIRST num_sync (replica_name_1, replica_name_2): This waits for confirmation from the firstnum_syncreplicas before returningsuccess. The list ofreplica_namesdetermines the relative priority of the replicas. Replica names are determined by theapplication_namesetting on the replicas.ANY num_sync (replica_name_1, replica_name_2): This waits for confirmation fromnum_syncreplicas in the provided list, regardless of their priority or position in the list. This is works as a quorum function.
Synchronous replication modes force the primary to wait until all required
replicas have written the WAL, or applied the database transaction, depending on
the synchronous_commit level. This could cause the primary to hang
indefinitely if a required replica crashes. When the replica reconnects, it
replays any of the WAL it needs to catch up. Only then is the primary able to
resume writes. To mitigate this, provision more than the amount of nodes
required under the synchronous_standby_names setting and list them in the
FIRST or ANY clauses. This allows the primary to move forward as long as a
quorum of replicas have written the most recent WAL transaction. Replicas that
were out of service are able to reconnect and replay the missed WAL transactions
asynchronously.
Replication diagnostics
The Postgres [pg_stat_replication][postgres-pg-stat-replication-docs] view
provides information about each replica. This view is particularly useful for
calculating replication lag, which measures how far behind the primary the
current state of the replica is. The replay_lag field gives a measure of the
seconds between the most recent WAL transaction on the primary, and the last
reported database commit on the replica. Coupled with write_lag and
flush_lag, this provides insight into how far behind the replica is. The
*_lsn fields also provide helpful information. They allow you to compare WAL locations between
the primary and the replicas. The state field is useful for determining
exactly what each replica is currently doing; the available modes are startup,
catchup, streaming, backup, and stopping.
To see the data, on the primary database, run this command:
The output looks like this:
Postgres provides some failover functionality, where the replica is promoted
to primary in the event of a failure. This is provided using the
[pg_ctl][pgctl-docs] command or the trigger_file. However, Postgres does
not provide support for automatic failover. For more information, see the
[Postgres failover documentation][failover-docs]. If you require a
configurable high availability solution with automatic failover functionality,
check out [Patroni][patroni-github].
===== PAGE: https://docs.tigerdata.com/self-hosted/replication-and-ha/about-ha/ =====
Examples:
Example 1 (sql):
SET password_encryption = 'scram-sha-256';
Example 2 (sql):
CREATE ROLE repuser WITH REPLICATION PASSWORD '<PASSWORD>' LOGIN;
Example 3 (yaml):
listen_addresses = '*'
wal_level = replica
max_wal_senders = 2
max_replication_slots = 2
synchronous_commit = off
Example 4 (sql):
SELECT * FROM pg_create_physical_replication_slot('replica_1_slot', true);
Integrate Kubernetes with Tiger
URL: llms-txt#integrate-kubernetes-with-tiger
Contents:
- Prerequisites
- Integrate TimescaleDB in a Kubernetes cluster
[Kubernetes][kubernetes] is an open-source container orchestration system that automates the deployment, scaling, and management of containerized applications. You can connect Kubernetes to Tiger Cloud, and deploy TimescaleDB within your Kubernetes clusters.
This guide explains how to connect a Kubernetes cluster to Tiger Cloud, configure persistent storage, and deploy TimescaleDB in your kubernetes cluster.
To follow the steps on this page:
- Install [self-managed Kubernetes][kubernetes-install] or sign up for a Kubernetes [Turnkey Cloud Solution][kubernetes-managed].
- Install [kubectl][kubectl] for command-line interaction with your cluster.
Integrate TimescaleDB in a Kubernetes cluster
To connect your Kubernetes cluster to your Tiger Cloud service:
Create a default namespace for your Tiger Cloud components
Create a namespace:
Set this namespace as the default for your session:
For more information, see [Kubernetes Namespaces][kubernetes-namespace].
- Create a Kubernetes secret that stores your Tiger Cloud service credentials
Update the following command with your [connection details][connection-info], then run it:
- Configure network access to Tiger Cloud
Managed Kubernetes: outbound connections to external databases like Tiger Cloud work by default. Make sure your cluster’s security group or firewall rules allow outbound traffic to Tiger Cloud IP.
Self-hosted Kubernetes: If your cluster is behind a firewall or running on-premise, you may need to allow egress traffic to Tiger Cloud. Test connectivity using your [connection details][connection-info]:
If the connection fails, check your firewall rules.
- Create a Kubernetes deployment that can access your Tiger Cloud
Run the following command to apply the deployment:
Test the connection
Create and run a pod that uses the [connection details][connection-info] you added to
timescale-secretin thetimescalenamespace:Launch a psql shell in the
test-podyou just created:
You start a psql session connected to your Tiger Cloud service.
Running TimescaleDB on Kubernetes is similar to running Postgres. This procedure outlines the steps for a non-distributed system.
To connect your Kubernetes cluster to self-hosted TimescaleDB running in the cluster:
Create a default namespace for Tiger Data components
Create the Tiger Data namespace:
Set this namespace as the default for your session:
For more information, see [Kubernetes Namespaces][kubernetes-namespace].
- Set up a persistent volume claim (PVC) storage
To manually set up a persistent volume and claim for self-hosted Kubernetes, run the following command:
- Deploy TimescaleDB as a StatefulSet
By default, the [TimescaleDB Docker image][timescale-docker-image] you are installing on Kubernetes uses the default Postgres database, user and password. To deploy TimescaleDB on Kubernetes, run the following command:
Allow applications to connect by exposing TimescaleDB within Kubernetes
Create a Kubernetes secret to store the database credentials
Deploy an application that connects to TimescaleDB
Test the database connection
Create and run a pod to verify database connectivity using your [connection details][connection-info] saved in
timescale-secret:Launch the Postgres interactive shell within the created
test-pod:
You see the Postgres interactive terminal.
You have successfully integrated Kubernetes with Tiger Cloud.
===== PAGE: https://docs.tigerdata.com/integrations/prometheus/ =====
Examples:
Example 1 (shell):
kubectl create namespace timescale
Example 2 (shell):
kubectl config set-context --current --namespace=timescale
Example 3 (shell):
kubectl create secret generic timescale-secret \
       --from-literal=PGHOST=<host> \
       --from-literal=PGPORT=<port> \
       --from-literal=PGDATABASE=<dbname> \
       --from-literal=PGUSER=<user> \
       --from-literal=PGPASSWORD=<password>
Example 4 (shell):
nc -zv <host> <port>
About timescaledb-tune
URL: llms-txt#about-timescaledb-tune
Contents:
- Install timescaledb-tune
- Tune your database with timescaledb-tune
Get better performance by tuning your TimescaleDB database to match your system
resources and Postgres version. timescaledb-tune is an open source command
line tool that analyzes and adjusts your database settings.
Install timescaledb-tune
timescaledb-tune is packaged with binary releases of TimescaleDB. If you
installed TimescaleDB from any binary release, including Docker, you already
have access. For more install instructions, see the
[GitHub repository][github-tstune].
Tune your database with timescaledb-tune
Run timescaledb-tune from the command line. The tool analyzes your
postgresql.conf file to provide recommendations for memory, parallelism,
write-ahead log, and other settings. These changes are written to your
postgresql.conf. They take effect on the next restart.
At the command line, run
timescaledb-tune. To accept all recommendations automatically, include the--yesflag.If you didn't use the
--yesflag, respond to each prompt to accept or reject the recommendations.The changes are written to your
postgresql.conf.
For detailed instructions and other options, see the documentation in the Github repository.
===== PAGE: https://docs.tigerdata.com/self-hosted/install/installation-windows/ =====
Examples:
Example 1 (bash):
timescaledb-tune
Manual Postgres configuration and tuning
URL: llms-txt#manual-postgres-configuration-and-tuning
Contents:
- Edit the Postgres configuration file
- Setting parameters at the command prompt
If you prefer to tune settings yourself, or for settings not covered by
timescaledb-tune, you can manually configure your installation using the
Postgres configuration file.
For some common configuration settings you might want to adjust, see the [about-configuration][about-configuration] page.
For more information about the Postgres configuration page, see the [Postgres documentation][pg-config].
Edit the Postgres configuration file
The location of the Postgres configuration file depends on your operating system and installation.
Find the location of the config file for your Postgres instance
Connect to your database:
Retrieve the database file location from the database internal configuration.
Postgres returns the path to your configuration file. For example:
Open the config file, then [edit your Postgres configuration][pg-config]
Save your updated configuration
When you have saved the changes you make to the configuration file, the new configuration is
not applied immediately. The configuration file is automatically reloaded when the server
receives a SIGHUP signal. To manually reload the file, use the pg_ctl command.
Setting parameters at the command prompt
If you don't want to open the configuration file to make changes, you can also
set parameters directly from the command prompt, using the postgres command.
For example:
===== PAGE: https://docs.tigerdata.com/self-hosted/tooling/install-toolkit/ =====
Examples:
Example 1 (shell):
psql -d "postgres://<username>:<password>@<host>:<port>/<database-name>"
Example 2 (sql):
SHOW config_file;
Example 3 (sql):
--------------------------------------------
      /home/postgres/pgdata/data/postgresql.conf
      (1 row)
Example 4 (shell):
vi /home/postgres/pgdata/data/postgresql.conf
Install TimescaleDB from cloud image
URL: llms-txt#install-timescaledb-from-cloud-image
Contents:
- Installing TimescaleDB from a pre-build cloud image
- Set up the TimescaleDB extension
- Where to next
You can install TimescaleDB on a cloud hosting provider, from a pre-built, publicly available machine image. These instructions show you how to use a pre-built Amazon machine image (AMI), on Amazon Web Services (AWS).
The currently available pre-built cloud image is:
- Ubuntu 20.04 Amazon EBS-backed AMI
The TimescaleDB AMI uses Elastic Block Store (EBS) attached volumes. This allows you to store image snapshots, dynamic IOPS configuration, and provides some protection of your data if the EC2 instance goes down. Choose an EC2 instance type that is optimized for EBS attached volumes. For information on choosing the right EBS optimized EC2 instance type, see the AWS [instance configuration documentation][aws-instance-config].
This section shows how to use the AMI from within the AWS EC2 dashboard. However, you can also use the AMI to build an instance using tools like Cloudformation, Terraform, the AWS CLI, or any other AWS deployment tool that supports public AMIs.
Installing TimescaleDB from a pre-build cloud image
- Make sure you have an [Amazon Web Services account][aws-signup], and are signed in to [your EC2 dashboard][aws-dashboard].
- Navigate to
Images → AMIs. - In the search bar, change the search to
Public imagesand type Timescale search term to find all available TimescaleDB images. - Select the image you want to use, and click
Launch instance from image.
After you have completed the installation, connect to your instance and
configure your database. For information about connecting to the instance, see
the AWS [accessing instance documentation][aws-connect]. The easiest way to
configure your database is to run the timescaledb-tune script, which is included
with the timescaledb-tools package. For more information, see the
[configuration][config] section.
After running the timescaledb-tune script, you need to restart the Postgres
service for the configuration changes to take effect. To restart the service,
run sudo systemctl restart postgresql.service.
Set up the TimescaleDB extension
When you have Postgres and TimescaleDB installed, connect to your instance and set up the TimescaleDB extension.
On your instance, at the command prompt, connect to the Postgres instance as the
postgressuperuser:At the prompt, create an empty database. For example, to create a database called
tsdb:Connect to the database you created:
Add the TimescaleDB extension:
You can check that the TimescaleDB extension is installed by using the \dx
command at the command prompt. It looks like this:
What next? [Try the key features offered by Tiger Data][try-timescale-features], see the [tutorials][tutorials], interact with the data in your Tiger Cloud service using [your favorite programming language][connect-with-code], integrate your Tiger Cloud service with a range of [third-party tools][integrations], plain old [Use Tiger Data products][use-timescale], or dive into the [API reference][use-the-api].
===== PAGE: https://docs.tigerdata.com/self-hosted/install/installation-macos/ =====
Examples:
Example 1 (bash):
sudo -u postgres psql
Example 2 (sql):
CREATE database tsdb;
Example 3 (sql):
\c tsdb
Example 4 (sql):
CREATE EXTENSION IF NOT EXISTS timescaledb;
About upgrades
URL: llms-txt#about-upgrades
Contents:
- Plan your upgrade
- Check your version
A major upgrade is when you upgrade from one major version of TimescaleDB, to the next major version. For example, when you upgrade from TimescaleDB 1 to TimescaleDB 2.
A minor upgrade is when you upgrade within your current major version of TimescaleDB. For example, when you upgrade from TimescaleDB 2.5 to TimescaleDB 2.6.
If you originally installed TimescaleDB using Docker, you can upgrade from within the Docker container. For more information, and instructions, see the [Upgrading with Docker section][upgrade-docker].
When you upgrade the timescaledb extension, the experimental schema is removed
by default. To use experimental features after an upgrade, you need to add the
experimental schema again.
Tiger Cloud is a fully managed service with automatic backup and restore, high availability with replication, seamless scaling and resizing, and much more. You can try Tiger Cloud free for thirty days.
- Install the Postgres client tools on your migration machine. This includes
psql, andpg_dump. - Read [the release notes][relnotes] for the version of TimescaleDB that you are upgrading to.
- [Perform a backup][backup] of your database. While TimescaleDB upgrades are performed in-place, upgrading is an intrusive operation. Always make sure you have a backup on hand, and that the backup is readable in the case of disaster.
If you use the TimescaleDB Toolkit, ensure the timescaledb_toolkit extension is on
version 1.6.0, then upgrade the timescaledb extension. If required, you
can then later upgrade the timescaledb_toolkit extension to the most
recent version.
Check your version
You can check which version of TimescaleDB you are running, at the psql command prompt. Use this to check which version you are running before you begin your upgrade, and again after your upgrade is complete:
===== PAGE: https://docs.tigerdata.com/self-hosted/upgrades/upgrade-pg/ =====
Examples:
Example 1 (sql):
\dx timescaledb

    Name     | Version |   Schema   |                             Description
-------------+---------+------------+---------------------------------------------------------------------
 timescaledb | x.y.z   | public     | Enables scalable inserts and complex queries for time-series data
(1 row)
Install TimescaleDB on Linux
URL: llms-txt#install-timescaledb-on-linux
Contents:
- Install and configure TimescaleDB on Postgres
- Add the TimescaleDB extension to your database
- Supported platforms
- Where to next
TimescaleDB is a Postgres extension for time series and demanding workloads that ingest and query high volumes of data.
This section shows you how to:
- Install and configure TimescaleDB on Postgres - set up a self-hosted Postgres instance to efficiently run TimescaleDB.
- Add the TimescaleDB extension to your database - enable TimescaleDB features and performance improvements on a database.
The following instructions are for development and testing installations. For a production environment, we strongly recommend that you implement the following, many of which you can achieve using Postgres tooling:
- Incremental backup and database snapshots, with efficient point-in-time recovery.
- High availability replication, ideally with nodes across multiple availability zones.
- Automatic failure detection with fast restarts, for both non-replicated and replicated deployments.
- Asynchronous replicas for scaling reads when needed.
- Connection poolers for scaling client connections.
- Zero-down-time minor version and extension upgrades.
- Forking workflows for major version upgrades and other feature testing.
- Monitoring and observability.
Deploying for production? With a Tiger Cloud service we tune your database for performance and handle scalability, high availability, backups, and management, so you can relax.
Install and configure TimescaleDB on Postgres
This section shows you how to install the latest version of Postgres and TimescaleDB on a supported platform using the packages supplied by Tiger Data.
If you have previously installed Postgres without a package manager, you may encounter errors following these install instructions. Best practice is to fully remove any existing Postgres installations before you begin.
To keep your current Postgres installation, [Install from source][install-from-source].
Install the latest Postgres packages
Run the Postgres package setup script
Add the TimescaleDB package
Install the TimescaleDB GPG key
Update your local repository list
Install TimescaleDB
To install a specific TimescaleDB [release][releases-page], set the version. For example:
sudo apt-get install timescaledb-2-postgresql-14='2.6.0*' timescaledb-2-loader-postgresql-14='2.6.0*'
Older versions of TimescaleDB may not support all the OS versions listed on this page.
- Tune your Postgres instance for TimescaleDB
By default, this script is included with the timescaledb-tools package when you install TimescaleDB. Use the prompts to tune your development or production environment. For more information on manual configuration, see [Configuration][config]. If you have an issue, run sudo apt install timescaledb-tools.
Restart Postgres
Log in to Postgres as
postgres
You are in the psql shell.
- Set the password for
postgres
When you have set the password, type \q to exit psql.
Install the latest Postgres packages
Run the Postgres package setup script
Install the TimescaleDB GPG key
For Ubuntu 21.10 and earlier use the following command:
wget --quiet -O - https://packagecloud.io/timescale/timescaledb/gpgkey | sudo apt-key add -
Update your local repository list
Install TimescaleDB
To install a specific TimescaleDB [release][releases-page], set the version. For example:
sudo apt-get install timescaledb-2-postgresql-14='2.6.0*' timescaledb-2-loader-postgresql-14='2.6.0*'
Older versions of TimescaleDB may not support all the OS versions listed on this page.
- Tune your Postgres instance for TimescaleDB
By default, this script is included with the timescaledb-tools package when you install TimescaleDB. Use the prompts to tune your development or production environment. For more information on manual configuration, see [Configuration][config]. If you have an issue, run sudo apt install timescaledb-tools.
Restart Postgres
Log in to Postgres as
postgres
You are in the psql shell.
- Set the password for
postgres
When you have set the password, type \q to exit psql.
Install the latest Postgres packages
Add the TimescaleDB repository
Update your local repository list
Install TimescaleDB
To avoid errors, do not install TimescaleDB Apache 2 Edition and TimescaleDB Community Edition at the same time.
On Red Hat Enterprise Linux 8 and later, disable the built-in Postgres module:
sudo dnf -qy module disable postgresql
Initialize the Postgres instance
Tune your Postgres instance for TimescaleDB
This script is included with the timescaledb-tools package when you install TimescaleDB.
For more information, see [configuration][config].
Enable and start Postgres
Log in to Postgres as
postgres
You are now in the psql shell.
- Set the password for
postgres
When you have set the password, type \q to exit psql.
Tiger Data supports Rocky Linux 8 and 9 on amd64 only.
Update your local repository list
Install the latest Postgres packages
Add the TimescaleDB repository
Disable the built-in PostgreSQL module
This is for Rocky Linux 9 only.
- Install TimescaleDB
To avoid errors, do not install TimescaleDB Apache 2 Edition and TimescaleDB Community Edition at the same time.
Initialize the Postgres instance
Tune your Postgres instance for TimescaleDB
This script is included with the timescaledb-tools package when you install TimescaleDB.
For more information, see [configuration][config].
Enable and start Postgres
Log in to Postgres as
postgres
You are now in the psql shell.
- Set the password for
postgres
When you have set the password, type \q to exit psql.
ArchLinux packages are built by the community.
Install the latest Postgres and TimescaleDB packages
Initalize your Postgres instance
Tune your Postgres instance for TimescaleDB
This script is included with the timescaledb-tools package when you install TimescaleDB. For more information, see [configuration][config].
Enable and start Postgres
Log in to Postgres as
postgres
You are in the psql shell.
- Set the password for
postgres
When you have set the password, type \q to exit psql.
Job jobbed, you have installed Postgres and TimescaleDB.
Add the TimescaleDB extension to your database
For improved performance, you enable TimescaleDB on each database on your self-hosted Postgres instance.
This section shows you how to enable TimescaleDB for a new database in Postgres using psql from the command line.
- Connect to a database on your Postgres instance
In Postgres, the default user and database are both postgres. To use a
different database, set <database-name> to the name of that database:
Add TimescaleDB to the database
Check that TimescaleDB is installed
You see the list of installed extensions:
Press q to exit the list of extensions.
And that is it! You have TimescaleDB running on a database on a self-hosted instance of Postgres.
Supported platforms
You can deploy TimescaleDB on the following systems:
| Operation system | Version |
|---|---|
| Debian | 13 Trixe, 12 Bookworm, 11 Bullseye |
| Ubuntu | 24.04 Noble Numbat, 22.04 LTS Jammy Jellyfish |
| Red Hat Enterprise | Linux 9, Linux 8 |
| Fedora | Fedora 35, Fedora 34, Fedora 33 |
| Rocky Linux | Rocky Linux 9 (x86_64), Rocky Linux 8 |
| ArchLinux (community-supported) | Check the [available packages][archlinux-packages] |
What next? [Try the key features offered by Tiger Data][try-timescale-features], see the [tutorials][tutorials], interact with the data in your Tiger Cloud service using [your favorite programming language][connect-with-code], integrate your Tiger Cloud service with a range of [third-party tools][integrations], plain old [Use Tiger Data products][use-timescale], or dive into the [API reference][use-the-api].
===== PAGE: https://docs.tigerdata.com/self-hosted/install/self-hosted/ =====
Examples:
Example 1 (bash):
sudo apt install gnupg postgresql-common apt-transport-https lsb-release wget
Example 2 (bash):
sudo /usr/share/postgresql-common/pgdg/apt.postgresql.org.sh
Example 3 (bash):
echo "deb https://packagecloud.io/timescale/timescaledb/debian/ $(lsb_release -c -s) main" | sudo tee /etc/apt/sources.list.d/timescaledb.list
Example 4 (bash):
wget --quiet -O - https://packagecloud.io/timescale/timescaledb/gpgkey | sudo gpg --dearmor -o /etc/apt/trusted.gpg.d/timescaledb.gpg
Set up multi-node on self-hosted TimescaleDB
URL: llms-txt#set-up-multi-node-on-self-hosted-timescaledb
Contents:
- Set up multi-node on self-hosted TimescaleDB
- Setting up multi-node on self-hosted TimescaleDB
[Multi-node support is sunsetted][multi-node-deprecation].
TimescaleDB v2.13 is the last release that includes multi-node support for Postgres versions 13, 14, and 15.
To set up multi-node on a self-hosted TimescaleDB instance, you need:
- A Postgres instance to act as an access node (AN)
- One or more Postgres instances to act as data nodes (DN)
- TimescaleDB [installed][install] and [set up][setup] on all nodes
- Access to a superuser role, such as
postgres, on all nodes
The access and data nodes must begin as individual TimescaleDB instances. They should be hosts with a running Postgres server and a loaded TimescaleDB extension. For more information about installing self-hosted TimescaleDB instances, see the [installation instructions][install]. Additionally, you can configure [high availability with multi-node][multi-node-ha] to increase redundancy and resilience.
The multi-node TimescaleDB architecture consists of an access node (AN) which stores metadata for the distributed hypertable and performs query planning across the cluster, and a set of data nodes (DNs) which store subsets of the distributed hypertable dataset and execute queries locally. For more information about the multi-node architecture, see [about multi-node][about-multi-node].
If you intend to use continuous aggregates in your multi-node environment, check the additional considerations in the [continuous aggregates][caggs] section.
Set up multi-node on self-hosted TimescaleDB
When you have installed TimescaleDB on the access node and as many data nodes as you require, you can set up multi-node and create a distributed hypertable.
Before you begin, make sure you have considered what partitioning method you want to use for your multi-node cluster. For more information about multi-node and architecture, see the About multi-node section.
Setting up multi-node on self-hosted TimescaleDB
On the access node (AN), run this command and provide the hostname of the first data node (DN1) you want to add:
Repeat for all other data nodes:
On the access node, create the distributed hypertable with your chosen partitioning. In this example, the distributed hypertable is called
example, and it is partitioned ontimeandlocation:Insert some data into the hypertable. For example:
When you have set up your multi-node installation, you can configure your cluster. For more information, see the [configuration section][configuration].
===== PAGE: https://docs.tigerdata.com/self-hosted/multinode-timescaledb/multinode-auth/ =====
Examples:
Example 1 (sql):
SELECT add_data_node('dn1', 'dn1.example.com')
Example 2 (sql):
SELECT add_data_node('dn2', 'dn2.example.com')
    SELECT add_data_node('dn3', 'dn3.example.com')
Example 3 (sql):
SELECT create_distributed_hypertable('example', 'time', 'location');
Example 4 (sql):
INSERT INTO example VALUES ('2020-12-14 13:45', 1, '1.2.3.4');
TimescaleDB tuning tool
URL: llms-txt#timescaledb-tuning-tool
To help make configuring TimescaleDB a little easier, you can use the [timescaledb-tune][tstune]
tool. This tool handles setting the most common parameters to good values based
on your system. It accounts for memory, CPU, and Postgres version.
timescaledb-tune is packaged with the TimescaleDB binary releases as a
dependency, so if you installed TimescaleDB from a binary release (including
Docker), you should already have access to the tool. Alternatively, you can use
the go install command to install it:
The timescaledb-tune tool reads your system's postgresql.conf file and
offers interactive suggestions for your settings. Here is an example of the tool
running:
When you have answered the questions, the changes are written to your
postgresql.conf and take effect when you next restart.
If you are starting on a fresh instance and don't want to approve each group of
changes, you can automatically accept and append the suggestions to the end of
your postgresql.conf by using some additional flags when you run the tool:
===== PAGE: https://docs.tigerdata.com/self-hosted/configuration/postgres-config/ =====
Examples:
Example 1 (bash):
go install github.com/timescale/timescaledb-tune/cmd/timescaledb-tune@latest
Example 2 (bash):
Using postgresql.conf at this path:
/usr/local/var/postgres/postgresql.conf

Is this correct? [(y)es/(n)o]: y
Writing backup to:
/var/folders/cr/example/T/timescaledb_tune.backup202101071520

shared_preload_libraries needs to be updated
Current:
#shared_preload_libraries = 'timescaledb'
Recommended:
shared_preload_libraries = 'timescaledb'
Is this okay? [(y)es/(n)o]: y
success: shared_preload_libraries will be updated

Tune memory/parallelism/WAL and other settings? [(y)es/(n)o]: y
Recommendations based on 8.00 GB of available memory and 4 CPUs for PostgreSQL 12

Memory settings recommendations
Current:
shared_buffers = 128MB
#effective_cache_size = 4GB
#maintenance_work_mem = 64MB
#work_mem = 4MB
Recommended:
shared_buffers = 2GB
effective_cache_size = 6GB
maintenance_work_mem = 1GB
work_mem = 26214kB
Is this okay? [(y)es/(s)kip/(q)uit]:
Example 3 (bash):
timescaledb-tune --quiet --yes --dry-run >> /path/to/postgresql.conf
Self-hosted TimescaleDB
URL: llms-txt#self-hosted-timescaledb
TimescaleDB is an extension for Postgres that enables time-series workloads, increasing ingest, query, storage and analytics performance.
Best practice is to run TimescaleDB in a Tiger Cloud service, but if you want to self-host you can run TimescaleDB yourself. Deploy a Tiger Cloud service. We tune your database for performance and handle scalability, high availability, backups and management so you can relax.
Self-hosted TimescaleDB is community supported. For additional help check out the friendly [Tiger Data community][community].
If you'd prefer to pay for support then check out our [self-managed support][support].
===== PAGE: https://docs.tigerdata.com/self-hosted/configuration/about-configuration/ =====
Install or upgrade of TimescaleDB Toolkit fails
URL: llms-txt#install-or-upgrade-of-timescaledb-toolkit-fails
Contents:
- Troubleshooting TimescaleDB Toolkit setup
In some cases, when you create the TimescaleDB Toolkit extension, or upgrade it
with the ALTER EXTENSION timescaledb_toolkit UPDATE command, it might fail
with the above error.
This occurs if the list of available extensions does not include the version you are trying to upgrade to, and it can occur if the package was not installed correctly in the first place. To correct the problem, install the upgrade package, restart Postgres, verify the version, and then attempt the update again.
Troubleshooting TimescaleDB Toolkit setup
- If you're installing Toolkit from a package, check your package manager's
local repository list. Make sure the TimescaleDB repository is available and
contains Toolkit. For instructions on adding the TimescaleDB repository, see
the installation guides:
- [Linux installation guide][linux-install]
- Update your local repository list with
apt updateoryum update. - Restart your Postgres service.
- Check that the right version of Toolkit is among your available extensions:
The result should look like this:
- Retry
CREATE EXTENSIONorALTER EXTENSION.
===== PAGE: https://docs.tigerdata.com/_troubleshooting/self-hosted/pg_dump-permission-denied/ =====
Examples:
Example 1 (sql):
SELECT * FROM pg_available_extensions
      WHERE name = 'timescaledb_toolkit';
Example 2 (bash):
-[ RECORD 1 ]-----+--------------------------------------------------------------------------------------
    name              | timescaledb_toolkit
    default_version   | 1.6.0
    installed_version | 1.6.0
    comment           | Library of analytical hyperfunctions, time-series pipelining, and other SQL utilities